Audi Q7: Rear Three-Point Seat Belt, Removing and Installing
Outer Second Row Rear Three-Point Seat Belt, Removing and Installing
Removing
- Remove the rear belt anchor. Refer to → Chapter "Rear Outer Belt End Fitting, Removing and Installing".
- Remove the C-pillar trim panel and guide out the seat belt webbing. Refer to → Chapter "C-Pillar Trim Panel, Removing and Installing"
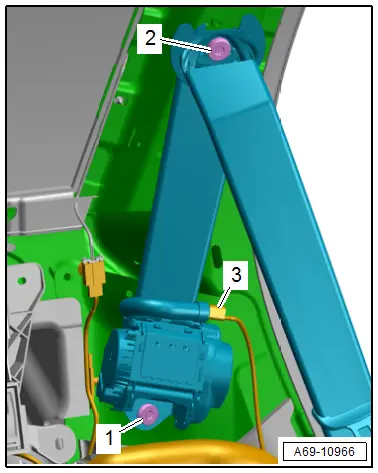
- Equipment level: release the connector lock with a small screwdriver and remove the connector -3- for the belt tensioner.
- Remove the bolts -1 and 2-.
- Guide out the three-point seat belt from the mount.
Installing
- If parts of the seat belt system are removed due to an accident, replace the belt system bolts.
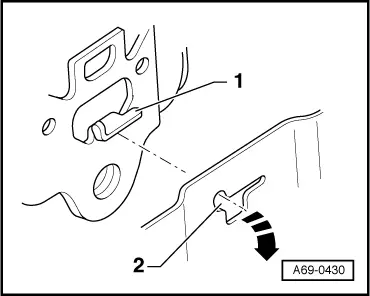
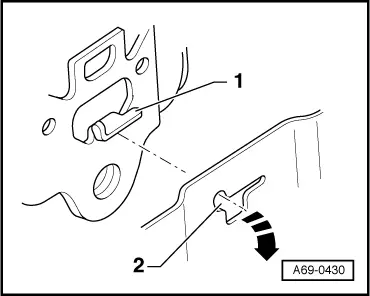
- Insert the automatic belt retractor with the anti-twist mechanism -1- in the mount -2- in direction of -arrow- and tighten the bolt.
Further installation is the reverse order of removal.
Installation notes, for example tightening specifications, replacing components. Refer to → Chapter "Overview - Outer Rear Three-Point Seat Belt".
Second Row Rear Three Point Seat Belt in Center, Removing and Installing
Removing
- Remove the second row backrest cushion in the center. Refer to → Chapter "Cover and Cushion, Removing and Installing, Center Second Row Backrest".
- Remove the center rear belt end fitting. Refer to → Chapter "Rear Seat Belt Anchor in Center Seating Position, Removing and Installing".
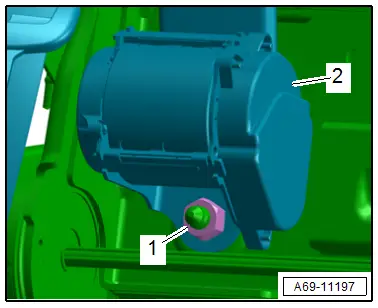
- Remove the nut -1-.
- Disengage the three-point seat belt -2- and remove it.
Installing
- If parts of the seat belt system are removed due to an accident, replace the belt system bolts.
- Insert the three-point seat belt with the anti-twist mechanism in the mount and tighten the nut.
Further installation is the reverse order of removal.
Installation instructions: for example tightening specifications, replacing components. Refer to → Chapter "Overview - Rear Center Three-Point Seat Belt".
Third Row Rear Three-Point Seat Belt, Removing and Installing
Removing
- Remove the luggage compartment side trim panel. Refer to → Chapter "Luggage Compartment Side Trim Panel, Removing and Installing".
- Remove the D-pillar trim panel. Refer to → Chapter "D-Pillar Trim Panel, Removing and Installing".
- Equipment level: release the connector lock with a small screwdriver and remove the connector -3- for the belt tensioner.
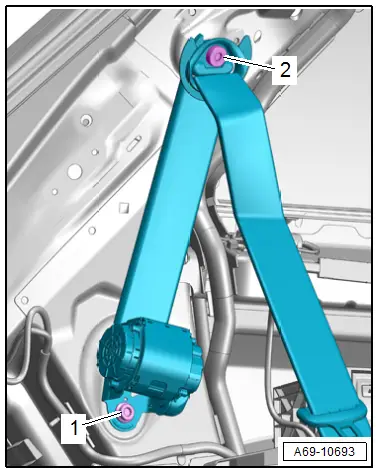
- Remove the bolts -1 and 2-.
- Guide out the three-point seat belt from the mount.
- Remove the third row rear belt end fitting. Refer to → Chapter "Third Row Rear Belt End Fitting, Removing and Installing".
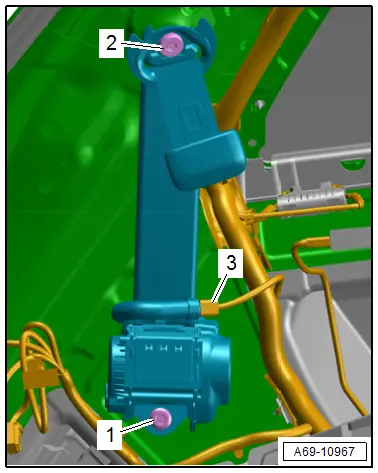
- Remove the bolts -1 and 2-.
- Guide out the three-point seat belt from the mount.
Installing
- If parts of the seat belt system are removed due to an accident, replace the belt system bolts.
- Insert the automatic belt retractor with the anti-twist mechanism -1- in the mount -2--arrow- and tighten the bolt.
Further installation is the reverse order of removal.
Installation notes, for example tightening specifications, replacing components. Refer to → Chapter "Overview - Third Row Three-Point Seat Belt".
Rear Seat Belt Guide, Removing and Installing
Special tools and workshop equipment required
- Pry Lever -80-200-
- Trim Removal Wedge -3409-
Second Row Belt in Center, Removing
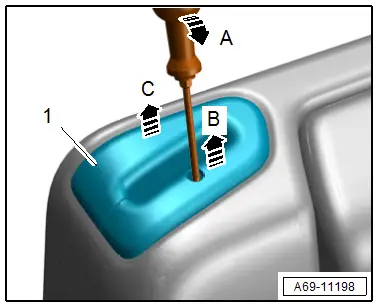
- Release the tabs with a screwdriver in direction of -arrow A-.
- At the same time, unclip the seat belt guide -1- upward in direction of -arrows B and C- using the -3409-.
- Open the gap on the belt guide and guide the seat belt webbing out.
Third Row Belt, Removing
- Remove the third row rear belt end fitting. Refer to → Chapter "Third Row Rear Belt End Fitting, Removing and Installing".
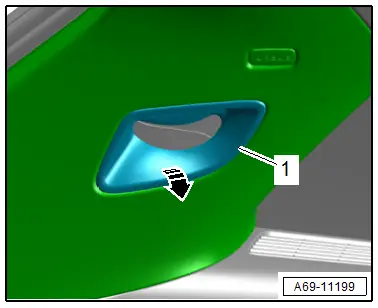
- Remove the seat belt guide -1- from the D-pillar trim panel -arrow- using the -80-200-.
- Disengage the seat belt guide at the D-pillar trim panel, guide the seat belt webbing out and remove.
Installing
Further installation is the reverse order of removal.
Installation instructions: tightening specifications, replacing body parts. Refer to → Chapter "Overview - Rear Center Three-Point Seat Belt" and → Chapter "Overview - Third Row Three-Point Seat Belt".

