Audi Q7: Seat Pan Cover and Cushion, Separating
Special tools and workshop equipment required
- Upholstery Clip Pliers -VAG1634-
 Caution
This procedure contains mandatory replaceable parts. Refer to component overview prior to starting procedure.
Mandatory Replacement Parts
- Upholstery Clip - Cover to Seat Cushion
Removing
- Remove the cushion. Refer to → Chapter "Seat Pan Cover and Cushion, Removing and Installing".
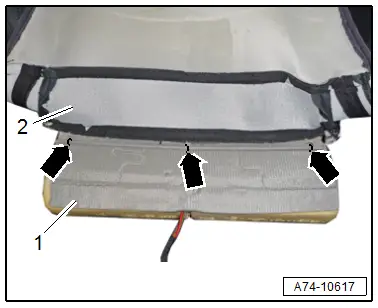
- Remove the cover -2- from the cushion -1- and cut upholstery clips -arrows- using pliers
Versions with Seat Depth Extension
- Carefully disengage the front cushion on the seat from the hooks on the cushion retaining plate -arrows-.
Installing
Install in reverse order of removal and note the following:
- Versions with seat heating: apply a new seat heating element when replacing the cushion. Refer to → Chapter "Seat Heating Element, Removing and Installing, Seat Depth Adjuster".
Installation notes, for example tightening specifications, replacing components. Refer to → Chapter "Overview - Seat Pan Cover and Cushion".
Backrest Cover and Cushion, Separating
Special tools and workshop equipment required
- Upholstery Clip Pliers -VAG1634-
Removing
- Remove the cover with the cushion. Refer to → Chapter "Backrest Cover and Cushion, Removing and Installing".
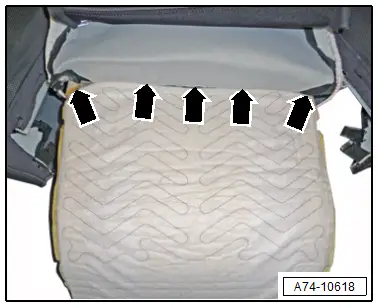
- Pull off cover -3- from the cushion -2- as far as possible and cut upholstery clips -1- using pliers.
Installing
Install in reverse order of removal.
Installation notes, for example tightening specifications, replacing components. Refer to → Chapter "Overview - Backrest Cover and Cushion".
Seat Heating Element, Removing and Installing
Seat Heating Element, Removing and Installing, Seat Bolster Cushion
Procedure
- Separate the cover and cushion on the seat bolsters. Refer to → Chapter "Seat Bolster Cushion on Seat Pan, Removing and Installing, Seat with Seat Depth Adjuster".
- Clip the wires directly at the heating elements.
 Note
Note
The old heating elements remain on the cushion and will be covered over by the new heating element.
- Align the new heating elements on the cushion.
- Remove the protective films from the heating elements in succession, taking care not to damage the heating elements.
- Glue the heating elements so that they align with the old heating elements and are free of wrinkles.
Further installation is the reverse order of removal.
Installation notes, for example tightening specifications, replacing components. Refer to → Chapter "Overview - Seat Heating Element".
Seat Heating Element, Removing and Installing, Seat Depth Adjuster
Procedure
- Remove the cushion. Refer to → Chapter "Seat Pan Cover and Cushion, Removing and Installing, Seat with Seat Depth Adjuster".
- Cut the wire directly on the old heating element.
 Note
Note
The old seat heating element remains on the cushion and will be covered by the new heating element.
- Align the new heating element on the cushion.
- Peel the protective film off the heating element one after the other. Be careful not to damage the heating element.
- Glue the heating element so that they align with the old heating element and are not wrinkled.
Further installation is the reverse order of removal.
Installation notes, for example tightening specifications, replacing components. Refer to → Chapter "Overview - Seat Heating Element".

