Audi Q7: Exterior Door Handle Lamps
Overview - Exterior Door Handle Lamps
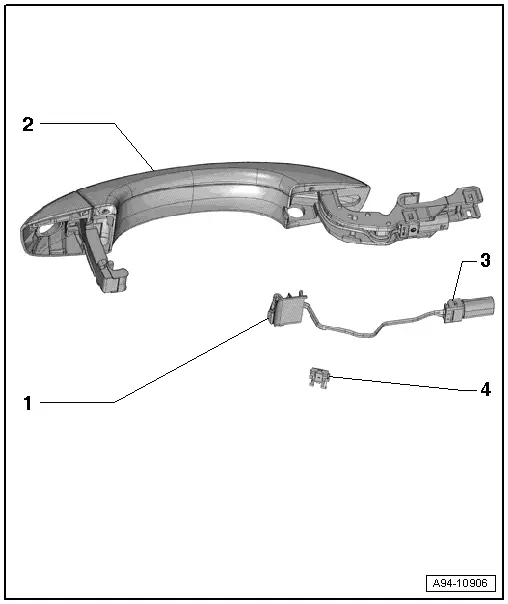
1 - Exterior Door Handle Illumination Bulb
Front exterior door handle
- Left Front Exterior Door Handle Illumination Bulb -L162-
- Right Front Exterior Door Handle Illumination Bulb -L163-
- Removing and installing. Refer to → Chapter "Left and Right Front Exterior Door Handle Illumination Bulb -L162-/-L163-, Removing and Installing".
Rear exterior door handle
- Left Rear Exterior Door Handle Illumination Bulb -L168-
- Right Rear Exterior Door Handle Illumination Bulb -L169-
- Removing and installing. Refer to → Chapter "Left and Right Rear Exterior Door Handle Illumination Bulb -L168-/-L169-, Removing and Installing".
2 - Exterior Door Handle
3 - Connector
4 - Wiring Guide
Exterior Door Handle Illumination Bulb, Removing and Installing
Left and Right Front Exterior Door Handle Illumination Bulb -L162-/-L163-, Removing and Installing
Special tools and workshop equipment required
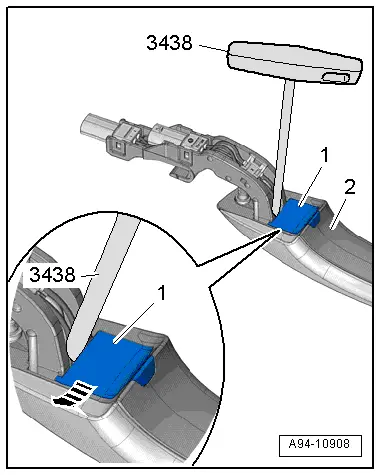
- T-Handle Hook -3438-
Removing
- Remove the exterior door handle. Refer to → Body Exterior; Rep. Gr.57; Door Components; Door Handle, Removing and Installing.
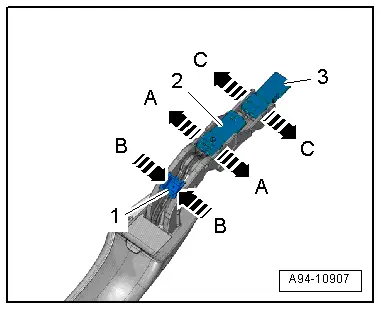
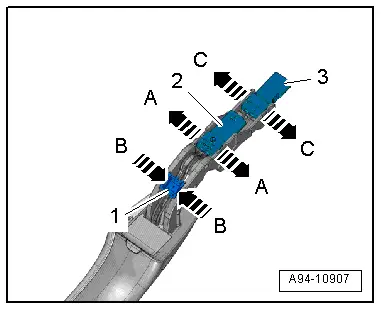
- Release the retaining tabs in direction of -arrows A- and remove the connector -2-.
- Carefully release the retaining hooks in direction of -arrows B- using a small screwdriver and remove the wiring guide -1-.
- If it is not possible to remove the exterior door handle illumination bulb on a vehicle with keyless entry because the wires are twisted, then release the tabs in direction of -arrows C- and remove the connector -3-.
- Release the bulb -1- on the exterior door handle -2- using the T-Handle Hook -3438-.
- Remove the bulb from the exterior door handle in direction of -arrow-.

Installing
Install in the reverse order of removal while noting the following:
- The entire exterior door handle illumination bulb must be replaced if the LED is faulty.
Left and Right Rear Exterior Door Handle Illumination Bulb -L168-/-L169-, Removing and Installing
Special tools and workshop equipment required
- T-Handle Hook -3438-
Removing
- Remove the exterior door handle. Refer to → Body Exterior; Rep. Gr.58; Door Components; Door Handle, Removing and Installing.
- Release the retaining tabs in direction of -arrows A- and remove the connector -2-.
- Carefully release the retaining hooks in direction of -arrows B- using a small screwdriver and remove the wiring guide -1-.
- If it is not possible to remove the exterior door handle illumination bulb on a vehicle with keyless entry because the wires are twisted, then release the tabs -arrows C- and remove the connector -3-.
- Release the bulb -1- on the exterior door handle -2- using the -3438-.
- Remove the bulb from the exterior door handle in direction of -arrow-.
Installing
Install in the reverse order of removal while noting the following:
- The entire exterior door handle illumination bulb must be replaced if the LED is faulty.
Sill Panel Strip Lamps
Overview - Entry Lamp
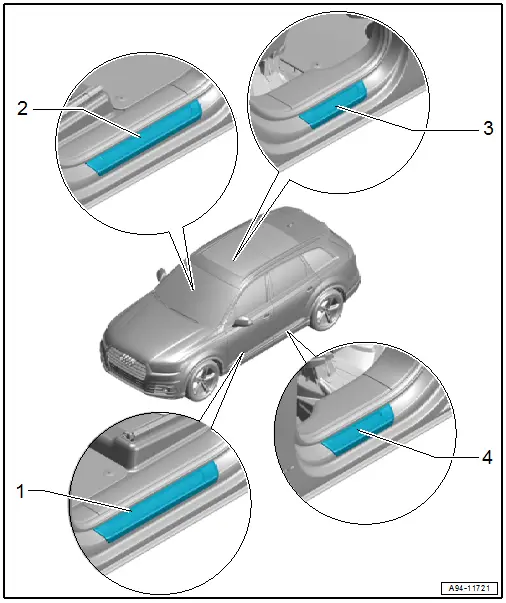
1 - Driver Side Sill Panel Strip Ambient Lighting Lamp -W102-
- Integrated in the sill panel
- Cannot be replaced separately
- Replace the sill panel if faulty. Refer to → Body Interior; Rep. Gr.70; Vehicle Interior Trim Panels; Sill Panel, Removing and Installing.
2 - Front Passenger Side Sill Panel Strip Ambient Lighting Lamp -W103-
- Integrated in the sill panel
- Cannot be replaced separately
- Replace the sill panel if faulty. Refer to → Body Interior; Rep. Gr.70; Vehicle Interior Trim Panels; Sill Panel, Removing and Installing.
3 - Front Passenger Side Rear Side Sill Panel Strip Ambient Lighting Lamp -W104-
- Integrated in the sill panel
- Cannot be replaced separately
- Replace the sill panel if faulty. Refer to → Body Interior; Rep. Gr.70; Vehicle Interior Trim Panels; Sill Panel, Removing and Installing.
4 - Driver Side Rear Side Sill Panel Strip Ambient Lighting Lamp -W105-
- Integrated in the sill panel
- Cannot be replaced separately
- Replace the sill panel if faulty. Refer to → Body Interior; Rep. Gr.70; Vehicle Interior Trim Panels; Sill Panel, Removing and Installing.

