Audi Q7: Generator, Checking
Perform Generator Test
Vehicle Diagnostic Tester is attached.
- Select the Diagnostic mode and
start the diagnostics.
- Select the tab Test Plan.
- Select Select Individual Tests
and choose the following sequence.
- Body
- Electrical Equipment
- 27 - Starter, voltage supply
- Electrical Components
- C - Generator, Checking
The Vehicle Diagnostic Tester continues with the generator
test from here on.
Overview - Generator, Bosch through MY 2000
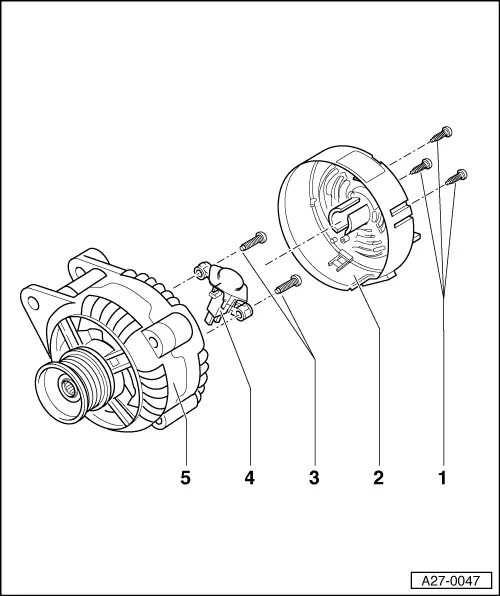
1 - Bolts
2 - Cover
3 - Bolts
4 - Voltage Regulator
- Removing:
- Remove the bolts -1- and remove the
protective cap -2-.
- Remove the bolts -3- and remove the
voltage regulator.
- Carbon brushes wear limit: 5 mm
5 - Generator
READ NEXT:
Note
The generators were implemented as a running change.
1 - Generator
2 - Voltage Regulator
Removing and installing. Refer to
→ Chapter "Voltage Regulator, Bo
Note
The new generators are installed as a running change.
1 - Nut
65 Nm
2 - Ribbed Belt Pulley
3 - Generator
4 - Voltage Regulator
Removing and
1 - Generator
2 - Voltage Regulator
Removing:
Remove the nuts -5- and the cover
-4-.
Remove the bolt -6- and the nuts
-7- and remove the voltage regulator.
Carbon brus
SEE MORE:
WARNING
Risk of injury. Follow all warning messages and
safety precautions. Refer to
→ Chapter "Warnings and Safety Precautions".
WARNING
Do not check or charge a Battery -A- when the visual
indicator has "no color or is
bright yellow". Jump starting must not be used!
Th
Luggage Compartment Floor Trim Panel, Removing and Installing, Vehicles
without High-Voltage System
Removing
- Remove the luggage compartment floor.
- Fold the second row seats forward.
- Disengage the luggage compartment floor trim panel
-1- at the side of the luggage
compartment f

