Audi Q7: Lock Cylinder, Removing and Installing
- Removing and installing the housing is performed the same way.
Removing
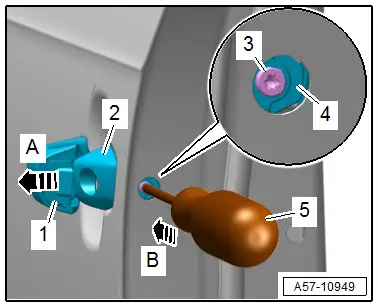
- Remove the cap -arrow-.

- Pull the door handle -1- all the way -arrow A- and hold it.
- Remove the clamping screw -3- all the way using a screwdriver -5-
- Push the retaining bracket -4- for the lock cylinder inward until it engages -arrow B-.
- The door handle is now locked in the "open" position.
- Remove the lock cylinder -2- from the mounting bracket.
 Note
Note
If the lock cylinder cannot be removed, push the ignition key in the lock cylinder and remove the lock cylinder with the key slightly turned.
Installing
Install in reverse order of removal and note the following:
- Slide the lock cylinder into the mounting bracket and then check if the door lock closing and opening position functions.
Tightening Specifications
- Refer to → Chapter "Overview - Door Handle and Mounting Bracket"
Lock Cylinder Cap, Removing and Installing
- Removing and installing the housing cap is performed the same way.
Removing
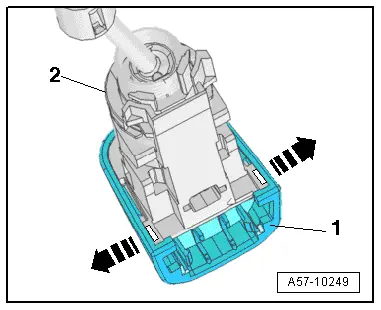
- Remove the lock cylinder/housing. Refer to → Chapter "Lock Cylinder, Removing and Installing".
- Spread the clips -arrows- and remove the cap -1- from the housing -2- using an awl if necessary.
Installing
Install in reverse order of removal and note the following:
- Push in the cap until it engages audibly.
Trim Molding Cap, Removing and Installing
Removing
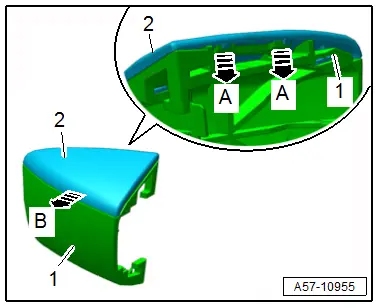
- Remove the lock cylinder/housing. Refer to → Chapter "Lock Cylinder, Removing and Installing".
- Release the retainers -A arrows-.
- Remove the trim molding -2- from the cap -1--arrow B-.
Installing
Install in reverse order of removal.

