Audi Q7: Luggage Compartment Roll Cover, Removing and Installing
Luggage Compartment Roll Cover Handle, Removing and Installing
Removing
- Remove the luggage compartment roll cover.
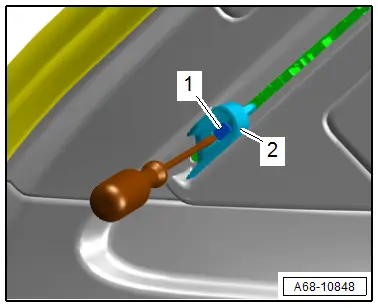
- Open the lid -1- and remove the bolts -2-.
- Loosen the roll cover handle, disengage from the frame -3- in the direction of -arrow- and remove it.
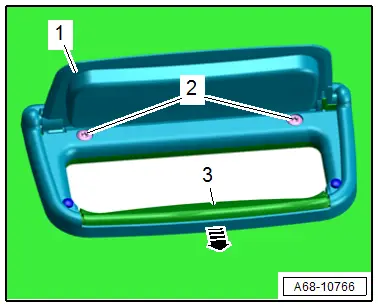
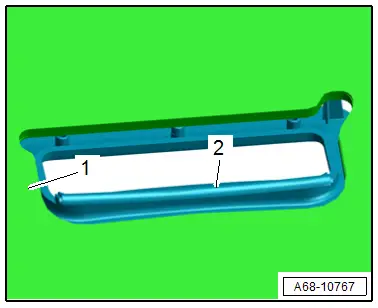
- Push the frame -2- out of the opening in the roll cover -1- and remove.
Installing
Install in reverse order of removal.
Installation notes, for example tightening specifications, replacing components. Refer to → Chapter "Overview - Luggage Compartment Roll Cover".
Luggage Compartment Cover Motor, Removing and Installing
Removing
- Remove the luggage compartment floor.
- Remove the lock carrier trim panel. Refer to → Chapter "Lock Carrier Trim Panel, Removing and Installing".
- Remove the luggage compartment side trim panel. Refer to → Chapter "Luggage Compartment Side Trim Panel, Removing and Installing".
- Remove the D-pillar trim panel. Refer to → Chapter "D-Pillar Trim Panel, Removing and Installing".
- Release the connector safety catch and disconnect the connector -arrow-.
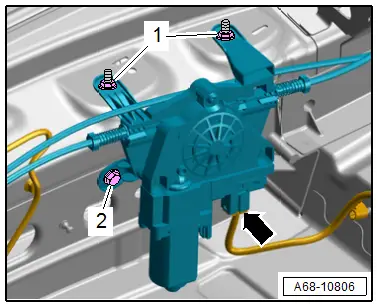
- Remove the nuts -1- and bolt -2-.

- Remove the bolts -1 and 2- and the nut -3-.
- Unclip the release cables for the guide rails on the bracket -arrow-.
- Repeat the process on the opposite side.
- Disengage and remove the guide rails with the roll cover motor.

Installing
- Attach the guide rails with the roll cover motor.
- Secure the guide rails with bolts -1 and 2- and nut -3-, but do not tighten.
- Repeat the process on the opposite side.
- Tighten the nuts and bolt in the sequence -1 and 2- on the roll cover motor.
- Connect the connector -arrow-.
- Tighten the bolts and nut to the guide rails in the sequence -1 to 3-.
- Clip the release cables for the guide rails to the bracket -arrow-.
- Repeat the process on the opposite side.
- Install the D-pillar trim panels. Refer to → Chapter "D-Pillar Trim Panel, Removing and Installing".
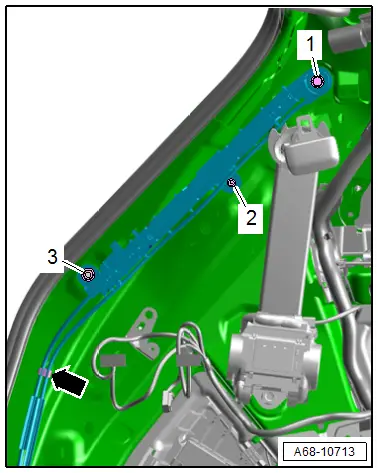
- Clip both catches -2- for the roll cover into the guide rails and secure with an expander pin -1-.
- Perform a function test after installing.
- Both of the roll cover catches must be parallel to each other at the top and bottom of the stop in the D-pillar trim panel guide.
- If the catch is not parallel, check the routing of the release cable and/or adjust the release cable.
Release Cable for the Roll Cover, Adjusting:
- Adjust the release cable on the release cable adjuster.
- Turn the release cable adjuster -1- in the direction of -arrow A or arrow B- or .
- Adjust the release cable so that both of the roll cover catches are parallel to each other.
Further installation is the reverse order of removal.
Installation notes, for example tightening specifications, replacing components. Refer to → Chapter "Overview - Luggage Compartment Roll Cover".

Roll Cover Bracket, Removing and Installing
Special tools and workshop equipment required
- Pop Rivet Nut Pliers -VAS5072A-
- Hand drill
- 3.5 mm diameter drill bit
- Protective Eyewear
Left Bracket, Removing
- Remove the luggage compartment side trim panel. Refer to → Chapter "Luggage Compartment Side Trim Panel, Removing and Installing".
 WARNING
Risk of eye injury!
Wear protective eyewear.
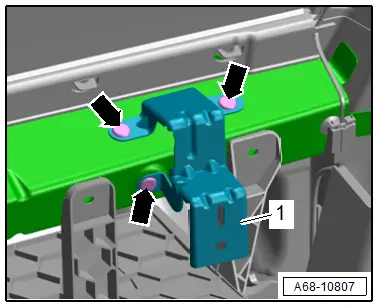
- Carefully drill the pop rivets -arrows- with a 3.5 mm diameter drill bit.
- Remove the roll cover bracket -1-.
Right Bracket, Removing
- Remove the luggage compartment side trim panel. Refer to → Chapter "Luggage Compartment Side Trim Panel, Removing and Installing".
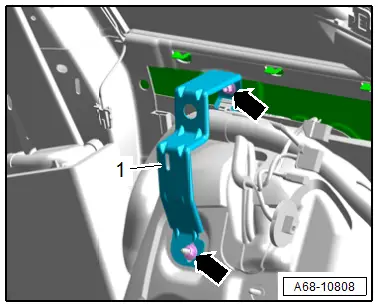
- Remove the nuts -arrows-.
- Unclip the wiring harness and remove the roll cover bracket -1-.
Installing
Install in reverse order of removal.
Installation notes, for example tightening specifications, replacing components. Refer to → Chapter "Overview - Luggage Compartment Roll Cover".

