Audi Q7 Owners & Service Manuals

Audi Q7: Center Console Rear Trim, Removing and Installing

Audi Q7 (4M) 2016-2025 Workshop Manual / Body / Body  Interior / Interior Equipment / Center Console Rear Trim, Removing and Installing

Special tools and workshop equipment required

  • Wedge Set -T10383-

Removing

- Move the front seats all the way forward.

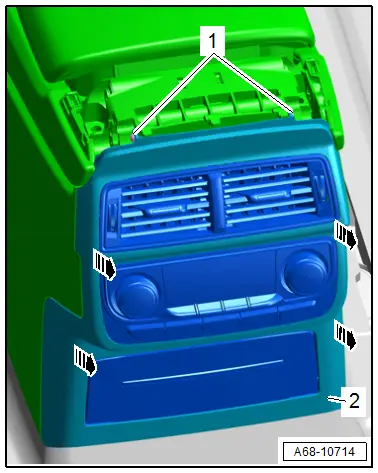
- Unclip the cover -1- using the -T10383/1--arrows- and remove it.

A68-10809

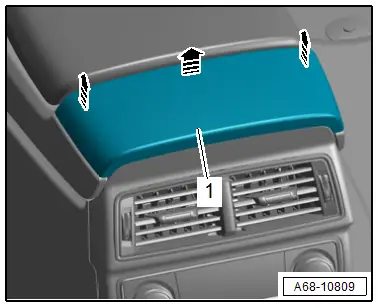
- Remove the bolts -1-.

- Using the -T10383/1-, unclip the trim -2- at the sides starting at the top from the center console in direction of -arrows-.

- Remove the trim toward the rear from the center console.

- Disconnect the connectors.

A68-10714

Installing

Install in reverse order of removal.

Installation notes, for example tightening specifications, replacing components. Refer to → Chapter "Overview - Center Console".

Center Console Insert, Removing and Installing

Removing

- Switch off the ignition.

- Shift the selector level into "P" position.

- Remove the selector lever handle. Refer to → 8-Speed Automatic Transmission; Rep. Gr.37; Selector Mechanism; Selector Lever Handle, Removing and Installing

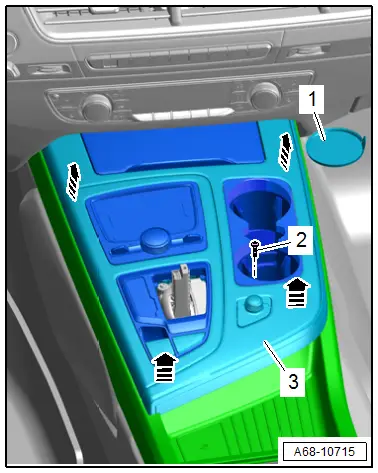
- Remove the liner mat -1- and remove the bolt -2- behind it.

- Starting at the back, reach with the hand under the center console insert and carefully remove it upward from the center console in the direction of -arrows-.

- Carefully pull the center console insert -3- out toward the rear, disconnect the connectors and remove it.

A68-10715

Installing

Install in reverse order of removal.

Installation notes, for example tightening specifications, replacing components. Refer to → Chapter "Overview - Center Console".

    READ NEXT:

     Front Center Console Storage Compartment, Removing and Installing

    Front Storage Compartment, Removing and Installing Special tools and workshop equipment required Trim Removal Wedge -3409- Removing - Remove the center console insert. Refer to → Chapt

     Center Console Trim Panel, Removing and Installing

    Removing - Move the front seat all the way to the rear and then into its lowest position. - Remove the center console. Refer to → Chapter "Center Console, Removing and Installing".

     Rear Center Console Vent, Removing and Installing

    Special tools and workshop equipment required Hook Tool -T40207- Removing - Carefully guide the -T40207- between the slats and hook it to the rear of the vent -1-. - Alternating between

    SEE MORE:

     Control Module/Digital Soand System Amplifier, Removing and Installing

    Digital Soand System Control Module -J525-, Removing and Installing, BOSE The Digital Soand System Control Module -J525- is located in the luggage compartment on the left rear. Special tools and workshop equipment required Fiber-Optic Repair Set - Connector Protective Caps -VAS6223/9-.  

     General Information

    Safety Precautions Check for Technical Bulletins that may supersede any information included in this manual.   WARNING Failure to follow these instructions may result in personal injury or possible death. Check the Technical Bulletins for information, cautions and warnings that may superse

    © 2019-2025 Copyright www.a-q7.com