Audi Q7: Center Console Trim Panel, Removing and Installing
Removing
- Move the front seat all the way to the rear and then into its lowest position.
- Remove the center console. Refer to → Chapter "Center Console, Removing and Installing".
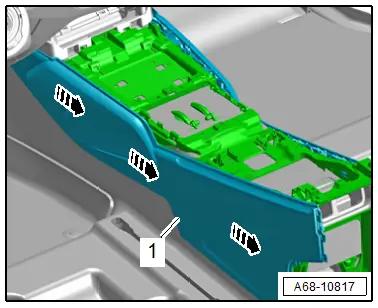
- Pull the trim panel -1- toward the rear from the center console support in the direction of-arrows-, and carefully remove between the center console support and the front seat.
Installing
Install in reverse order of removal.
Installation notes, for example tightening specifications, replacing components. Refer to → Chapter "Overview - Center Console, Support/Cover".
Center Console, Removing and Installing
Center Console, Removing and Installing
Special tools and workshop equipment required
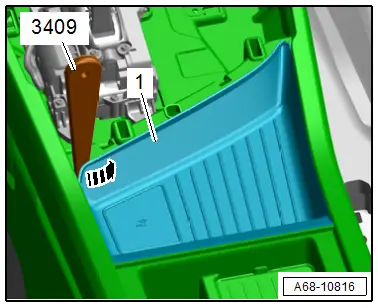
- Trim Removal Wedge -3409-
Removing
- Remove the center console insert. Refer to → Chapter "Center Console Insert, Removing and Installing".
- Remove the selector mechanism. Refer to → 8-Speed Automatic Transmission; Rep. Gr.37; Selector Mechanism; Selector Mechanism, Removing and Installing.
- Remove the center console rear trim. Refer to → Chapter "Center Console Rear Trim, Removing and Installing".
- Remove the center armrest. Refer to → Chapter "Front Center Armrest, Removing and Installing".
- Pry out the edge of the storage compartment from the center console -arrow-, starting at the front left corner using the -3409-
- Remove the whole left side from the center console, pull out the storage compartment -1- from the center console and remove it.
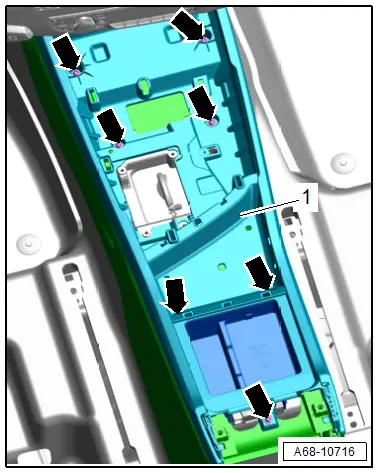
- Remove the bolts -arrows-.
- Lift up the center console -1- slightly and disconnect the connectors.
- Free up the wire and remove the center console.
Installing
Install in reverse order of removal.
Installation instructions: for example tightening specifications, replacing components. Refer to → Chapter "Overview - Center Console".
Center Console Support, Removing and Installing
Removing
- Remove the center console. Refer to → Chapter "Center Console, Removing and Installing".
- Remove the center console trim panel. Refer to → Chapter "Center Console Trim Panel, Removing and Installing".
- Disengage the left and right carpet from the center console support.
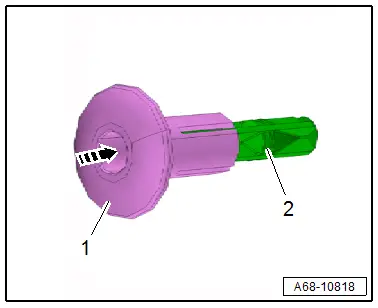
- To remove the expanding clips -1- push the clamping pin -2- in carefully approximately 5 mm until it engages audibly in the expanding clip -arrow- (do not push in completely, otherwise the clamping pin can fall).
- Unclip the wiring harness and free it up.
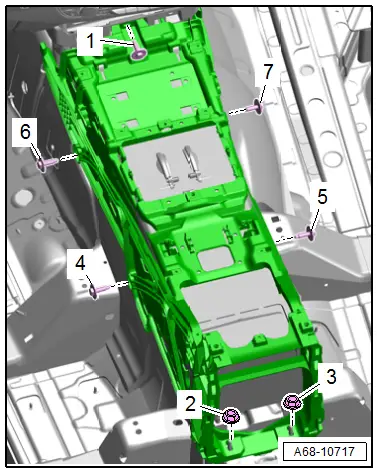
- Remove the bolts -1, 4, 5, 6 and 7- and nuts -2 and 3-.
- Lift up the center console support from the threaded pin and remove it toward the rear.
Installing
Install in reverse order of removal and note the following:
- Tighten the bolts and nuts in the following sequence: -1 through 7-.
Installation notes, for example tightening specifications, replacing components. Refer to → Chapter "Overview - Center Console, Support/Cover".
Cupholder, Removing and Installing
Removing
- Remove the center console insert. Refer to → Chapter "Center Console Insert, Removing and Installing".
- Place the center console insert on a soft surface.
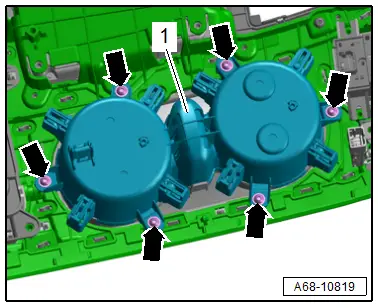
- Remove the bolts -arrows-.
- Remove the cupholder -1-.
Installing
Install in reverse order of removal.
Installation notes, for example tightening specifications, replacing components. Refer to → Chapter "Overview - Center Console, Insert".

