Audi Q7: Overview - Hood
Overview - Hood
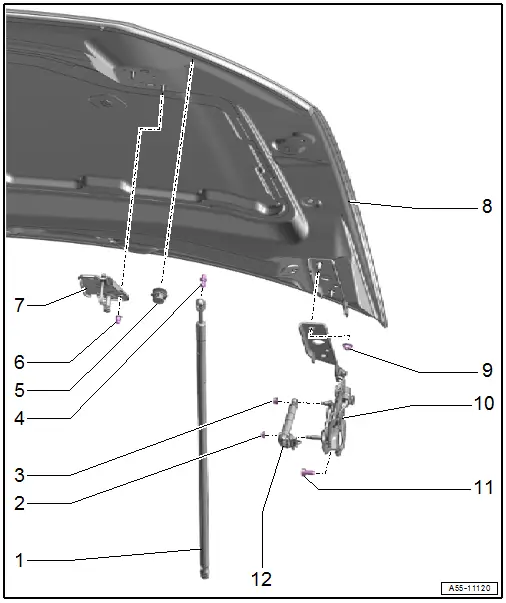
1 - Gas-Filled Strut
- Removing and Installing. Refer to → Chapter "Gas-Filled Strut, Removing and Installing".
- Venting. Refer to → Chapter "Gas-Filled Strut, Venting".
2 - Nut
- Tightening specification. Refer to → Body Interior; Rep. Gr.69; Pedestrian Protection; Overview - Pedestrian Protection.
3 - Clip
4 - Ball Pin
- 14 Nm
5 - Adjusting Buffer
- Adjusting. Refer to → Chapter "Height, Adjusting using Adjusting Buffer".
6 - Nut
- 8 Nm
- Quantity: 2
7 - Striker
- Removing and Installing. Refer to → Chapter "Striker, Removing and Installing".
- Adjusting. Refer to → Chapter "Side and Height Adjustment at Striker".
8 - Front Lid
- Removed pedestrian protection: reset the hinge. Refer to → Chapter "Hinge, Resetting"
- Removing and Installing. Refer to → Chapter "Front Lid, Removing and Installing".
- Adjusting. Refer to → Chapter "Front Lid, Adjusting".
9 - Nut
- 21 Nm
- Quantity: 2
10 - Hinge
- Removing and Installing. Refer to → Chapter "Hinges, Removing and Installing".
11 - Bolt
- 21 Nm
- Quantity: 2
12 - Pedestrian Protection Trigger
- Pedestrian Protection Trigger 1 -G598-, Pedestrian Protection Trigger 2 -G599-
- removed pedestrian protection: reset the hinge. Refer to → Chapter "Hinge, Resetting"
- Removing and Installing. Refer to → Body Interior; Rep. Gr.69; Pedestrian Protection; Overview - Pedestrian Protection.
Overview - Insulation and Impact Guard on Hood
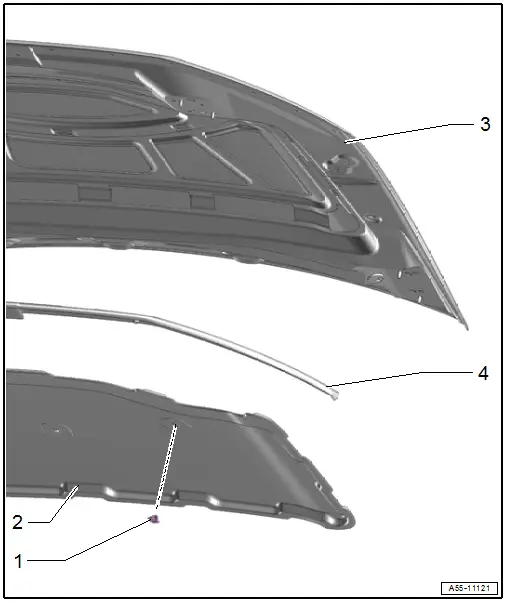
1 - Clip
- For the insulation
2 - Insulation
- Removing and Installing. Refer to → Chapter "Insulation, Removing and Installing".
3 - Front Lid
- Overview
4 - Impact Guard
- Removing and Installing. Refer to → Chapter "Impact Guard, Removing and Installing".

