Audi Q7: Hinges, Removing and Installing
- Follow the safety precautions. Refer to → Body Interior; Rep. Gr.00; Safety Precautions; Safety Precautions when Working on Pyrotechnic Components.
 NOTICE
Risk of damaging the hood by opening when the pedestrian protection is triggered
- Only open the hood after the triggered pedestrian protection has been reset.
- Removed pedestrian protection: hinge is reset. Refer to → Chapter "Hinge, Resetting"
Removing
- Disconnect the battery. Refer to → Electrical Equipment; Rep. Gr.27; Battery; Battery, Disconnecting and Connecting.
- Remove the front lid. Refer to → Chapter "Front Lid, Removing and Installing".
- Remove the windshield wiper motor. Refer to → Electrical Equipment; Rep. Gr.92; Windshield Wiper System; Windshield Wiper MotorV Removing and Installing.
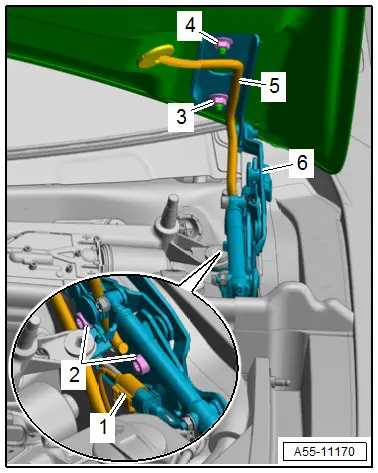
- Vehicles with pedestrian protection: disconnect the connector -1- from the pedestrian protection trigger and free it up.
- Mark the hinge for reinstallation.
- Free up the wiring harness -5-.
- Remove the bolts -2-.
- Remove the nuts -3 and 4-.
- Remove the hinge -6-.
- The following components must also be removed if the hinge is being replaced:
- Pedestrian protection trigger. Refer to → Body Interior; Rep. Gr.69; Pedestrian Protection; Overview - Pedestrian Protection.
Installing
Install in reverse order of removal and note the following:
- Install the hinge according the marking made during removal.
- Adjust the hinge. Refer to → Chapter "Side, Length and Height Adjustment at Hinge".
Tightening Specifications
- Refer to → Chapter "Overview - Hood"
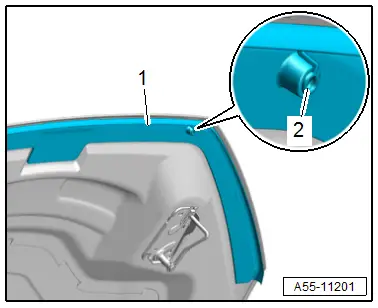
Striker, Removing and Installing
Removing
- Mark the striker for reinstallation.
- Remove the nuts -2 and 3-.
- Remove the striker -1-.
Installing
Install in reverse order of removal and note the following:
- Install the striker according the marking made during removal.
- Adjust the striker. Refer to → Chapter "Side and Height Adjustment at Striker".
Tightening Specifications
- Refer to → Chapter "Overview - Hood"
Gas-Filled Strut, Removing and Installing
Removing
- Support the lid or secure it against falling.
- Using a small screwdriver, lift the locking spring -1- slightly -arrow- and remove the gas-filled strut -2- from the ball pin.
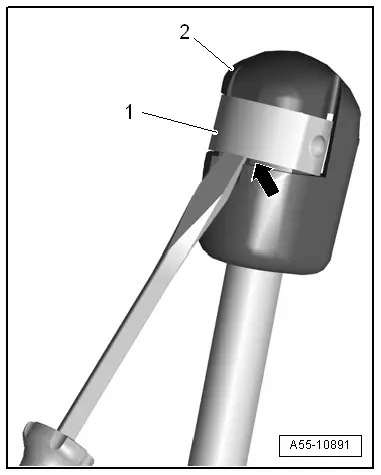
Installing
Install in reverse order of removal and note the following:
- Press the gas-filled strut onto the ball stud until it engages audibly.
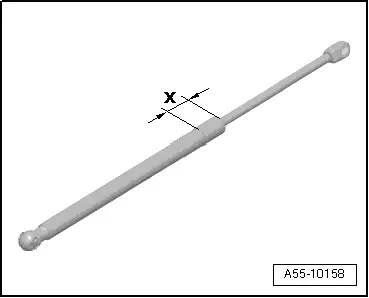
Gas-Filled Strut, Venting
Procedure
- Clamp the gas-filled strut in a vise in the area -x- = 50 mm.
 Caution
Risk of eye injury due to flying shavings.
Eye irritation and injury is possible.
- Wear protective eyewear.
- Saw the gas-filled strut cylinder within the first third of the overall cylinder length, starting from the edge on the piston rod side. While doing so, cover the cut area with a cleaning cloth to absorb oil spraying out.
Hinge, Resetting
- To complete the procedure, a second technician is required to be at the following position.
 NOTICE
Risk of damaging the hood by opening when the pedestrian protection is triggered
- Only open the hood after the triggered pedestrian protection has been reset.
- Use tape to protect the edges of the hood and the fender at their transition from damage.
- Push the hood hinge. Refer to -item 10-, with a second technician, at the same time back into the original position on both sides until it engages.
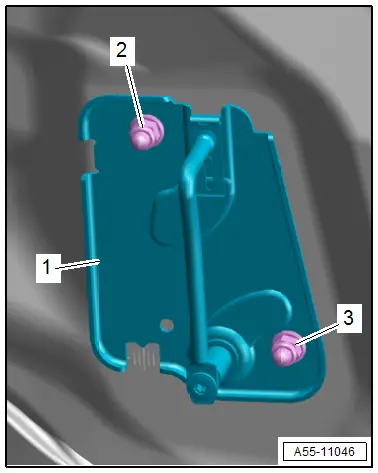
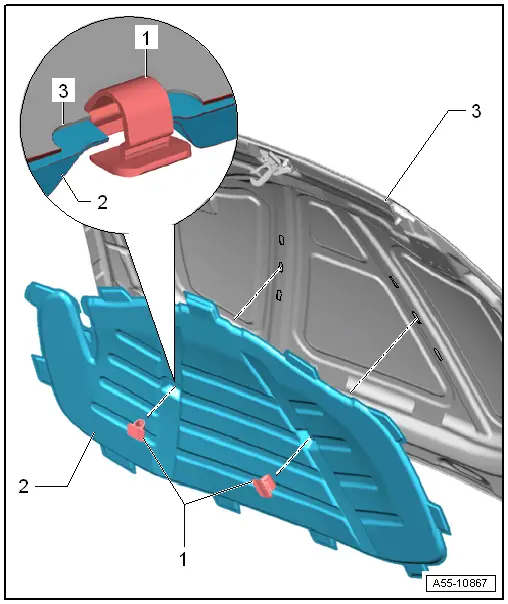
Insulation, Removing and Installing
Removing
- Release the clips -1- and remove the insulation -2-.
Installing
Install in reverse order of removal and note the following:
- First slide the insulation over the tabs on the rear edge and into the designated cut-outs on the inner panel -3-.
- Insert the tabs at the front edge and sides.
- The clips must engage audibly when pressing in.
Impact Guard, Removing and Installing
Removing
- Release the catches -2- and remove the front impact guard -1-.
Installing
Install in reverse order of removal and note the following:
- Press on the catches until they engage audibly.