Audi Q7: Release Cable, Removing and Installing
Latch Release Lever Release Cable, Removing and Installing
Removing
- Remove the latch release lever mounting bracket. Refer to → Chapter "Latch Release Lever Mounting Bracket, Removing and Installing".
- Remove the vehicle electrical system control module bracket. Refer to → Electrical Equipment; Rep. Gr.97; Relay Panels, Fuse Panels, E-boxes; Component Location Overview - Relay Panels, Fuse Panels, E-boxes.
- Remove the plenum chamber cover. Refer to → Chapter "Plenum Chamber Cover, Removing and Installing".
- Remove the air filter housing. Refer to → Engine Mechanical; Rep. Gr.23; Air Filter; Air Filter Housing, Removing and Installing or → Engine Mechanical; Rep. Gr.24; Air Filter; Air Filter Housing, Removing and Installing.
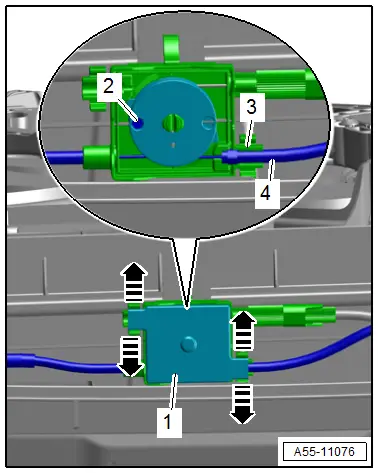
- Release the retainers -arrows- and remove the housing cover -1-.
- Loosen the release cable -4- from the support bracket -3- and disengage the release cable nipple -2-.
- Free up the release cable at the lock carrier and the body.
- Remove the grommet and remove the release cable outward.
Installing
Install in reverse order of removal and note the following:
- Engage the release cable nipple -3- in the coupling roller -2- and push the release cable in the support bracket.
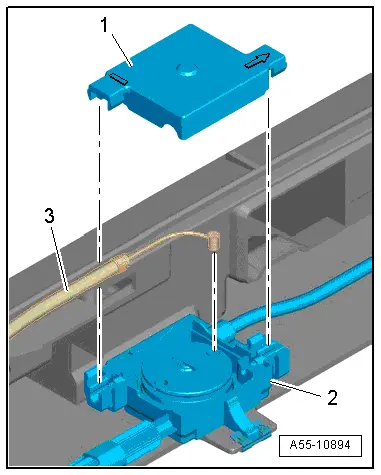
- Position the housing cover -1- so that the printed arrow points toward the free coupling connection.
- To release the latches evenly, adjust the release cable at the thumbwheel.
Coupling with Latch Release Cables, Removing and Installing
Removing
- Remove the air filter housing. Refer to → Engine Mechanical; Rep. Gr.23; Air Filter; Air Filter Housing, Removing and Installing or → Engine Mechanical; Rep. Gr.24; Air Filter; Air Filter Housing, Removing and Installing.
- Remove the latch and disengage the release cable for the latch release lever. Refer to → Chapter "Latch, Removing and Installing".
- Release the retainers -arrows- and remove the housing cover -1-.
- Loosen the release cable -4- from the support bracket -3- and disengage the release cable nipple -2-.
- Release the catches and remove the coupling from the lock carrier.
- Free up the release cables and guide them out of the lock carrier.

Installing
Install in reverse order of removal and note the following:
- Engage the release cable nipple -3- in the coupling roller -2- and push the release cable in the support bracket.
- Position the housing cover -1- so that the printed arrow points toward the free coupling connection.
- To release the latches evenly, adjust the release cable at the thumbwheel piece.


