Audi Q7: Overview - Rear Lid
Overview - Rear Lid
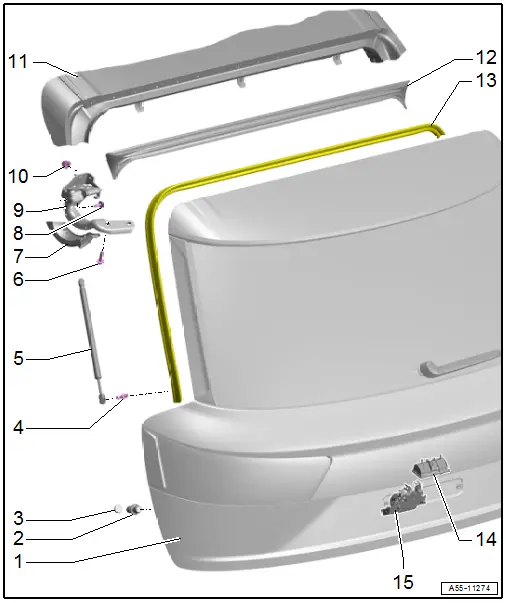
1 - Rear Lid
- Removing and Installing. Refer to → Chapter "Rear Lid, Removing and Installing".
- Adjusting. Refer to → Chapter "Rear Lid, Adjusting".
2 - Adjusting Buffer
- Removing and Installing. Refer to → Chapter "Adjusting Buffer, Removing and Installing".
- Adjusting. Refer to → Chapter "Height, Adjusting using Adjusting Buffer".
3 - Stop
- For the adjusting buffer
4 - Ball Pin
- 21 Nm
- Quantity: 2
5 - Gas-Filled Strut
- Removing and Installing. Refer to → Chapter "Gas-Filled Strut, Removing and Installing".
- Venting. Refer to → Chapter "Gas-Filled Strut, Venting".
6 - Bolt
- 30 Nm
- Quantity: 2
7 - Hinge Cover
8 - Bolt
- 21 Nm
9 - Hinge
- Removing and Installing. Refer to → Chapter "Hinges, Removing and Installing".
10 - Nut
- 21 Nm
11 - Body
12 - Roof Frame Cover
- Removing and Installing. Refer to → Chapter "Roof Frame Cover, Removing and Installing".
13 - Rear Lid Seal
- Removing and Installing. Refer to → Chapter "Rear Lid Seal, Removing and Installing".
14 - Release Button In Rear Lid Handle -E234-
- Component Location Overview. Refer to → Electrical Equipment; Rep. Gr.96; Controls; Component Location Overview - Luggage Compartment Controls
15 - Latch
- Overview.
Overview - Rear Lid Release
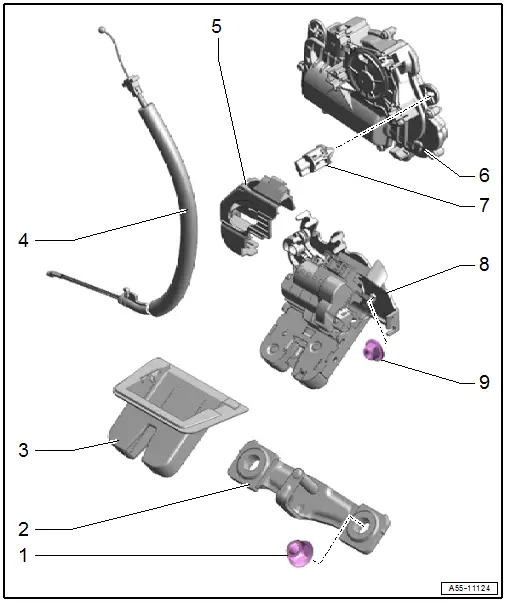
1 - Nut
- 21 Nm
- Quantity: 2
2 - Striker
- Removing and Installing. Refer to → Chapter "Striker, Removing and Installing".
- Adjusting. Refer to → Chapter "Height Adjustment at Striker".
3 - Rear Lid Latch Trim Panel
- Removing and Installing. Refer to → Body Interior; Rep. Gr.70; Luggage Compartment Trim Panels; Rear Lid Lower Trim Panel, Removing and Installing
4 - Closing Assist Release Cable
- Removing and Installing. Refer to → Chapter "Closing Assist Release Cable, Removing and Installing".
5 - Anti-Theft Protection
- For the latch
6 - Rear Lid Closing Assist Motor -V382-
- Removing and Installing. Refer to → Chapter "Rear Lid Closing Assist Motor -V382-, Removing and Installing".
7 - Locking Element
- For the closing assist
8 - Latch
- Removing and Installing. Refer to → Chapter "Latch, Removing and Installing".
9 - Nut
- 21 Nm
- Quantity: 2
Overview - Electric Rear Lid Release
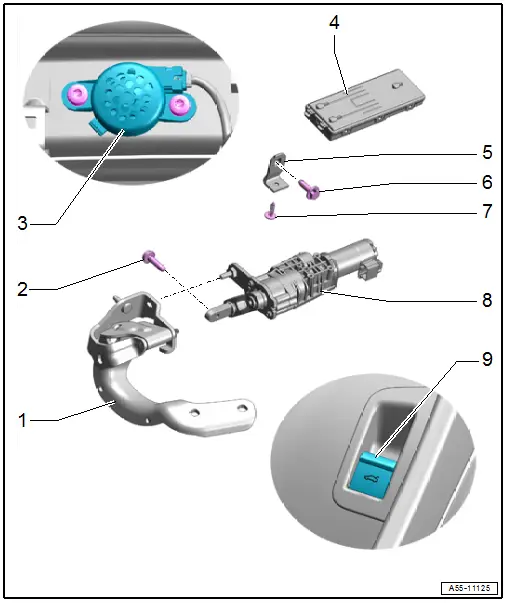
1 - Hinge
- Removing and Installing. Refer to → Chapter "Hinges, Removing and Installing".
2 - Bolt
- 20 Nm + 90º
- Replace after removing
3 - Rear Lid Warning Buzzer -H32-
- Removing and Installing. Refer to → Electrical Equipment; Rep. Gr.96; Controls; Rear Lid Warning BuzzerH32, Removing and Installing.
4 - Rear Lid Control Module -J605-
- Removing and Installing. Refer to → Chapter "Rear Lid Control Module -J605-, Removing and Installing".
5 - Bracket
- Must not be adjusted
6 - Bolt
- 21 Nm
7 - Bolt
- 6 Nm
8 - Rear Lid Motor
- Rear Lid Motor 1 -V444-, Rear Lid Motor 2 -V445-
- Perform the adaptation after installing.
- Removing and Installing. Refer to → Chapter "Rear Lid Drive Unit -VX69-, Removing and Installing".
9 - Rear Lid Remote Release Button -E233-
- Removing and Installing. Refer to → Electrical Equipment; Rep. Gr.96; Controls; Rear Lid Remote Release ButtonE233, Removing and Installing.
Overview - Sensor-Controlled Rear Lid Release
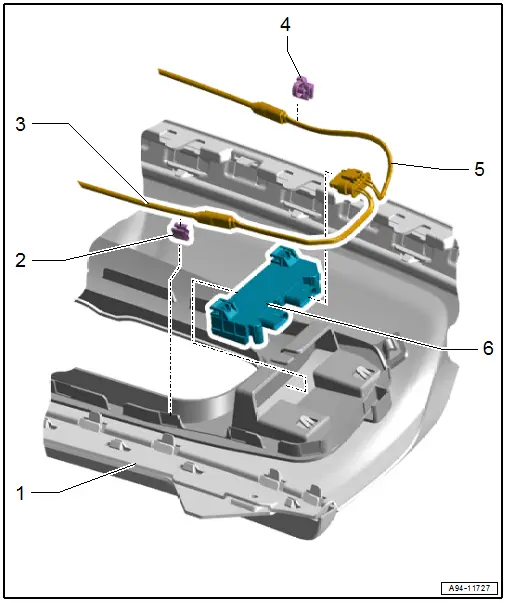
1 - Rear Bumper Cover
2 - Clip
- Quantity: 6
3 - Power Rear Lid Opener Sensor -G750-
- Removing and Installing. Refer to → Chapter "Power Rear Lid Opener Sensors -G750-/-G760-, Removing and Installing".
4 - Cable Holder
- Quantity: 7
5 - Rear Lid Opener Sensor 2 -G760-
- Removing and Installing. Refer to → Chapter "Power Rear Lid Opener Sensors -G750-/-G760-, Removing and Installing".
6 - Rear Lid Opener Control Module -J938-
- Removing and Installing. Refer to → Chapter "Rear Lid Opener Control Module -J938-, Removing and Installing".

