Audi Q7 Owners & Service Manuals

Audi Q7: Rear Lid Seal, Removing and Installing

Audi Q7 (4M) 2016-2025 Workshop Manual / Body / Body Exterior / Hood, Lids / Rear Lid Seal, Removing and Installing

Removing

- Remove the rear lid seal from the body flange.

Installing

Install in reverse order of removal and note the following:

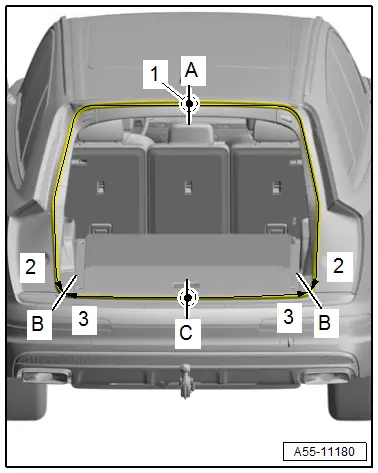
- Install the rear lid seal on the body flange in the sequence: -1, 2 and 3-.

- Align the mark -A- on the rear lid seal to the center roof frame seal hole and attach.

- Attach the left and right rear lid seal downward to -item C-.

- Align the rear lid seal with the butt joint -A- to the striker and attach.

- Attach the left and right rear lid seal upward through -item B-.

- Press on the entire length of the rear lid seal.

A55-11180

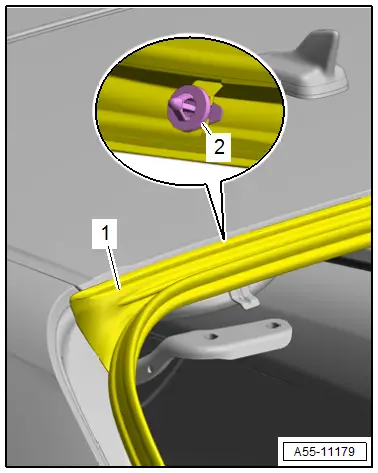
Roof Frame Cover, Removing and Installing

Removing

- Open the rear lid.

- Release the catches -2- and loosen the roof frame cover -1- from the body.

- Remove the roof frame cover.

A55-11179

Installing

Install in reverse order of removal and note the following:

- Check the clip for damage.

- Position the roof frame cover and press the clips on until they engage audibly.

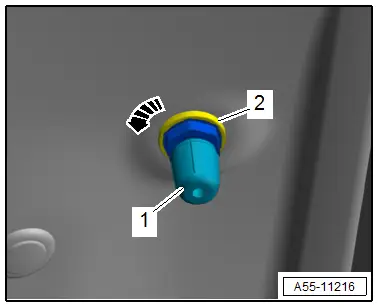
Adjusting Buffer, Removing and Installing

Removing

- Turn the adjusting buffer -1- counter-clockwise -arrow- and remove it from the opening in the body.

Installing

Install in reverse order of removal and note the following:

- Check the seal -2- between the adjusting buffer and body for damage.

- Adjust the adjusting buffer. Refer to → Chapter "Height, Adjusting using Adjusting Buffer".

A55-11216

    READ NEXT:

     Gas-Filled Strut, Removing and Installing

    Removing - Using a small screwdriver, lift the locking spring -1- slightly -arrow- and remove the gas-filled strut -2- from the ball pin. - Support the lid or secure it against falling. In

     Rear Lid Drive Unit -VX69-, Removing and Installing

      Caution This procedure contains mandatory replaceable parts. Refer to component overview prior to starting procedure. Removing - Remove the D-pillar trim panel. Refer to → Body

     Front Doors, Central Locking System

    Overview - Fuel Filler Door Unit 1 - Drain Hose For the fuel filler door unit Removing and Installing. Refer to → Chapter "Fuel Filler Door Unit Drain Hose, Removing and Install

    SEE MORE:

     Finding Leaks via Vacuum Test using A/C Service Station or Nitrogen Pressure Testing

    Vehicles with a High Voltage System (Hybrid Vehicles) Read and follow all of the supplemental warnings for all work performed on vehicles with the high voltage system. Refer to → Chapter "Warnings when Working on Vehicles with High Voltage System" and → Electrical Equipment; 

     Night Vision System Camera, Removing and Installing

    Special tools and workshop equipment required Torque Wrench 1783 - 2-10Nm -VAG1783-   Caution This procedure contains mandatory replaceable parts. Refer to component overview prior to starting procedure. Mandatory Replacement Parts Seal - Night Vision System Camera Removing - Tur

    © 2019-2025 Copyright www.a-q7.com