Audi Q7: Overview - Seat Pan Cover and Cushion
Overview - Seat Pan Cover and Cushion, Seat without Seat Depth Adjuster
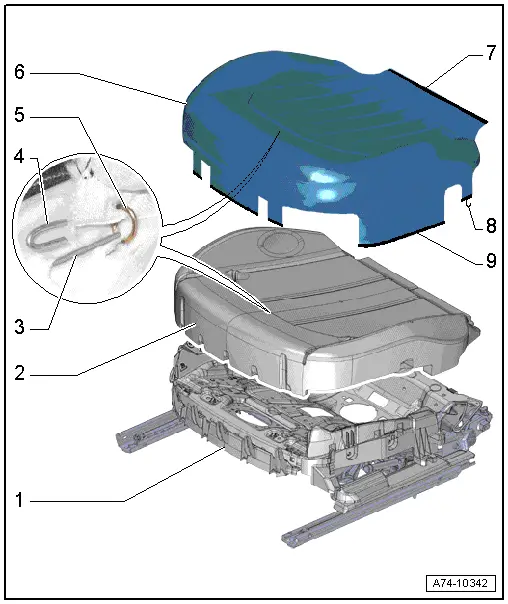
1 - Seat Pan
2 - Cushion
- Cover with cushion, removing and installing. Refer to → Chapter "Seat Pan Cover and Cushion, Removing and Installing, Seat without Seat Depth Adjuster".
- Cover and cushion, disconnecting and assembling. Refer to → Chapter "Seat Pan Cover and Cushion, Separating".
3 - Wire
- Covered in foam padding
- For securing the cover to the cushion
4 - Contour Wire
- Pushed into the cover
5 - Upholstery Clip
- For securing the cover to the cushion
- Replacing
- Install at the same location with Upholstery Clip Pliers -VAG1634-.
6 - Cover
- Cover with cushion, removing and installing. Refer to → Chapter "Seat Pan Cover and Cushion, Removing and Installing, Seat without Seat Depth Adjuster".
- Cover and cushion, disconnecting and assembling. Refer to → Chapter "Seat Pan Cover and Cushion, Separating".
7 - Molding
- Sewn into cover
- For engaging the cover on the seat pan
8 - Tab
- With hooks
- For engaging the cover on the seat pan
9 - Molding
- Sewn into seat cover
- For engaging the cover on the seat pan
Overview - Seat Pan Cover and Cushion, Seat with Seat Depth Adjuster
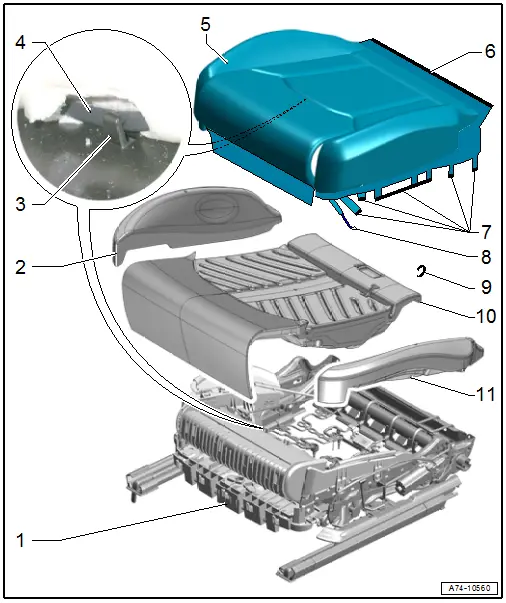
1 - Seat Pan
- With a seat depth adjuster
2 - Seat Bolster Cushion
- Removing and installing. Refer to → Chapter "Seat Bolster Cushion on Seat Pan, Removing and Installing, Seat with Seat Depth Adjuster".
3 - Hooks
- On the seat depth adjuster cover
- Quantity: 4
4 - Clamping Strip
- For attaching the cover and seat cushion to the seat depth adjuster cover
- Sewn into cover
5 - Cover
- Cover with seat cushion, removing and installing. Refer to → Chapter "Seat Pan Cover and Cushion, Removing and Installing, Seat with Seat Depth Adjuster".
- Cover and seat cushion, disconnecting. Refer to → Chapter "Seat Pan Cover and Cushion, Separating".
- Check that there are no folds after installing
6 - Molding
- Sewn into cover
- For engaging the cover on the seat pan
- Check for proper seating
7 - Tab
- With hooks
- Sewn into cover
- For engaging the cover on the seat pan
8 - Rubber Band
- Quantity: 2
- Pushed into the cover
- For attaching to the seat depth adjuster
9 - Upholstery Clip
- For attaching the cover to the seat cushion
- Replace after removing
- Install at the same location with Upholstery Clip Pliers -VAG1634-.
10 - Cushion
- Cover with cushion, removing and installing. Refer to → Chapter "Seat Pan Cover and Cushion, Removing and Installing, Seat with Seat Depth Adjuster".
- Cover and seat cushion, disconnecting. Refer to → Chapter "Seat Pan Cover and Cushion, Separating".
11 - Seat Bolster Cushion
- Removing and installing. Refer to → Chapter "Seat Bolster Cushion on Seat Pan, Removing and Installing, Seat with Seat Depth Adjuster".
Overview - Backrest Cover and Cushion
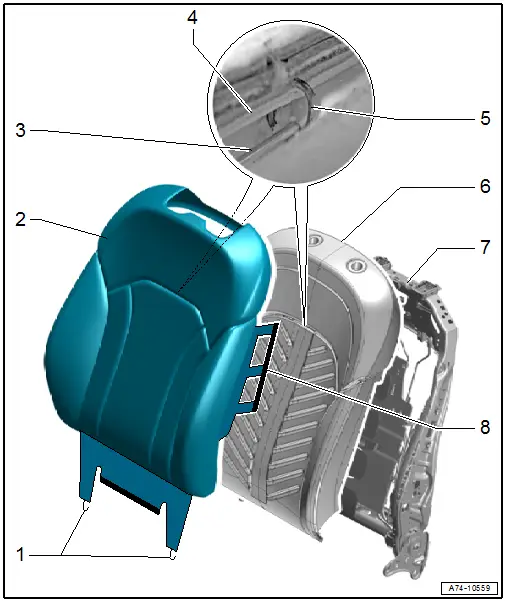
1 - Tab
- With hooks
- Sewn into cover
- For attaching the cover to the backrest frame
2 - Cover
- Cover with cushion, removing and installing. Refer to → Chapter "Backrest Cover and Cushion, Removing and Installing".
- Cover and cushion, disconnecting and assembling. Refer to → Chapter "Backrest Cover and Cushion, Separating".
- Check that there are no folds after installing
3 - Wire
- Covered in foam padding
- For securing the cover to the cushion
4 - Contour Wire
- Pushed into the cover
- For securing the cover to the cushion
5 - Upholstery Clip
- For securing the cover to the cushion
- Replace after removing
- Install at the same location with Upholstery Clip Pliers -VAG1634-.
6 - Cushion
- Cover with cushion, removing and installing. Refer to → Chapter "Backrest Cover and Cushion, Removing and Installing".
- Cover and Cushion, Disconnecting and Assembling. Refer to → Chapter "Backrest Cover and Cushion, Separating".
7 - Backrest Frame
8 - Tab
- With molding
- Sewn into cover
- For attaching the cover to the backrest frame
Overview - Seat Heating Element
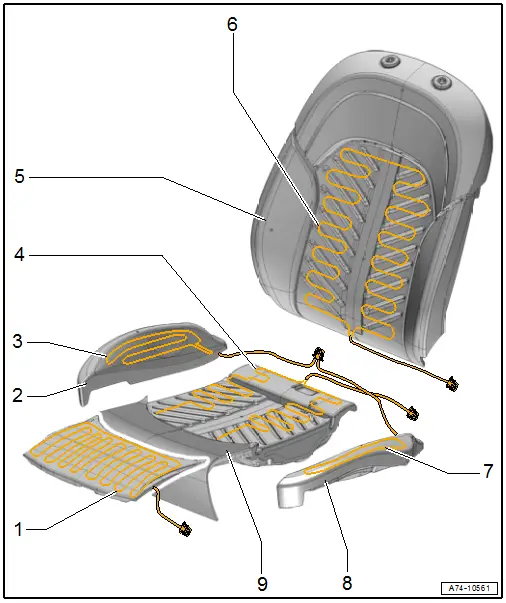
1 - Left Front Seat Extension Heating Element -Z168-
- Front passenger side: Right Front Seat Extension Heating Element -Z169-
- Only for versions equipped with seat depth adjuster
- Removing and installing. Refer to → Chapter "Seat Heating Element, Removing and Installing, Seat Depth Adjuster".
2 - Seat Bolster Cushion
- When replacing, apply a new heating element. Refer to → Chapter "Seat Heating Element, Removing and Installing, Seat Bolster Cushion".
3 - Left Seat Bolster Heating for Left Front Seat -Z151-
- Front passenger side: Left Seat Bolster Heating for Right Front Seat -Z153-
- The heating element is glued to the seat bolster cushion
- Removing and installing. Refer to → Chapter "Seat Heating Element, Removing and Installing, Seat Bolster Cushion".
4 - Left Front Seat Heating Element -Z45-
- Front passenger side: Right Front Seat Heating Element -Z46-
- Heating element sewn into cover; if faulty, replace the cover. Refer to → Chapter "Seat Pan Cover and Cushion, Separating".
5 - Backrest Cushion
6 - Left Front Seat Heated Backrest -Z116-
- Front passenger side: Right Front Seat Heated Backrest -Z117-
- Heating element sewn into cover; if faulty, replace the cover. Refer to → Chapter "Backrest Cover and Cushion, Separating".
7 - Right Seat Bolster Heating for Left Front Seat -Z152-
- Front passenger side: Right Seat Bolster Heating for Right Front Seat -Z154-
- The heating element is glued to the seat bolster cushion
- Removing and installing. Refer to → Chapter "Seat Heating Element, Removing and Installing, Seat Bolster Cushion".
8 - Seat Bolster Cushion
- When replacing, apply a new heating element. Refer to → Chapter "Seat Heating Element, Removing and Installing, Seat Bolster Cushion".
9 - Seat Cushion
- Versions with seat depth adjuster and seat heating element: apply new heating element when replacing. Refer to → Chapter "Seat Heating Element, Removing and Installing, Seat Depth Adjuster".

