Audi Q7: Luggage Compartment Side Trim Panel, Removing and Installing
Luggage Compartment Side Trim Panel, Removing and Installing, Vehicle without High-Voltage System
Special tools and workshop equipment required
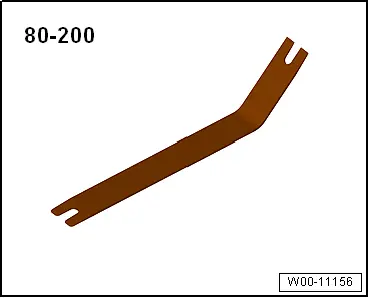
- Pry Lever -80-200-
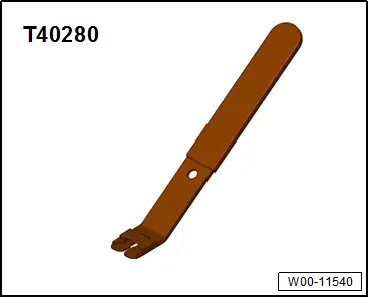
- Omega Clip Tool -T40280-
Removing
- Versions with 7 seats: fold in the third row backrest.
- Driver side: if installed, remove the control unit and/or the backrest adjustment button for the third row. Refer to → Electrical Equipment; Rep. Gr.96; Controls; Component Location Overview - Luggage Compartment Controls.
- Remove the lock carrier trim panel. Refer to → Chapter "Lock Carrier Trim Panel, Removing and Installing".
- Remove the luggage compartment lamp. Refer to → Electrical Equipment; Rep. Gr.96; Lamps; Component Location Overview - Luggage Compartment Lamps.
- Equipped on some models, front passenger side: remove the spare tire carrier. Refer to → Chapter "Spare Tire Carrier, Removing and Installing".
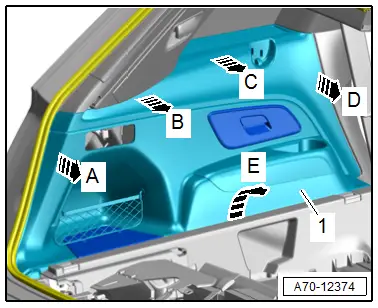
- Free up the luggage compartment side trim panel near the rear lid seal.
- Unclip the luggage compartment side trim panel -1- from the body starting at the back and unclip the trim panels -arrows A to D-.
- Pull the luggage compartment side trim panel slightly inward and disconnect the connector.
- Pull the luggage compartment side trim panel upward from the support -arrow E- and remove it.
Installing
Install in reverse order of removal.
Installation instructions: for example tightening specifications, replacing components. Refer to → Chapter "Overview - Luggage Compartment Side Trim Panel, Vehicles without High-Voltage System".
Luggage Compartment Side Trim Panel, Removing and Installing, Vehicle with High-Voltage System
Special tools and workshop equipment required
- Pry Lever -80-200-

- Omega Clip Tool -T40280-
Removing
- Fold the second row seats forward.
- Remove the lock carrier trim panel. Refer to → Chapter "Lock Carrier Trim Panel, Removing and Installing".
- Remove the luggage compartment lamp. Refer to → Electrical Equipment; Rep. Gr.96; Lamps; Component Location Overview - Luggage Compartment Lamps.
- Driver side: remove the control unit. Refer to → Electrical Equipment; Rep. Gr.96; Controls; Component Location Overview - Luggage Compartment Controls.

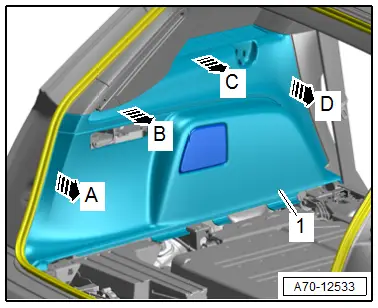
- Free up the luggage compartment side trim panel near the rear lid seal.
- Unclip the luggage compartment side trim panel -1- from the body starting at the back and unclip the trim panels -arrows A to D-.
- Pull the luggage compartment side trim panel slightly inward and disconnect the connector.
- Remove the luggage compartment side trim panel toward the rear.
Installing
Install in reverse order of removal.
Installation instructions: for example tightening specifications, replacing components. Refer to → Chapter "Overview - Luggage Compartment Side Trim Panel, Vehicles with High-Voltage System".

