Audi Q7: Name Badges and Emblems
Overview - Name Badges and Emblems
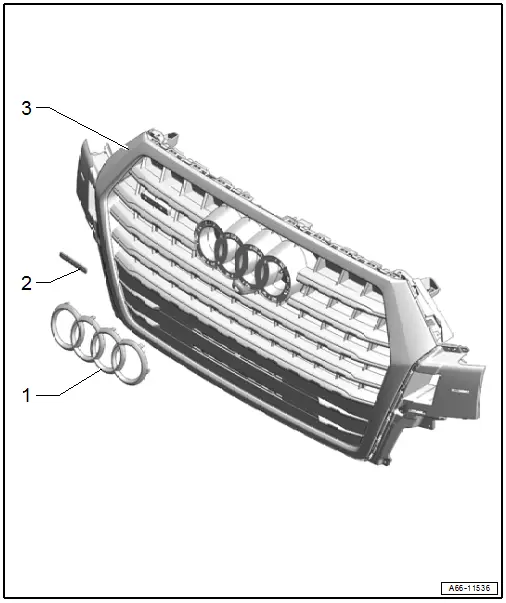
1 - Emblem
- Removing and Installing. Refer to → Chapter "Radiator Grille Name Badges and Emblems, Removing and Installing".
2 - quattro Name Badge
- Replace after removing
- Removing and Installing. Refer to → Chapter "Radiator Grille Name Badges and Emblems, Removing and Installing".
3 - Radiator Grille
General Information - Name Badges and Emblems, Replacing
Special tools and workshop equipment required
- Roller -3356-
- Cleaning Solution -D 009 401 04-
- Applicator -D 009 500 25-
- Bonding Agent -D 355 205 A2-
- Loosened name badges and emblems must be replaced.
- The vehicle as well as the name badges and emblems must be at room temperature.
- The adhesive surfaces must be free of dirt and grease.
- If the Bonding Agent -D 355 205 A2- dries longer than 3 hours, then it must be primed again.
- Clean the adhesive surfaces using Cleaning Solution -D 009 401 04-.
- Apply Bonding Agent -D 355 205 A2- on the adhesive surface using the Applicator -D 009 500 25- and let dry.
- Warm the adhesive areas to approximately 40 ℃ (104 ºF) using a hot air blower.
- After successfully assembling, press on the emblems again with the roller.
Dimensions - Rear Lid Name Badges and Emblems
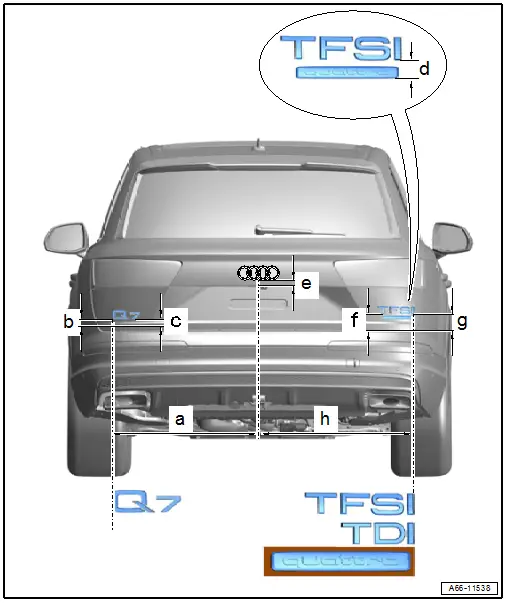
- Dimension -a- = 721 mm
- Dimension -b- = 63 mm
- Dimension -c- = 64 mm
- Dimension -d- = 20 mm
- Dimension -e- = 27 mm
- Dimension -f- = 71 mm
- Dimension -g- = 69.5 mm
- Dimension -h- = 721 mm
Dimensions - Fender Name Badges and Emblems
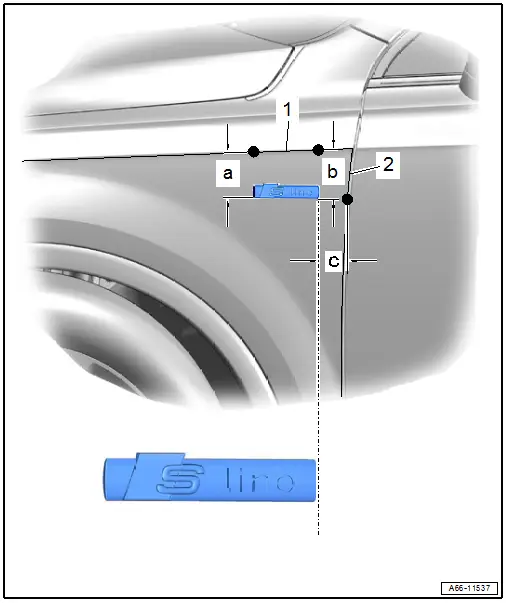
- Dimension -a- = 64.5 mm
- Dimension -b- = 65.5 mm
- Dimension -c- = 52 mm
- -1- Cover edge in fender.
- -2- Fender rear edge.
Radiator Grille Name Badges and Emblems, Removing and Installing
- General Information for Replacing Name Badges and Emblems. Refer to → Chapter "General Information - Name Badges and Emblems, Replacing".
Emblem, Removing and Installing
Removing
- Remove the reinforcement brace for the radiator grille. Refer to → Chapter "Reinforcement Brace, Removing and Installing".
- If equipped, remove the peripheral camera. Refer to → Communication; Rep. Gr.91; Peripheral Camera; Component Location Overview - Peripheral Camera.
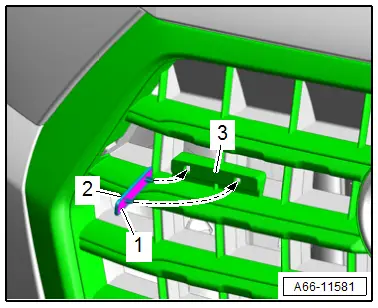
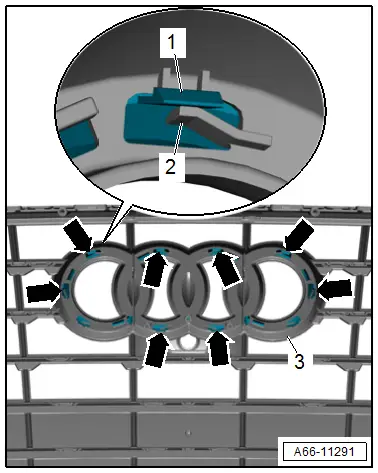
- Release the tabs -1--arrows- and remove the cover -2-.
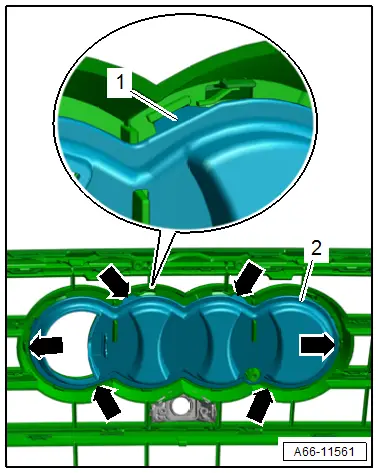
- Release the tap -1--arrows-, to do this lift the securing tab -2-.
- Remove the emblem from the radiator grille -3-.
Installing
Install in reverse order of removal and note the following:
- Press on the emblem until it audibly engages.
quattro Name Badge, Removing and Installing
 Caution
This procedure contains mandatory replaceable parts. Refer to component overview prior to starting procedure. Refer to → Chapter "Overview - Name Badges and Emblems"
Special tools and workshop equipment required
- Angled Screwdriver -VAS6416-
Removing
- Carefully warm up the name badge -1- using the -VAS1978/14A-.
- Remove the name badge with the -VAS6416- from the radiator grille -2-.
- Remove the name badge.
Installing
Install in reverse order of removal and note the following:
- Clean the adhesive surface using the Cleaning Solution -D 009 401 04-.
- Apply Bonding Agent -D 355 205 A2- on the adhesive surface using the Applicator -D 009 500 25- and let dry.
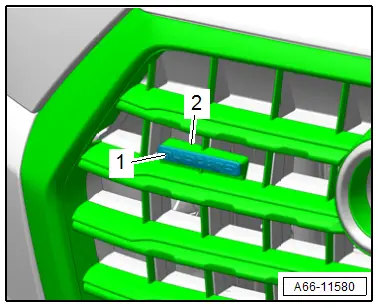
- Remove the protective film from the adhesive tape -1-.
- Position the name badge -2- on the radiator grille -3-.
- Push on the name badge with the -3356-.
- Vehicle resting time is at least one hour at room temperature.