Audi Q7: Overview - Component Location Instrument Panel Lamps
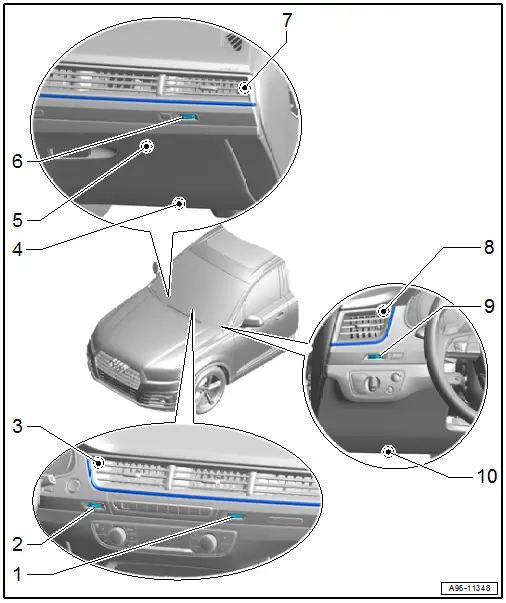
1 - Center Instrument Panel Vent Illumination Bulb -L68- Right
- Cannot be replaced separately if faulty.
- Replacing. Refer to → Body Interior; Rep. Gr.70; Instrument Panel; Instrument Panel Vent, Removing and Installing.
2 - Center Instrument Panel Vent Illumination Bulb -L68- Left
- Cannot be replaced separately if faulty.
- Replacing. Refer to → Body Interior; Rep. Gr.70; Instrument Panel; Instrument Panel Vent, Removing and Installing.
3 - Instrument Panel Contour Illumination Lamp 2 -L244-
- Cannot be replaced separately if faulty.
- Replacing. Refer to → Body Interior; Rep. Gr.70; Instrument Panel; Instrument Panel Vent, Removing and Installing.
4 - Right Front Footwell Lamp -K269-
- Removing and installing. Refer to → Chapter "Left and Right Front Footwell Lamp -K268-/-K269-, Removing and Installing".
5 - Glove Compartment Lamp -W6-
- 12 V, 5 W
- Removing and installing. Refer to → Chapter "Glove Compartment Lamp -W6-, Removing and Installing".
6 - Right Instrument Panel Vent Illumination Bulb -L69-
- Equipment level
- Cannot be replaced separately if faulty.
- Replacing. Refer to → Body Interior; Rep. Gr.70; Instrument Panel; Instrument Panel Vent, Removing and Installing.
7 - Instrument Panel Contour Illumination Lamp 3 -L245-
- Cannot be replaced separately if faulty.
- Replacing. Refer to → Body Interior; Rep. Gr.70; Instrument Panel; Instrument Panel Vent, Removing and Installing.
8 - Instrument Panel Contour Illumination Lamp 1 -L243-
- Cannot be replaced separately if faulty.
- Replacing. Refer to → Body Interior; Rep. Gr.70; Instrument Panel; Instrument Panel Vent, Removing and Installing.
9 - Left Instrument Panel Vent Illumination Bulb -L67-
- Equipment level
- Cannot be replaced separately if faulty.
- Replacing. Refer to → Body Interior; Rep. Gr.70; Instrument Panel; Instrument Panel Vent, Removing and Installing.
10 - Left Front Footwell Lamp -K268-
- Removing and installing. Refer to → Chapter "Left and Right Front Footwell Lamp -K268-/-K269-, Removing and Installing".
Overview - Component Location Front Door Lamps
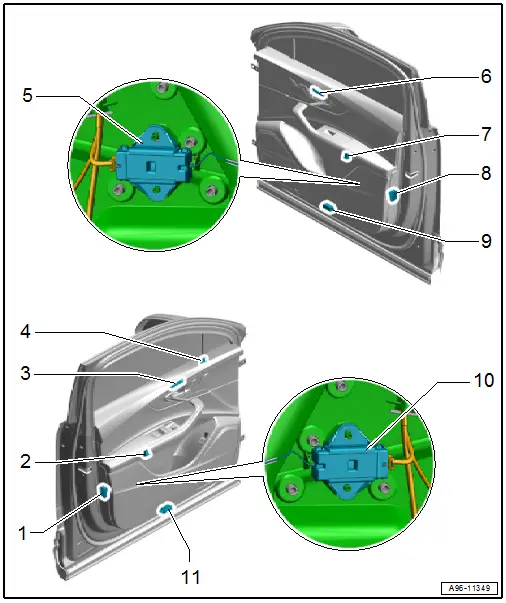
1 - Driver Door Warning Lamp -W30-
- 12 V, 3 W
- Removing and installing. Refer to → Chapter "Driver and Front Passenger Door Warning Lamp -W30-/-W36-, Removing and Installing".
2 - Left Door Storage Compartment Illumination Lamp -L255-
- Removing and installing. Refer to → Chapter "Door Storage Compartment Illumination Lamp, Removing and Installing".
3 - Driver Side Interior Door Handle Illumination Lamp -L219-
- Removing and installing. Refer to → Chapter "Front Interior Door Handle Illumination Lamp, Removing and Installing".
4 - Central Locking -Safe- Indicator Lamp -K133-
- Removing and installing. Refer to → Chapter "Central Locking -Safe- Indicator Lamp -K133-, Removing and Installing".
5 - Right Front Door Storage Compartment Illumination Control Module -J1040-
- Removing and installing. Refer to → Chapter "Left and Right Front Door Storage Compartment Illumination Control Module -J1039-/-J1040-, Removing and Installing".
6 - Passenger Side Interior Door Handle Illumination Lamp -L220-
- Removing and installing. Refer to → Chapter "Front Interior Door Handle Illumination Lamp, Removing and Installing".
7 - Right Door Storage Compartment Illumination Lamp -L256-
- Removing and installing. Refer to → Chapter "Door Storage Compartment Illumination Lamp, Removing and Installing".
8 - Front Passenger Door Warning Lamp -W36-
- 12 V, 3 W
- Removing and installing. Refer to → Chapter "Driver and Front Passenger Door Warning Lamp -W30-/-W36-, Removing and Installing".
9 - Front Passenger Exit Warning Lamp -W112-
- Removing and installing. Refer to → Chapter "Driver and Front Passenger Exit Warning Lamp -W111-/-W112-, Removing and Installing".
10 - Left Front Door Storage Compartment Illumination Control Module -J1039-
- Removing and installing. Refer to → Chapter "Left and Right Front Door Storage Compartment Illumination Control Module -J1039-/-J1040-, Removing and Installing".
11 - Driver Exit Warning Lamp -W111-
- Removing and installing. Refer to → Chapter "Driver and Front Passenger Exit Warning Lamp -W111-/-W112-, Removing and Installing".
Component Location Overview - Rear Door Lamps
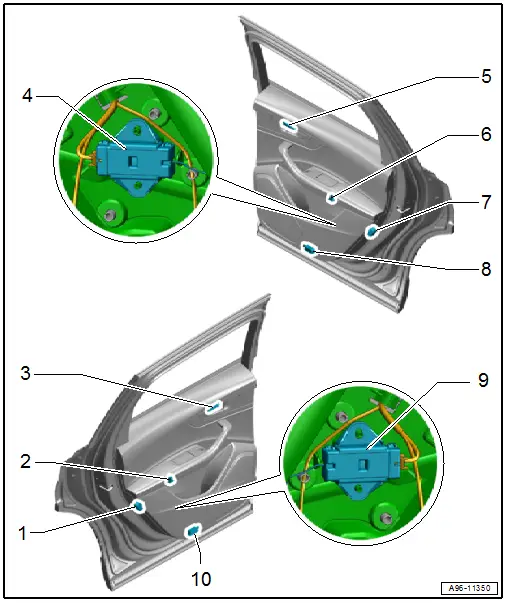
1 - Left Rear Door Warning Lamp -W37-
- 12 V, 3 W
- Removing and installing. Refer to → Chapter "Rear Door Warning Lamps, Removing and Installing".
2 - Left Rear Door Storage Compartment Illumination Lamp -L257-
- Removing and installing. Refer to → Chapter "Rear Door Storage Compartment Illumination Bulb, Removing and Installing".
3 - Driver Side Rear Interior Door Handle Illumination Bulb -L221-
- Removing and installing. Refer to → Chapter "Rear Interior Door Handle Illumination Lamp, Removing and Installing".
4 - Right Rear Door Storage Compartment Illumination Control Module -J1042-
- Removing and installing. Refer to → Chapter "Left and Right Rear Door Storage Compartment Illumination Control Module -J1041-/-J1042-, Removing and Installing".
5 - Passenger Side Rear Interior Door Handle Illumination Bulb -L222-
- Removing and installing. Refer to → Chapter "Rear Interior Door Handle Illumination Lamp, Removing and Installing".
6 - Right Rear Door Storage Compartment Illumination Lamp -L258-
- Removing and installing. Refer to → Chapter "Rear Door Storage Compartment Illumination Bulb, Removing and Installing".
7 - Right Rear Door Warning Lamp -W38-
- 12 V, 3 W
- Removing and installing. Refer to → Chapter "Rear Door Warning Lamps, Removing and Installing".
8 - Passenger Side Rear Exit Warning Lamp -W114-
- Removing and installing. Refer to → Chapter "Rear Entry Lamps, Removing and Installing".
9 - Left Rear Door Storage Compartment Illumination Control Module -J1041-
- Removing and installing. Refer to → Chapter "Left and Right Rear Door Storage Compartment Illumination Control Module -J1041-/-J1042-, Removing and Installing".
10 - Driver Side Rear Exit Warning Lamp -W113-
- Removing and installing. Refer to → Chapter "Rear Entry Lamps, Removing and Installing".

