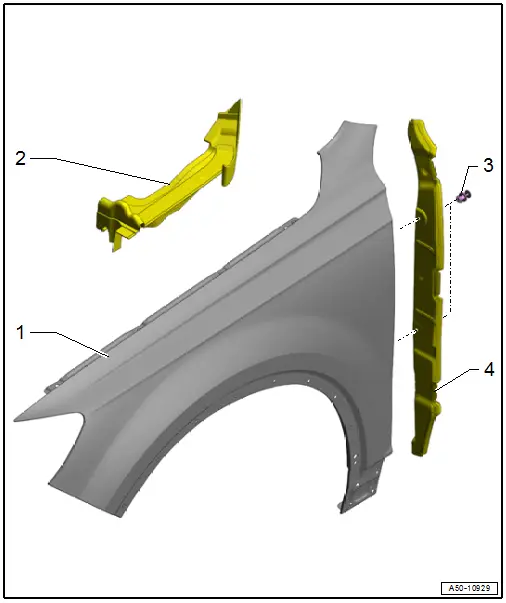
Audi Q7: Overview - Fender
Overview - Fender

1 - Double Bolt
- 10 Nm
- Quantity: 3
2 - Fender Brace
- Removing and Installing. Refer to → Chapter "Fender Brace, Removing and Installing".
3 - Bolt
- 10 Nm
- Quantity: 4
4 - Bolt
- 10 Nm
5 - Center Bracket
- Removing and Installing. Refer to → Chapter "Fender Bracket, Removing and Installing, Center".
6 - Bolt
- 10 Nm
- Quantity: 2
7 - Rear Bracket
- Removing and Installing. Refer to → Chapter "Fender Bracket, Removing and Installing, Rear".
8 - Bolt
- 10 Nm
9 - Body
10 - Bolt
- 5 Nm
11 - Bolt
- 10 Nm
12 - Fender
- Removing and Installing. Refer to → Chapter "Fender, Removing and Installing".
13 - Bolt
- 10 Nm
- Quantity: 2
14 - Bolt
- Quantity: 2
- 10 Nm
15 - Bolt
- 10 Nm
- Quantity: 2
16 - Bolt
- 10 Nm
- Quantity: 3
Overview - Fender Bracing
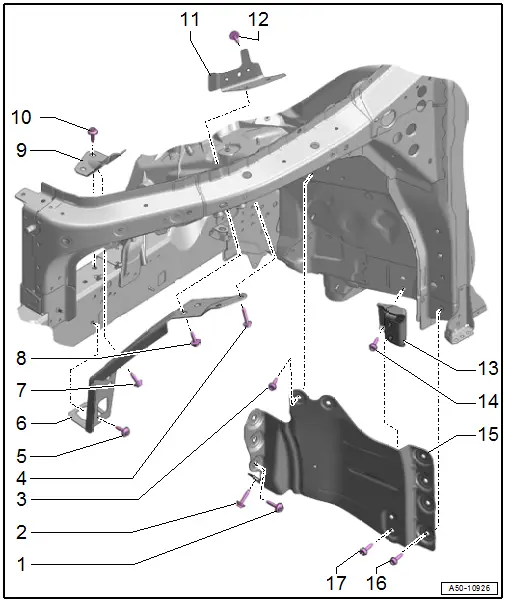
1 - Bolt
- 36 Nm
- Quantity: 3
2 - Bolt
- 36 Nm
3 - Bolt
- 25 Nm
- Quantity: 2
4 - Bolt
- Quantity: 2
- 25 Nm
5 - Bolt
- 25 Nm
- Quantity: 3
6 - Tension Strut
- Removing and Installing. Refer to → Chapter "Tension Strut, Removing and Installing".
7 - Bolt
- 25 Nm
- Quantity: 2
8 - Bolt
- 25 Nm
- Quantity: 2
9 - Lower Reinforcement
- For the tension strut
10 - Bolt
- 25 Nm
- Quantity: 2
11 - Upper Reinforcement
- For the tension strut
12 - Bolt
- 25 Nm
- Quantity: 2
13 - Support
- For wheel blocker cover
- Removing and Installing. Refer to → Chapter "Wheel Blocker Cover, Removing and Installing".
14 - Bolt
- 25 Nm
- Quantity: 2
15 - Wheel Blocker Cover
- Removing and Installing. Refer to → Chapter "Wheel Blocker Cover, Removing and Installing".
16 - Bolt
- 25 Nm
- Quantity: 4
17 - Bolt
- 25 Nm
- Quantity: 2
Overview - Covers on Fender
1 - Fender
- Overview.
2 - Rear Cover
- Removing and Installing. Refer to → Chapter "Rear Fender Cover, Removing and Installing".
3 - Expanding Rivet
- Quantity: 2
4 - End Panel
- Removing and Installing. Refer to → Chapter "End Panel, Removing and Installing".

