Audi Q7: Overview - Front Three-Point Seat Belt
Audi Q7 (4M) 2016-2026 Workshop Manual / Body / Body Interior / Passenger Protection, Airbags, Seat Belts / Overview - Front Three-Point Seat Belt
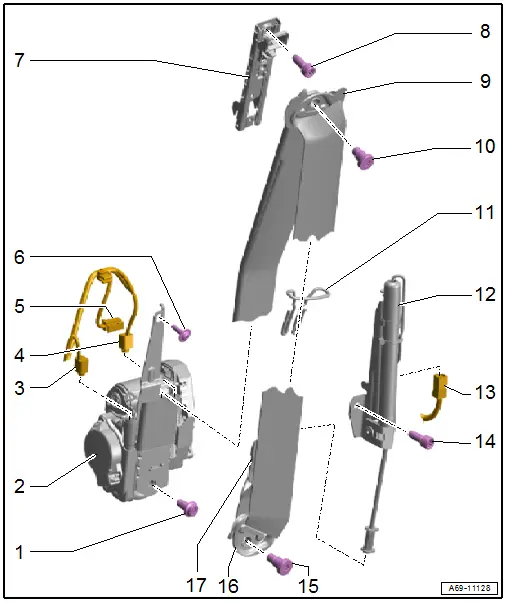
1 - Bolt
- 40 Nm
- Replace the bolt if it was removed because of an accident when the seat belt was buckled.
2 - Automatic Belt Retractor
- Driver side with
- Driver Seat Belt Tensioner Igniter 1 -N153-
- Driver Belt Force Limiter -G551-
- Equipped on some models: Left Front Seat Belt Tensioner Control Module -J854-
- Front passenger side with
- Front Passenger Seat Belt Tensioner Igniter 1 -N154-
- Front Passenger Belt Force Limiter -G552-
- Equipped on some models: Right Front Seat Belt Tensioner Control Module -J855-
- Removing and installing. Refer to → Chapter "Front Three-Point Seat Belt, Removing and Installing".
- The Left Front Seat Belt Tensioner Control Module -J854-/ Right Front Seat Belt Tensioner Control Module -J855- must be adapted after replacing the automatic belt retractors using the Vehicle Diagnostic Tester.
3 - Connector
- Driver side: for Driver Seat Belt Tensioner Igniter 1 -N153-
- Front passenger side: for Front Passenger Seat Belt Tensioner Igniter 1 -N154-
4 - Connector
- Driver side: for the Driver Belt Force Limiter -G551-
- Front passenger side: for Front Passenger Belt Force Limiter -G552-
5 - Connector
- Driver side: for Left Front Seat Belt Tensioner Control Module -J854-
- For Right Front Seat Belt Tensioner Control Module -J855-
6 - Screw
- 4.5 Nm
7 - Seat Belt Height Adjuster
- Seat belt height adjuster must be replaced if the belt tensioner has deployed with the belt on
- Removing and installing. Refer to → Chapter "Seat Belt Height Adjuster, Removing and Installing".
8 - Bolt
- 20 Nm
- Replace the bolt if it was removed because of an accident when the seat belt was buckled.
9 - Seat Belt Guide
10 - Bolt
- 40 Nm
- Replace the bolt if it was removed because of an accident when the seat belt was buckled.
11 - Front Seat Belt Guide
- Belt placed in the front belt guide
- Do not jam or damage the belt
- Removing and installing. Refer to → Chapter "Front Seat Belt Guide, Removing and Installing".
12 - Driver Seat Belt Tensioner Igniter 2 -N297-
- Passenger side: Front Passenger Seat Belt Tensioner Igniter 2 -N298-
- Removing and installing. Refer to → Chapter "Front Belt Tensioner, Removing and Installing".
13 - Connector
14 - Bolt
- 20 Nm
- Replace the bolt if it was removed because of an accident when the seat belt was buckled.
15 - Bolt
- 40 Nm
- Seat belt tensioner igniter
16 - Seat Belt Guide
17 - Belt End Fitting
- Removing and installing. Refer to → Chapter "Front Belt End Fitting, Removing and Installing".
Overview - Outer Rear Three-Point Seat Belt
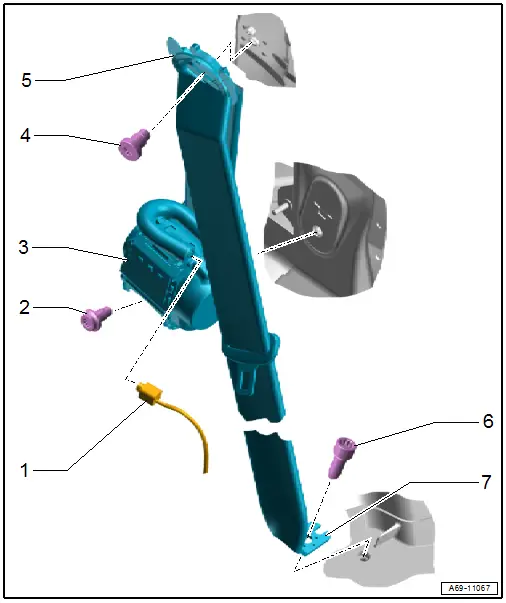
1 - Connector
2 - Bolt
- 40 Nm
- Replace the bolt if it was removed because of an accident when the seat belt was buckled.
3 - Automatic Belt Retractor
- Driver side: with Driver Side Rear Seat Belt Tensioner Igniter -N196-
- Passenger side: with Passenger Side Rear Seat Belt Tensioner Igniter -N197-
- Removing and installing. Refer to → Chapter "Rear Three-Point Seat Belt, Removing and Installing".
4 - Bolt
- 40 Nm
- Replace the bolt if it was removed because of an accident when the seat belt was buckled.
5 - Seat Belt Guide
6 - Bolt
- 40 Nm
- Replace the bolt if it was removed because of an accident when the seat belt was buckled.
7 - Belt End Fitting
- Removing and installing. Refer to → Chapter "Front Belt End Fitting, Removing and Installing".
Overview - Rear Center Three-Point Seat Belt
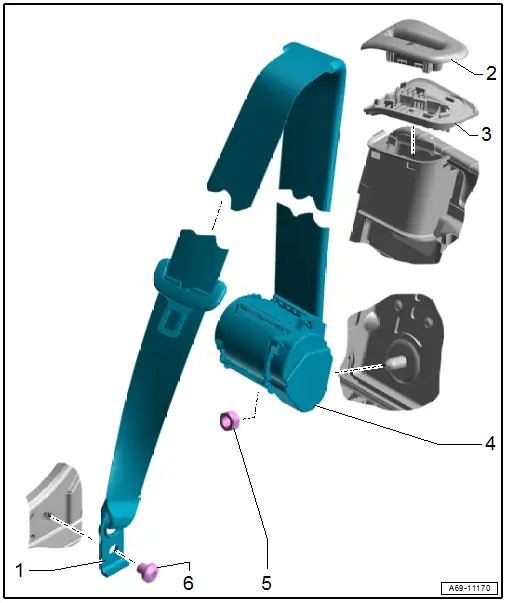
1 - Rear Center Belt End Fitting
- Removing and installing. Refer to → Chapter "Rear Seat Belt Anchor in Center Seating Position, Removing and Installing".
2 - Rear Seat Belt Guide Trim in Center
- Removing and installing. Refer to → Chapter "Rear Seat Belt Guide, Removing and Installing".
- Press on until it engages audibly
3 - Rear Center Seat Belt Guide
- Replace the entire seat belt guide if damaged.
- Removing and installing. Refer to → Chapter "Cover and Cushion, Removing and Installing, Center Second Row Backrest".
- Press on until it engages audibly
4 - Automatic Belt Retractor
- Removing and installing. Refer to → Chapter "Second Row Rear Three Point Seat Belt in Center, Removing and Installing".
5 - Nut
- 40 Nm
- Replace the bolt if it was removed because of an accident when the seat belt was buckled.
6 - Bolt
- 40 Nm
- Replace the bolt if it was removed because of an accident when the seat belt was buckled.

