Audi Q7: Sill Panel, Removing and Installing
Front Sill Panel Strip, Removing and Installing
Special tools and workshop equipment required
- Trim Removal Wedge -3409-
- Wedge Set -T10383-
- Omega Clip Tool -T40280-
Removing
- Move the front seat all the way forward into its highest position.
- Free up the sill panel in the area of the door seal.
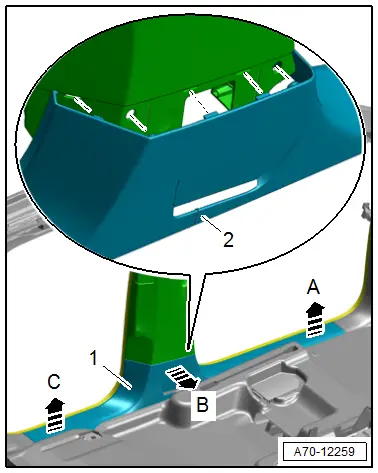
- Unclip sill panel -1- from the side sill starting at the front using the -3409- in direction of -arrow A-.
- Release the retaining tab from the sill panel strip from B-pillar trim using the -T10383/1- in direction of -arrow B-.
- Unclip the sill panel from the back of the side sill using the -3409- in direction of -arrow C-.
- Open the tab -2- on the sill panel strip, guide out the strap and remove the sill panel strip.
Installing
Install in reverse order of removal.
Installation notes, for example tightening specifications, replacing components. Refer to → Chapter "Overview - Sill Panel Strip".
Rear Sill Panel, Removing and Installing
Special tools and workshop equipment required
- Trim Removal Wedge -3409-
- Omega Clip Tool -T40280-
Removing
- Remove the luggage compartment side trim panel. Refer to → Chapter "Luggage Compartment Side Trim Panel, Removing and Installing".
- Unclip the front sill panel trim near the rear sill panel strip. Refer to → Chapter "Front Sill Panel Strip, Removing and Installing".
- 7-seat vehicle: remove the third row backrest adjustment button. Refer to → Electrical Equipment; Rep. Gr.96; Controls; Component Location Overview - Luggage Compartment Controls.
- Vehicle with high-voltage system: remove the luggage compartment floor trim panel. Refer to → Chapter "Luggage Compartment Floor Trim Panel, Removing and Installing, Vehicles with High-Voltage System".
- Free up the sill panel in the area of the door seal.
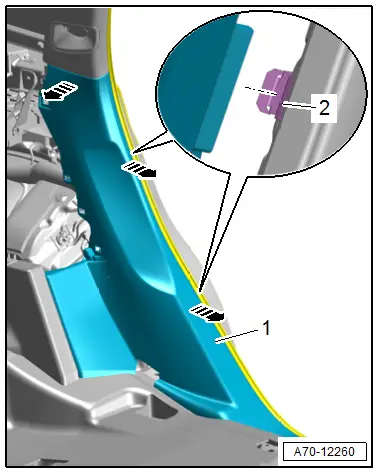
- Unclip the sill panel strip -1- from the clamps -2- on the sill panel starting at the bottom -arrows- using a -3409-.
- Unclip the sill panel from the C-pillar trim panel and disengage it from the luggage compartment floor support.
Installing
Install in reverse order of removal.
Installation instructions: for example tightening specifications, replacing components. Refer to → Chapter "Overview - Sill Panel Strip".

