Audi Q7: B-Pillar Trim Panel, Removing and Installing
B-Pillar Upper Trim Panel, Removing and Installing
Special tools and workshop equipment required
- Trim Removal Wedge -3409-
Removing
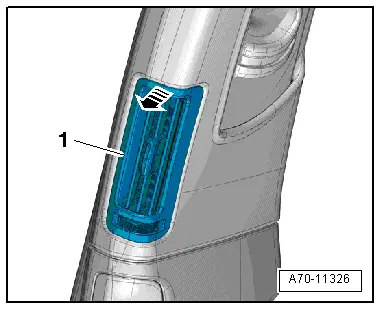
- Release the B-pillar vent -1- at the upper clip using a small screwdriver -arrow-.
- Disconnect the connector and remove vent.
 WARNING
Follow all safety precautions when working on pyrotechnic components. Refer to → Chapter "Safety Precautions for Pyrotechnic Components".
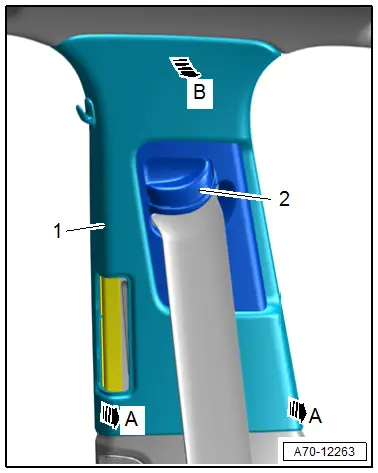
- Move seat belt height adjuster -2- to the lowest position.
- Free up the B-pillar trim panel -1- near the door seals, disengage at the B-pillar and unclip from the bracket in direction of -arrows A-.
- Remove the B-pillar upper trim panel from the mount on the body in direction of -arrow B- by tilting the trim panel inward and pulling it downward at the same time.
- Remove the B-pillar trim panel with the seat belt still threaded through.
 Note
Note
To replace the B-pillar upper trim panel, remove the front belt end fitting. Refer to → Chapter "Front Belt End Fitting, Removing and Installing".
Bracket, Removing
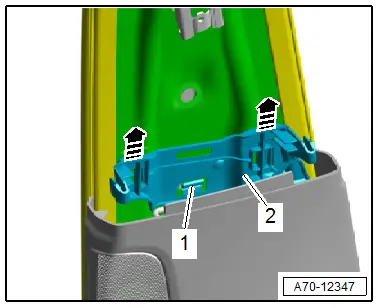
- Disengage the air duct at the B-pillar and push slightly to the side together with the seat belt webbing.
- Release the catch -1- using a screwdriver and pull the bracket -2- for the B-pillar trim panel upward out of the mounts in direction of -arrows-.
Installing
 WARNING
- Follow all safety precautions when working on pyrotechnic components. Refer to → Chapter "Safety Precautions for Pyrotechnic Components".
- Do not pinch the head curtain airbag when installing the B-pillar trim.
- Guide the belt webbing and seat belt latch in through the slide for the seat belt height adjuster.
 Note
Note
Make sure that the belt height adjuster is in the lowest position.
- First, insert the B-pillar trim panel upward into the mount on the roof.
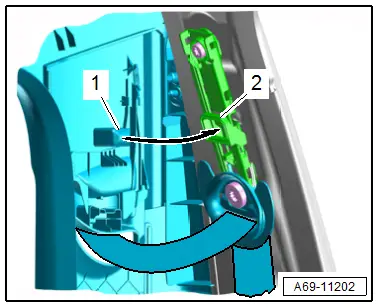
- The retaining pin -1- for the sliding piece on the B-pillar trim panel must engage in the mount -2- on the seat belt height adjuster in direction of -arrow-.
Further installation is the reverse order of removal.
Installation notes, for example tightening specifications, replacing components. Refer to → Chapter "Overview - B-Pillar Trim Panel".
B-Pillar Lower Trim Panel, Removing and Installing
Special tools and workshop equipment required
- Pry Lever -80-200-
- Omega Clip Tool -T40280-
Removing
- Remove front sill panel trim. Refer to → Chapter "Front Sill Panel Strip, Removing and Installing".
- Remove the B-pillar upper trim panel, and set aside with the seat belt webbing still threaded through it. Refer to → Chapter "B-Pillar Upper Trim Panel, Removing and Installing".
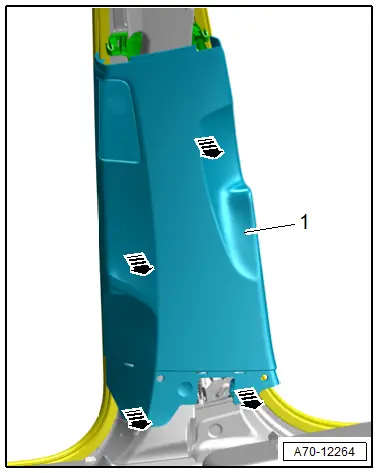
- Free up the B-pillar lower trim panel -1- in the area near the door seals, disengage on the side at the B-pillar and unclip from the B-pillar using the -80-200--arrows-.
- Disconnect the connector and remove the trim panel.
Installing
Further installation is the reverse order of removal.
Installation notes, for example tightening specifications, replacing components. Refer to → Chapter "Overview - B-Pillar Trim Panel".

