Audi Q7: Footrest, Removing and Installing
Removing
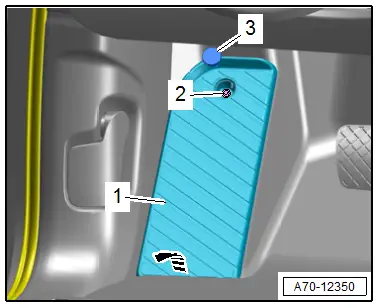
- Pry off the cap -3- with a small screwdriver.
- Remove the bolt -2- underneath.
- Pull the footrest -1- downward -arrow- and remove it.
Installing
Install in reverse order of removal.
Installation notes, for example tightening specifications, replacing components. Refer to → Chapter "Overview - Footrest and Carpet".
Carpet, Removing and Installing
Front Carpet, Removing and Installing
Special tools and workshop equipment required
- Trim Removal Wedge -3409-
 Note
Note
- As an original part, the left and right front carpets are delivered with connecting pieces in the center.
- Both connecting pieces must be removed from the perforation before installation.
Removing
- Remove the front seat. Refer to → Chapter "Front Seat, Removing and Installing".
- Remove front sill panel trim → Chapter "Front Sill Panel Strip, Removing and Installing".
- Driver side: remove the footrest. Refer to → Chapter "Footrest, Removing and Installing".
- Remove the A-pillar lower trim. Refer to → Chapter "A-Pillar Lower Trim Panel, Removing and Installing".
- Remove the center console trim panel. Refer to → Chapter "Center Console Trim Panel, Removing and Installing".
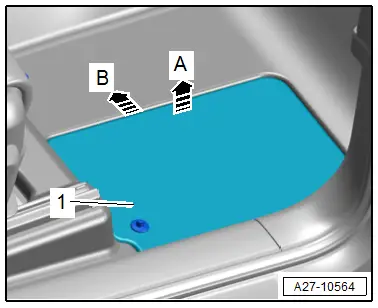
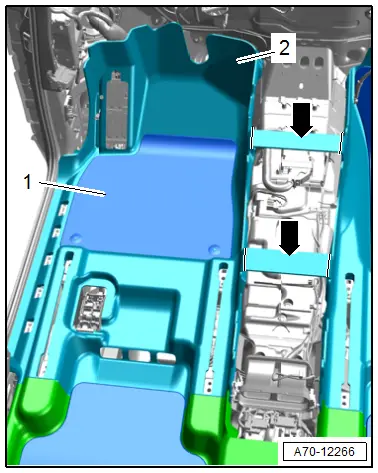
- Front passenger side: remove the floor mat, release the cover -1- upward in direction of -arrow A- and remove toward the center of the vehicle in direction of -arrow B-.
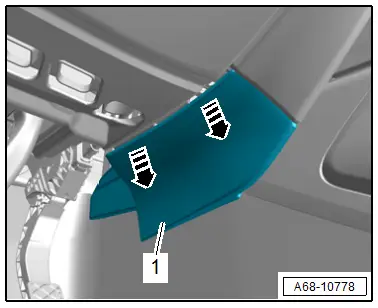
- Unclip the inner cover -1- on the driver side or front passenger side from the instrument panel cover using the -3409- in direction of -arrows-.
- Disengage the carpet on the center console support.
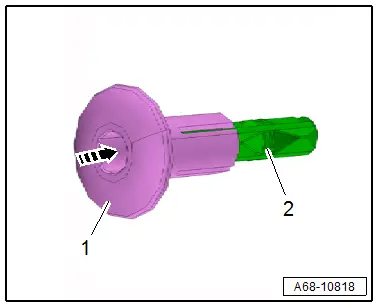
- To remove the expanding clips -1- push the clamping pin -2- in carefully approximately 5 mm until it engages audibly in the expanding clip in direction of -arrow- (do not push in completely, otherwise the clamping pin can fall).
- Remove the floor mat -1-.
- Lift up the rear carpet -2- and pull toward the rear.
- Fold and remove the carpet in the center.
 Note
Note- Make sure the floor covering does not tear at the openings.
- Ignore the -arrows-.
Installing
- When it is an original part, remove both connecting pieces -arrows- at the perforation before installation.
- Place and align the carpet in the vehicle, until the hole patterns align.
Further installation is the reverse order of removal.
Installation notes, for example tightening specifications, replacing components. Refer to → Chapter "Overview - Footrest and Carpet".
Rear Carpet, Removing and Installing
Removing
- Move the front seats all the way forward.
- Remove the bench seat / single seats. Refer to → Chapter "Bench Seat/Single Seat, Removing and Installing".
- Remove the trim panels for the seat anchor. Refer to → Chapter "Seat Anchor Trim Panel, Removing and Installing, Seat High, Outer Second Row".
- Equipped on some models: remove the third row bench seat. Refer to → Chapter "Third Row Seat, Removing and Installing".
- Remove the center console rear trim. Refer to → Chapter "Center Console Rear Trim, Removing and Installing".
- Remove front sill panel trim. Refer to → Chapter "Front Sill Panel Strip, Removing and Installing".
- Remove the rear sill trim. Refer to → Chapter "Rear Sill Panel, Removing and Installing".
- Remove the luggage compartment floor support. Refer to → Chapter "Luggage Compartment Support, Removing and Installing".
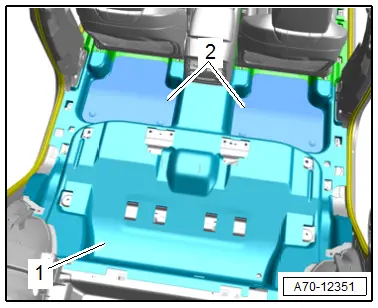
- Remove the rear seat rail cover -1- by carefully releasing the tabs -3, 4 and 5- on the seat rail -2- using a screwdriver.
- Remove the floor mat -2-.
- Remove the carpet -1- under the seat rails for the front seat.
 Note
Note
Make sure the floor covering does not tear at the openings.
- Fold the carpet and remove.
Installing
- Fold the floor covering and lay it in the vehicle.
- Push floor covering forward and align it so that the openings align.
Further installation is the reverse order of removal.
Installation instructions: for example tightening specifications, replacing components. Refer to → Chapter "Overview - Footrest and Carpet".
Speaker Trim, Removing and Installing
Special tools and workshop equipment required
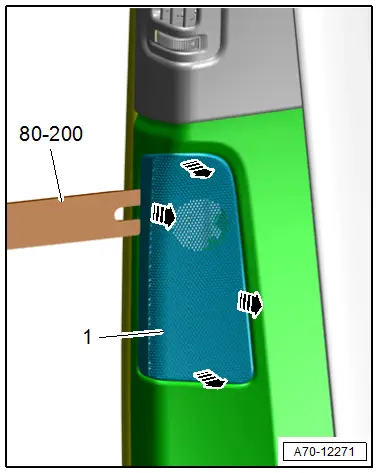
- Pry Lever -80-200-
Removing
 Caution
There is a risk of damaging the speaker trim.
Proceed very carefully when removing and installing.
- Carefully detach the speaker trim -1- using the -80-200--arrows- by sliding the wedge approximately 2 mm in the seam under the speaker trim.
- Disengage the remaining tabs for the speaker trim along the seam.
- Disconnect the connector and remove the speaker trim.
Installing
Install in reverse order of removal.
Installation instructions: for example tightening specifications, replacing components. Refer to → Chapter "Overview - B-Pillar Trim Panel".

