Audi Q7: Overview - Luggage Compartment Floor
Overview - Luggage Compartment Floor, Vehicles without High-Voltage System
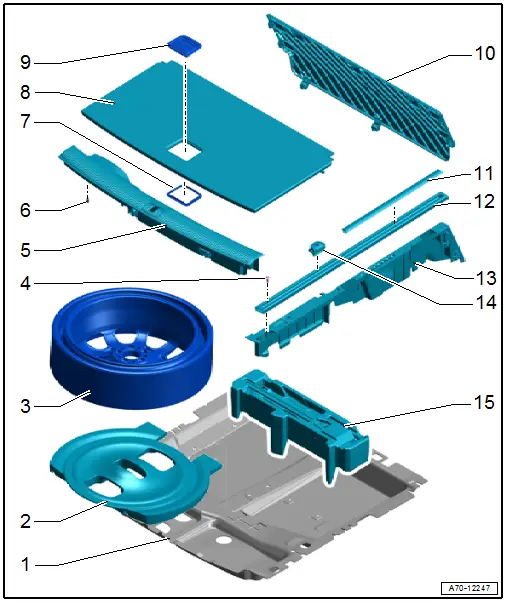
1 - Trim Panel
- Removing and installing. Refer to → Chapter "Spare Wheel Well Trim, Removing and Installing".
2 - Collapsible Tire Filling Piece
- Equipped on some models
3 - Spare Tire
- Equipped on some models
4 - Bolt
- 12 Nm
- Quantity: 3
5 - Lock Carrier Trim
- Removing and installing. Refer to → Chapter "Lock Carrier Trim Panel, Removing and Installing".
- Must grip into the pins
- Press on until it engages audibly
- Stretch the rear lid seal lip
6 - Clip
- Quantity: 6
- Insert in the trim panel
- Remove any remaining clips in the body mounting points using the Omega Clip Tool -T40280-. To install, insert into the trim panel.
- Replace damaged or deformed clips
7 - Frame
- For the luggage compartment floor panel handle
- Can be pressed down in one position on luggage compartment floor handle.
- Press on until it engages audibly
8 - Luggage Compartment Floor
9 - Handle
- For the luggage compartment floor
- Removing and installing. Refer to → Chapter "Rear Luggage Compartment Floor Handle, Removing and Installing".
10 - Luggage Compartment Floor Trim Panel
- For versions with 5 seats
- Removing and installing. Refer to → Chapter "Luggage Compartment Support, Removing and Installing".
11 - Rail Cover
- For versions with 7 seats
- Removing and installing. Refer to → Chapter.
12 - Retaining Tracks
- Quantity: 2
- Removing and installing. Refer to → Chapter "Rail, Removing and Installing".
13 - Luggage Compartment Floor Support
- Removing and installing. Refer to → Chapter "Luggage Compartment Support, Removing and Installing".
14 - Tie Down
- Quantity: 4
- Insert into the rail
15 - Tool Box
- Equipped on some models
Overview - Luggage Compartment Floor, Vehicles with High-Voltage System
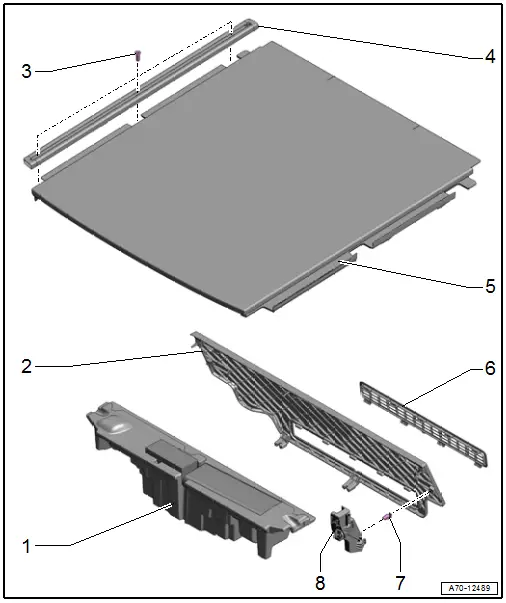
1 - Tool Box
2 - Luggage Compartment Floor Trim Panel
- Removing and Installing. Refer to → Chapter "Luggage Compartment Floor Trim Panel, Removing and Installing, Vehicles with High-Voltage System".
3 - Bolt
- 12 Nm
- Quantity: 3
4 - Retaining tracks
- Quantity: 2
- Removing and Installing. Refer to → Chapter "Luggage Compartment Floor, Removing and Installing, Vehicle with High-Voltage System".
5 - Luggage Compartment Floor
- Removing and Installing. Refer to → Chapter "Luggage Compartment Floor, Removing and Installing, Vehicle with High-Voltage System".
6 - Air Intake Grille
- Clipped in the luggage compartment floor trim panel
7 - Clip
- Quantity: 7
- Insert in the trim panel
- Remove any remaining clips from the mounting point using the Omega Clip Tool -T40280- and use them to install the trim.
- Replace damaged or deformed clips
8 - Luggage Compartment Floor Trim Panel Bracket
- Removing and Installing. Refer to → Chapter "Luggage Compartment Floor Trim Panel Bracket, Removing and Installing, Vehicles with High-Voltage System".
Overview - Luggage Compartment Floor, Upright Spare Tire
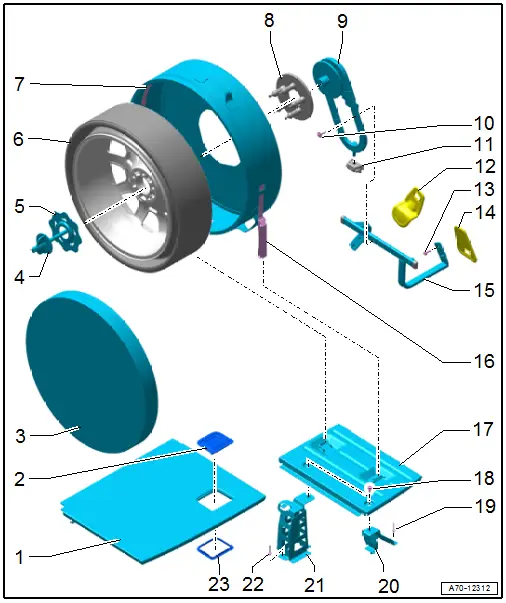
1 - Left Luggage Compartment Floor
2 - Handle
- For the luggage compartment floor
- Removing and installing. Refer to → Chapter "Rear Luggage Compartment Floor Handle, Removing and Installing".
3 - Trim Panel
4 - Wing Bolt
- 20 Nm
5 - Baseplate
- Remove counter-clockwise
6 - Spare Tire
7 - Trim Panel
8 - Adapter
9 - Bracket
- Removing and installing. Refer to → Chapter "Spare Tire Carrier, Removing and Installing".
10 - Bolt
- 20 Nm
- Quantity: 2
11 - Tie Down
- Insert into the rail
12 - Front Trim
- Slide on the support and insert into the trim panel
13 - Bolt
- 20 Nm
- Quantity: 2 each
14 - Rear Trim
- Slide on the support and insert into the trim panel
15 - Support
- Removing and installing. Refer to → Chapter "Spare Tire Carrier, Removing and Installing".
16 - Mounting Strap
- Guide into the trim panel and engage on the luggage compartment floor
17 - Right Luggage Compartment Floor
- Removing and installing. Refer to → Chapter "Luggage Compartment Floor, Removing and Installing, Upright Spare Tire".
- Press on until it engages audibly
18 - Bolt
- 20 Nm
- Quantity: 2
19 - Rivet
- Quantity: 4
20 - Rear Bracket
- Riveted to the lock carrier
- Removing and installing. Refer to → Chapter "Luggage Compartment Floor Bracket, Removing and Installing".
21 - Front Bracket
- Riveted to the vehicle floor
- Removing and installing. Refer to → Chapter "Luggage Compartment Floor Bracket, Removing and Installing".
22 - Rivet
- Quantity: 5
23 - Frame
- For the luggage compartment floor panel handle
- Can be placed only in one position on luggage compartment floor handle.
- Press on until it engages audibly

