Audi Q7 Owners & Service Manuals

Audi Q7: Window Frame Trim Panel, Removing and Installing

Audi Q7 (4M) 2016-2025 Workshop Manual / Body / Body  Interior / Interior Trim / Window Frame Trim Panel, Removing and Installing

Special tools and workshop equipment required

  • Trim Removal Wedge -3409-

Removing

- Lower the door window.

- Remove the door trim panel. Refer to → Chapter "Rear Door Trim Panel, Removing and Installing".

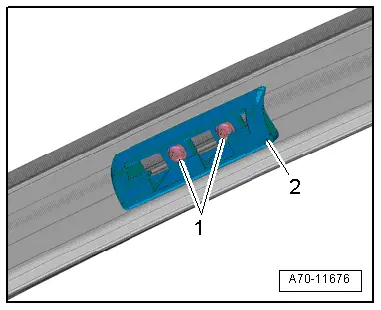
- If installed, remove the screws -1- and remove the mounting eye -2- from the window frame.

A70-11676

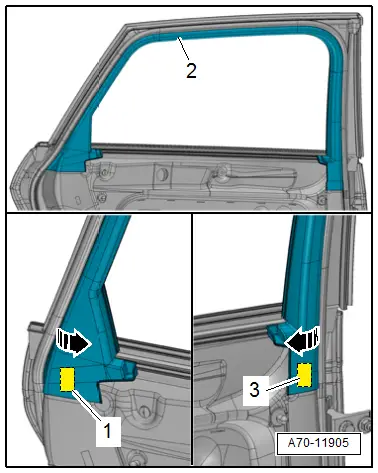
- Loosen the trim on the ends from the adhesive pads -1 and 3- from the door, using the -3409-.

- Pry off the window frame trim -2- starting at the bottom and working along the length of the window guide to the upper rear in direction of -arrows-.

- Remove the trim downward from the window frame.

A70-11905

Installing

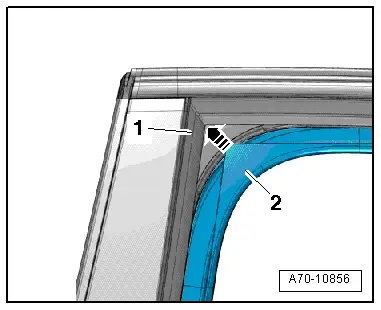
- Insert window frame trim -2- at upper front in the window guide -1- in direction of -arrow-.

A70-10856

- Install window frame trim -2- along the entire length of the window guide.

- Remove all new part protective foil from the adhesive pads.

- Push the trim in the area of the adhesive pads firmly -1, and 3- against the door.

  Note

Ignore the -arrows-.

Further installation is the reverse order of removal.

Installation notes, for example tightening specifications, replacing components. Refer to → Chapter "Overview - Rear Door Trim Panel".

A70-11905

    READ NEXT:

     Overview - Instrument Panel

    1 - Light Switch Trim Removing and Installing. Refer to → Chapter "Light Switch Trim, Removing and Installing". Press on until it engages audibly 2 - Instrument Panel

     Instrument Panel Side Cover, Removing and Installing

    Special tools and workshop equipment required Trim Removal Wedge -3409- Removing - Pry the instrument panel side cover -1- off using the -3409--arrow- and remove it. Installing Install in

     Speaker Trim, Removing and Installing

    Special tools and workshop equipment required Wedge Set -T10383- Removing the Center Speaker Trim   Caution There is a risk of damaging the speaker trim. Proceed very carefully when removin

    SEE MORE:

     Adjusting the display

    Fig. 5 Upper display: adjusting the display Switching the view Press the VIEW button to switch between the default view (1) and the enhanced view (2). Adjusting the layout Depending on the vehicle equipment, various layouts may be available. Applies to: MMI: Select on the home screen: SETT

     Overview - Display Control Head

    Overview - Front Display Control Head, "Low" or "Mid" A/C System General Information. Refer to → Chapter "A/C System Control and Regulation Components in Vehicle Interior". Depending on vehicle equipment, there are different versions of the A/C system for the Audi Q7. Make sure to use t

    © 2019-2025 Copyright www.a-q7.com