Audi Q7: Windshield Washer System
Overview - Windshield Washer System
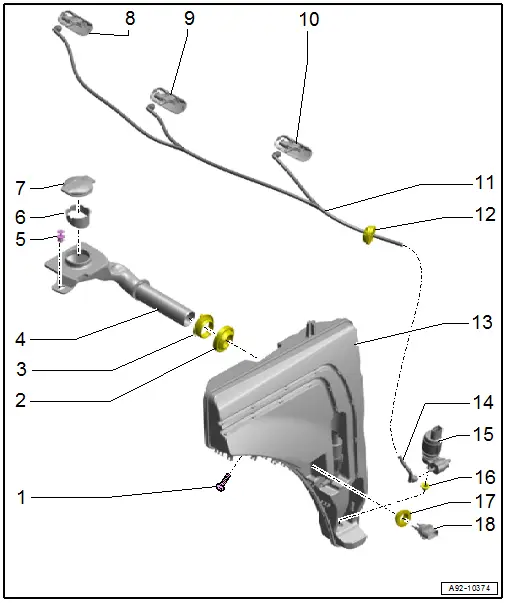
1 - Bolt
- 8 Nm
2 - Gasket
- Replace if damaged.
3 - Grommet
- Replace if damaged.
4 - Filler Tube
- For the washer fluid reservoir
- Removing and installing. Refer to → Chapter "Washer Fluid Reservoir Filler Neck, Removing and Installing".
5 - Expanding Rivet
6 - Screen
7 - Cap
- For the filler neck
8 - Right Washer Nozzle
- With Right Washer Nozzle Heater -Z21-
- Removing and installing. Refer to → Chapter "Washer Nozzles, Removing and Installing".
- Adjusting. Refer to → Chapter "Washer Nozzles, Adjusting".
9 - Center Washer Nozzle
- With Center Washer Nozzle Heater -Z114-
- Removing and installing. Refer to → Chapter "Washer Nozzles, Removing and Installing".
- Adjusting. Refer to → Chapter "Washer Nozzles, Adjusting".
10 - Left Washer Nozzle
- with Left Washer Nozzle Heater -Z20-
- Removing and installing. Refer to → Chapter "Washer Nozzles, Removing and Installing".
- Adjusting. Refer to → Chapter "Washer Nozzles, Adjusting".
11 - Washer Fluid Hose
- From the windshield washer pump
12 - Grommet
- For the washer fluid hose in the hood
13 - Washer Fluid Reservoir
- For front/rear window washer system and headlamp washer system
- Removing and installing. Refer to → Chapter "Washer Fluid Reservoir, Removing and Installing".
14 - Washer Fluid Hose
- To the washer nozzles
15 - Windshield Washer Pump -V5-
- For the front and rear window washer system
- Removing and installing. Refer to → Chapter "Windshield Washer Pump, Removing and Installing".
16 - Grommet
- Replace if damaged.
17 - Grommet
- Replace if damaged.
18 - Windshield Washer Fluid Level Sensor -G33-
- Removing and installing. Refer to → Chapter "Windshield Washer Fluid Level Sensor, Removing and Installing".
Washer Fluid Reservoir, Removing and Installing
Washer Fluid Reservoir Filler Neck, Removing and Installing
Special tools and workshop equipment required
- Drip Tray
Removing
- Place a drip tray under the washer fluid reservoir.
- Remove the plenum chamber cover. Refer to → Body Exterior; Rep. Gr.50; Bulkhead; Plenum Chamber Cover, Removing and Installing.
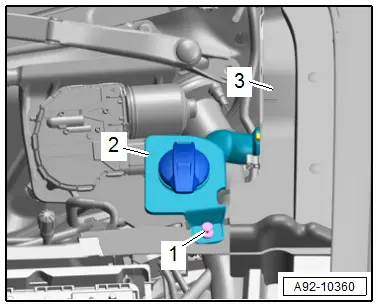
- Remove the expanding rivet -1-.
- Remove the filler neck -2- from the washer fluid reservoir and the body breakout -3- to the right side.
Installing
Install in the reverse order of removal while noting the following:
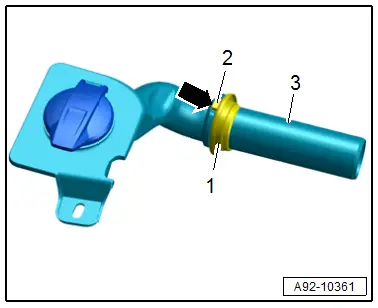
- Slide the grommet -1- all the way onto the filler tube for the filler neck -3-.
- The tab -2- must fit into the opening -arrow- on the filler tube.
- Insert the filler neck into the windshield washer fluid reservoir.
- Pay attention that the gasket is not crushed when sliding it in the washer fluid reservoir.
Tightening Specifications
- Refer to → Chapter "Overview - Windshield Washer System"
Washer Fluid Reservoir, Removing and Installing
Removing
- Remove the washer fluid reservoir filler neck. Refer to → Chapter "Washer Fluid Reservoir Filler Neck, Removing and Installing".
- Remove the left front wheel housing liner rear section. Refer to → Body Exterior; Rep. Gr.66; Wheel Housing Liner; Front Wheel Housing Liner, Removing and Installing.
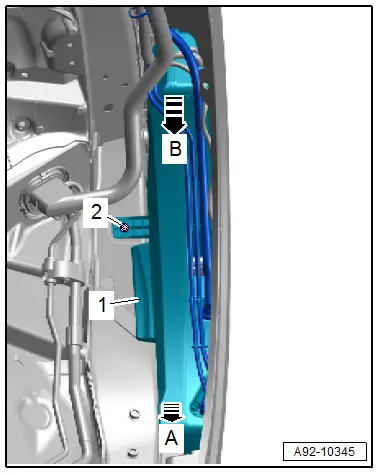
- Remove the bolt -2-.
- Pivot the washer fluid reservoir -1- below toward the front in direction of -arrow A- and then and pull it downward in direction of -arrow B-.
- At the same time the lower and upper securing tabs are removed from the mounts.
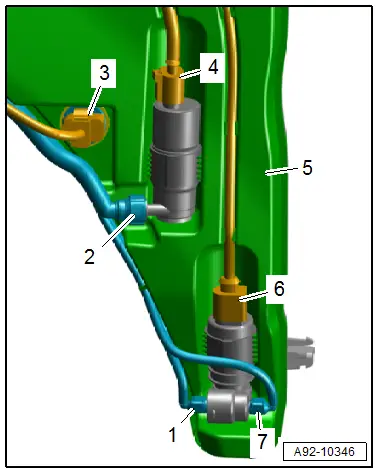
- Disconnect the connectors -3, 4 and 6-.
- Remove the washer fluid hose -1 and 7- from the windshield washer pump.
- Remove the hose -2- from the headlamp washer pump.
- Free up the wire.
- Remove the washer fluid reservoir -5-.
Installing
Install in the reverse order of removal while noting the following:
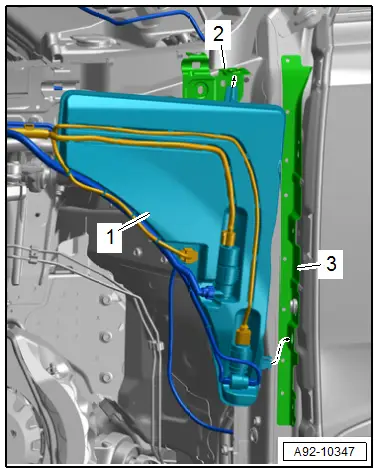
- Pay attention when inserting the washer fluid reservoir -1- that the securing tabs engage in the mounts -2 and 3-.
Tightening Specifications
- Refer to → Chapter "Overview - Windshield Washer System"
Windshield Washer Fluid Level Sensor, Removing and Installing
Special tools and workshop equipment required
- Drip Tray
Removing
- Remove the washer fluid reservoir until the windshield washer fluid level sensor is accessible. Refer to → Chapter "Washer Fluid Reservoir, Removing and Installing".
- Place a drip tray under the washer fluid reservoir.
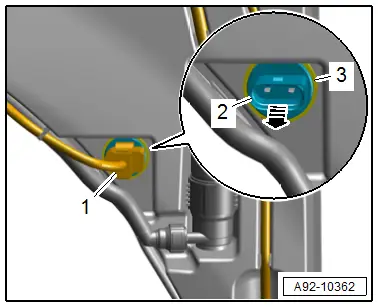
- Disconnect the connector -1-.
- Remove the Windshield Washer Fluid Level Sensor -G33--2- from the washer fluid reservoir.
Installing
Install in the reverse order of removal while noting the following:
- Check the grommet -3- for damage.
Windshield Washer Pump, Removing and Installing
Special tools and workshop equipment required
- Elbow Assembly Tool -T10118-
- Drip Tray
Removing
- Remove the washer fluid reservoir until the windshield washer pump is accessible. Refer to → Chapter "Washer Fluid Reservoir, Removing and Installing".
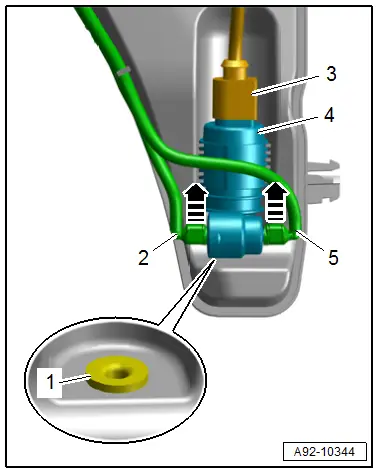
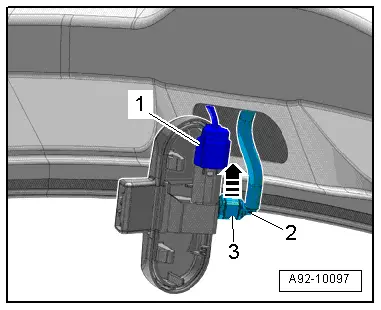
- Disconnect the connector -3- using an Elbow Assembly Tool -T10118-.
- Place a drip tray under the washer fluid reservoir.
- Open the clips in direction of -arrows- and remove the windshield washer fluid hoses -2 and 5- from the windshield washer pump -4-.
- Remove the windshield washer pump upward from the washer fluid reservoir.
Installing
Install in the reverse order of removal while noting the following:
- Check the grommet -1- for damage.
Washer Nozzles, Removing and Installing
Removing
- Unclip the washer nozzle -1- for the windshield washer system from the hood in the direction of -arrow-.
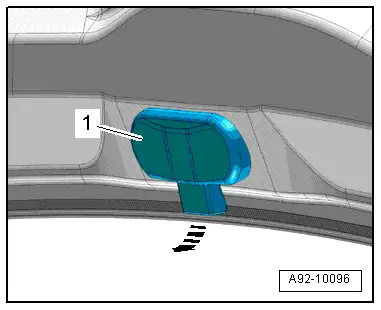
- Release the clip -3- in direction of -arrow- and remove the washer fluid hose -2- from the windshield washer system washer nozzle.
- Disconnect the connector -1- if equipped.
Installing
Install in the reverse order of removal while noting the following:
- When connecting the washer fluid hose, make sure that the clip engages audibly into the washer fluid hose connection.
- Install the windshield washer system washer nozzle in the hood.
Washer Nozzles, Adjusting
Adjust the washer nozzles for the windshield washer system.
- Clean the dirty washer nozzle if the spray field does not match the specifications.
Washer Nozzle, Cleaning
 NOTICE
Risk of damaging the washer nozzles by misuse.
- Do not clean the spray nozzles using any objects.
- Remove the washer nozzle. Refer to → Chapter "Washer Nozzles, Removing and Installing".
- Rinse the washer nozzle with clean water opposite the spray direction.
- To remove any remaining contaminants, the washer nozzle may only be blown out with compressed air in the opposite direction of spray.
- If the spray field still does not match the specifications, replace the washer nozzle.

