
Audi Q7: Battery Interrupt Igniter
Audi Q7 (4M) 2016-2026 Workshop Manual / Body / Body Interior / Passenger Protection, Airbags, Seat Belts / Battery Interrupt Igniter
Overview - Battery Interrupt Igniter
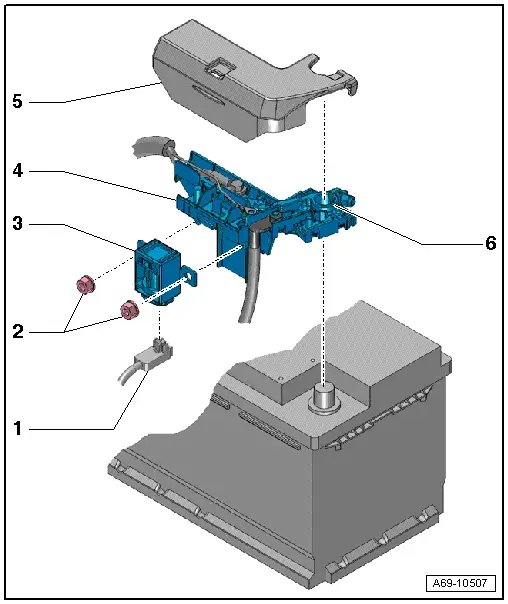
1 - Connector
- For the Battery Interrupt Igniter -N253-
2 - Nuts
- Tightening specification. Refer to → Electrical Equipment; Rep. Gr.97; Relay Panels, Fuse Panels and E-Boxes; Component Location Overview - Relay Panels, Fuse Panels and E-Boxes.
3 - Battery Interrupt Igniter -N253-
- Available only together with -4-
4 - Fuse Panel A -SA-
- Removing and installing. Refer to → Electrical Equipment; Rep. Gr.97; Relay Panels, Fuse Panels and E-Boxes; Component Location Overview - Relay Panels, Fuse Panels and E-Boxes.
5 - Cover
- For Fuse Panel A -SA-
6 - Positive Terminal Clamp
- Tightening specification. Refer to → Electrical Equipment; Rep. Gr.27; Battery; Overview - Battery.
Battery Interrupt Igniter, Removing and Installing
 WARNING
- Follow all safety precautions when working on pyrotechnic components. Refer to → Chapter "Safety Precautions for Pyrotechnic Components".
- Follow all regulations when disposing of pyrotechnic components. Refer to → Chapter "Airbag, Belt Tensioner and Battery Cut-Out Units, Storing, Transporting and Disposing (Pyrotechnic Components)".
 Note
Note
- If the Airbag Indicator Lamp -K75- turns on after a vehicle accident, check whether crash data is stored using the Vehicle Diagnostic Tester. If this is the case, check if the malfunction "Resistance too high" for the Battery Interrupt Igniter -N253- is stored in the Diagnostic Trouble Code (DTC) memory. If this is the case, Battery Interrupt Igniter -N253- must be replaced.
- The Battery Interrupt Igniter -N253- interrupts the electrical circuit each time an airbag is deployed. The Battery Interrupt Igniter -N253- must be replaced after a deployment.
- The Battery Interrupt Igniter -N253- is available as a replacement part only together with Fuse Panel A -SA-.
- Fuse Panel A - SA-, Removing and installing. Refer to → Electrical Equipment; Rep. Gr.97; Relay Panels, Fuse Panels and E-Boxes; Component Location Overview - Relay Panels, Fuse Panels and E-Boxes.

