Audi Q7: Bench Seat/Single Seat, Removing and Installing
Seat Low, Removing and Installing, Outer Second Row
Special tools and workshop equipment required
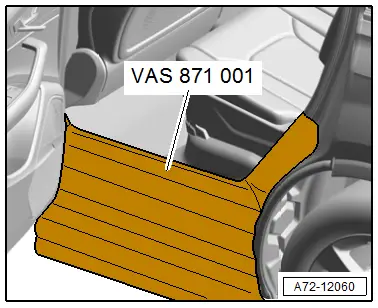
- Universal Vehicle Protector -VAS871001-
- Airbag Lockout Adapter -VAS6282-
Removing
 WARNING
- Follow all safety precautions when working on pyrotechnic components. Refer to → Chapter "Safety Precautions for Pyrotechnic Components".
- Before handling pyrotechnic components (for example, disconnecting the connector), the person handling it must "discharge static electricity". This can be done by briefly touching the door striker pin, for example.
- Disconnect the battery ground cable with the ignition turned on. Refer to → Electrical Equipment; Rep. Gr.27; Battery; Battery, Disconnecting and Connecting.
- Move the front seats all the way forward.
- Remove the seat cushion. Refer to → Chapter "Cover and Cushion, Removing and Installing, Second Row Seat Pan Low".
- Remove the stand support trim panel on the side sill side. Refer to → Chapter "Stand Support Front Trim Panel on Side Sill Side, Removing and Installing, Seat Low, Outer Second Row".
- Remove the stand support trim panel on the tunnel side. Refer to → Chapter "Stand Support Tunnel-Side Trim Panel, Removing and Installing, Seat Low, Second Row".
- Disconnect the connectors to the connector station, and connect the -VAS6282- to the thorax airbag connector. Refer to → Chapter "Airbag Adapter, Connecting and Disconnecting".
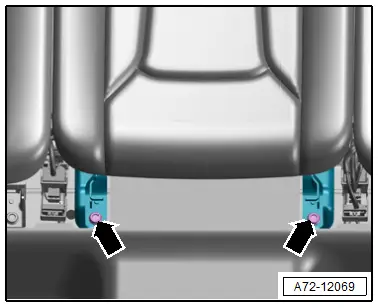
- Remove the bolts -arrows-.
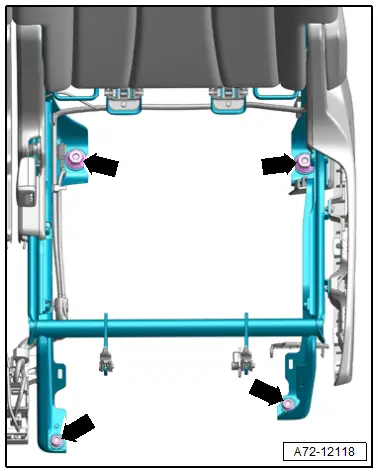
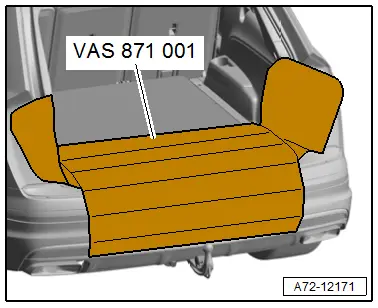
- To protect the sill panel before prying out the rear seat, attach the -VAS871001- as shown.
- Remove the seat from the vehicle with a second technician.

Installing
 WARNING
- Follow all safety precautions when working on pyrotechnic components. Refer to → Chapter "Safety Precautions for Pyrotechnic Components".
- Before handling pyrotechnic components (for example, connecting the connector), the person handling it must "discharge static electricity". This can be done by briefly touching the door striker pin, for example.
Install in reverse order of removal and note the following:
 Note
Note
Make sure the connectors are pushed in all the way and that they engage audibly.
- Remove the -VAS6282- and connect the connector to the connector station. Refer to → Chapter "Airbag Adapter, Connecting and Disconnecting".
 WARNING
Repairing pyrotechnic components (for example the airbag and seat belt tensioner) incorrectly increases the risk of unintentional deployments when the battery is connected.
- The ignition must be on when connecting the battery.
- For personal safety when connecting the battery, stay out of the deployment area of the airbag and maintain a distance from the seat belt tensioners/seat belts.
- Make sure that there are no other people inside the vehicle at the time when the battery is connected.
- Connect the battery ground cable with the ignition turned on. Refer to → Electrical Equipment; Rep. Gr.27; Battery; Battery, Disconnecting and Connecting.
 Note
Note
If the Airbag Indicator Lamp -K75- indicates a fault, check the Diagnostic Trouble Code (DTC) memory, erase it and check it again using the Vehicle Diagnostic Tester.
Installation notes, for example tightening specifications, replacing components. Refer to → Chapter "Overview - Bench Seat/Single Seat, Seat Low, Outer Second Row Seat".
Seat Low, Removing and Installing, Center Second Row
Special tools and workshop equipment required
- Universal Vehicle Protector -VAS871001-
Removing
- Move the front seats all the way forward.
- Remove the seat cushion. Refer to → Chapter "Cover and Cushion, Removing and Installing, Second Row Seat Pan Low".
- Remove the stand support trim panels on the tunnel side. Refer to → Chapter "Stand Support Tunnel-Side Trim Panel, Removing and Installing, Seat Low, Second Row".
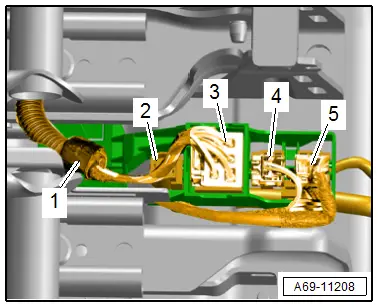
- Disconnect the connector -5- for the Center Second Row Seat Belt Switch -F391- and free up the wire.
 Note
Note
Ignore the other -items-.

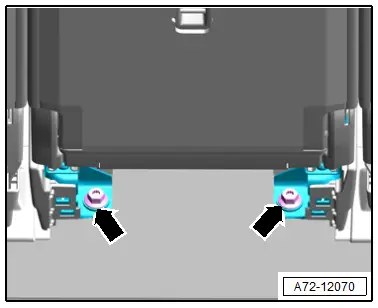
- Remove the bolts -arrows-.
- Fold the backrests forward.
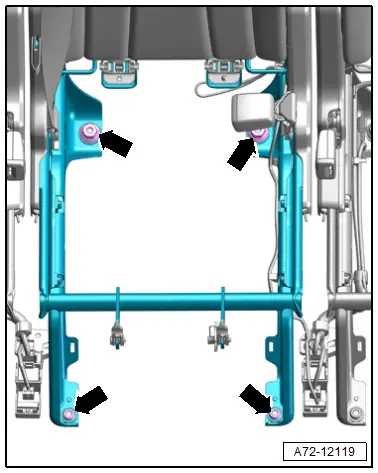
- To protect the sill panel before prying out the rear seat, attach the -VAS871001- as shown.
- Remove the seat from the vehicle with a second technician.

Installing
Install in reverse order of removal.
Installation notes, for example tightening specifications, replacing components. Refer to → Chapter "Overview - Bench Seat/Single Seat, Seat Low, Center Second Row Seat".
Seat High, Removing and Installing, Outer Second Row
Special tools and workshop equipment required
- Universal Vehicle Protector -VAS871001-
Removing
 WARNING
- Follow all safety precautions when working on pyrotechnic components. Refer to → Chapter "Safety Precautions for Pyrotechnic Components".
- Before handling pyrotechnic components (for example, disconnecting the connector), the person handling it must "discharge static electricity". This can be done by briefly touching the door striker pin, for example.
- Disconnect the battery ground cable with the ignition turned on. Refer to → Electrical Equipment; Rep. Gr.27; Battery; Battery, Disconnecting and Connecting.
- Move the front seats all the way forward.
- Remove the seat cushion. Refer to → Chapter "Cover and Cushion, Removing and Installing, Second Row Seat Pan High".
- Remove the hinge trim panel on the side sill side. Refer to → Chapter "Hinge Trim Panel on Side Sill Side, Removing and Installing, Seat High, Outer Second Row".
- Remove the hinge trim panel on the tunnel side. Refer to → Chapter "Hinge Tunnel-Side Trim Panel, Removing and Installing, Seat High, Outer Second Row".
- Disconnect the connectors to the connector station, and connect the -VAS6282- to the thorax airbag connector. Refer to → Chapter "Airbag Adapter, Connecting and Disconnecting".
- Slide seat toward rear.
- Remove the bolt -1- on the inside of the hinge.
 Caution
There is a risk of injury when removing the seat.
- The seat may only be removed when the tension is released on the gas-filled strut; the seat must be folded forward to do so.
- Secure the seat from tipping if the bolts at the hinges are loose.
- Only loosen the bolt -2- on the outer hinge, and do not remove it.
- Fold the backrest forward and fold the seat forward.
- Remove the bolt on the outer hinge completely.

- To protect the sill panel before prying out the rear seat, attach the -VAS871001- as shown.
- Remove the seat from the vehicle with a second technician.
Installing
 WARNING
- Follow all safety precautions when working on pyrotechnic components. Refer to → Chapter "Safety Precautions for Pyrotechnic Components".
- Before handling pyrotechnic components (for example, connecting the connector), the person handling it must "discharge static electricity". This can be done by briefly touching the door striker pin, for example.
Install in reverse order of removal and note the following:
- Backrest is folded forward and seat is folded forward.
- First tighten the bolts -1 and 2- by hand only.
- Fold the seat backward and let it lock into place so that it aligns.
- Slide the seat toward the rear and tighten the bolts.

 Note
Note
Make sure the connectors are pushed in all the way and that they engage audibly.
- Remove the -VAS6282- and connect the connector to the connector station. Refer to → Chapter "Airbag Adapter, Connecting and Disconnecting".
 WARNING
Repairing pyrotechnic components (for example the airbag and seat belt tensioner) incorrectly increases the risk of unintentional deployments when the battery is connected.
- The ignition must be on when connecting the battery.
- For personal safety when connecting the battery, stay out of the deployment area of the airbag and maintain a distance from the seat belt tensioners/seat belts.
- Make sure that there are no other people inside the vehicle at the time when the battery is connected.
- Connect the battery ground cable with the ignition turned on. Refer to → Electrical Equipment; Rep. Gr.27; Battery; Battery, Disconnecting and Connecting.
 Note
Note
If the Airbag Indicator Lamp -K75- indicates a fault, check the Diagnostic Trouble Code (DTC) memory, erase it and check it again using the Vehicle Diagnostic Tester.
Installation notes, for example tightening specifications, replacing components. Refer to → Chapter "Overview - Bench Seat/Single Seat, Seat High, Outer Second Row Seat".
Seat High, Removing and Installing, Center Second Row
Special tools and workshop equipment required
- Universal Vehicle Protector -VAS871001-, not illustrated
Removing
- Move the front seats all the way forward.
- Slide seat toward rear.
- Remove the hinge trim panel on the tunnel side. Refer to → Chapter "Hinge Tunnel-Side Trim Panel, Removing and Installing, Seat High, Outer Second Row".
- Disconnect the connector -5- for the Center Second Row Seat Belt Switch -F391- and free up the wire.
 Note
Note
Ignore the other -items-.
- Remove the bolts -arrows-.
- Fold the backrests of the outer seats forward and fold the seats forward.
- Push seat forward.
- Fold the backrest forward.
- Remove the left and right seat rail trim panel. Refer to → Chapter "Seat Rail Trim Panel, Removing and Installing, Seat High, Center Second Row".
- Remove the bolts -arrows-.
- To protect the sill panel before prying out the rear seat, attach the -VAS871001- as shown.
- Remove the seat from the vehicle with a second technician.

Installing
Install in reverse order of removal.
Installation notes, for example tightening specifications, replacing components. Refer to → Chapter "Overview - Bench Seat/Single Seat, Seat High, Center Second Row Seat".
Third Row Seat, Removing and Installing
Special tools and workshop equipment required
- Universal Vehicle Protector -VAS871001-, not illustrated
Removing
- Move the second row seats into the front most position.
- Fold the outer second row seats forward.
- Remove the guide for the lower child seat anchor. Refer to → Chapter "Lower Child Seat Anchor Guide, Removing and Installing, Second and Third Row".
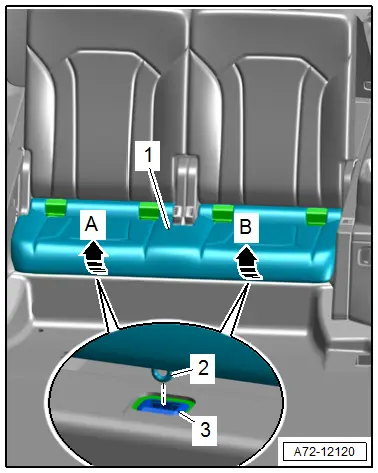
- Grasp with both hands on one side under the seat cushion frame.
- Pull the seat cushion -1- up forcefully with both hands -arrow A- so the wire hooks -2- on the seat cushion frame release from the mounting grommet -3-.
- Repeat the procedure on the opposite side -arrow B-.
- Disengage the seat cushion from the seat frame and remove from the vehicle.
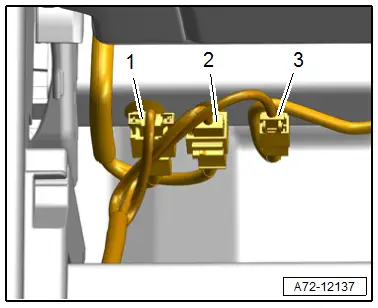
- Disconnect the connectors -1, 2 and 3- by releasing the catch.
- Repeat the process on the opposite side.
- Remove the luggage compartment floor support. Refer to → Chapter "Luggage Compartment Support, Removing and Installing".
- Remove the bolts -1 and 2-.
 Note
Note
A second technician is required to remove the seat frame -3-.
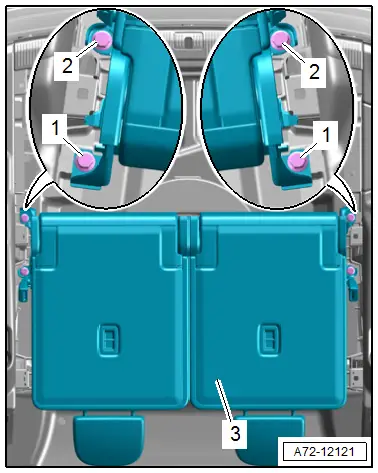
- To protect the rear bumper before prying out the seat frame, install the -VAS871001- as shown.
- With the help of a second technician, pry out the seat frame through the lid opening out of the vehicle.
Installing
- Align the seat frame in the vehicle and tighten the bolts first hand-tight.
- Tighten the bolts in the sequence -1 and 2-.
Installation is performed in reverse order of removal, while noting the following:
 Note
Note
Make sure the connectors are pushed in all the way and that they engage audibly.
Installation notes, for example tightening specifications, replacing components. Refer to → Chapter "Overview - Bench Seat/Single Seat, Third Row Seat".

