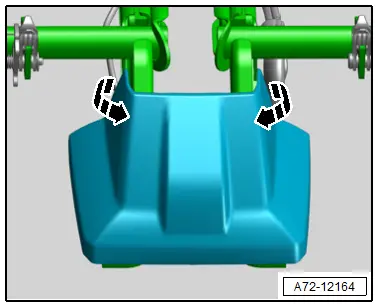
Audi Q7: Stand Support Tunnel-Side Trim Panel, Removing and Installing, Seat Low, Second Row
Removing
- Release the hooks in direction of -arrows- and remove the trim panel forward.
Installing
Install in reverse order of removal.
Installation notes, for example tightening specifications, replacing components. Refer to → Chapter "Overview - Bench Seat/Single Seat, Seat Low Trim Panels, Center Second Row Seat".
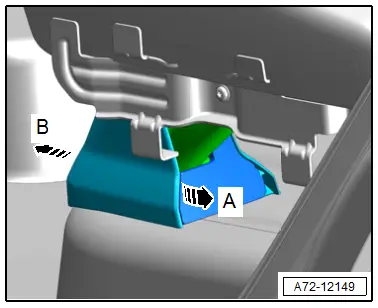
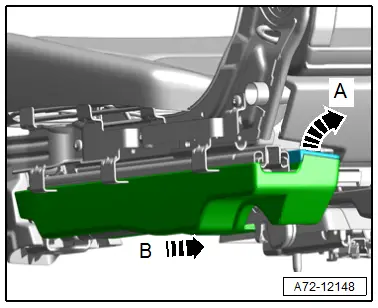
Stand Support Front Trim Panel on Side Sill Side, Removing and Installing, Seat Low, Outer Second Row
Removing
- Remove the seat side trim on side sill side. Refer to → Chapter "Seat Side Trim on Side Sill Side, Removing and Installing, Outer Second Row Seat".
- Release the hooks in direction of -arrow A- and remove the trim panel forward in direction of -arrow B-.
Installing
Install in reverse order of removal.
Installation notes, for example tightening specifications, replacing components. Refer to → Chapter "Overview - Bench Seat/Single Seat, Seat Low Trim Panels, Outer Second Row Seat".
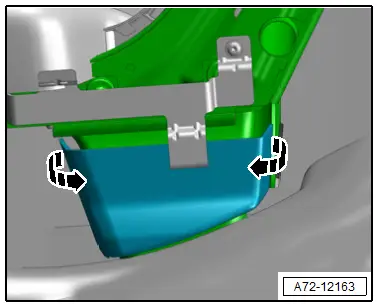
Stand Support Rear Trim Panel on Side Sill Side, Removing and Installing, Seat Low, Outer Second Row
Removing
- Release the hooks -arrows- and remove the trim panel forward.
Installing
Install in reverse order of removal.
Installation notes, for example tightening specifications, replacing components. Refer to → Chapter "Overview - Bench Seat/Single Seat, Seat Low Trim Panels, Outer Second Row Seat".
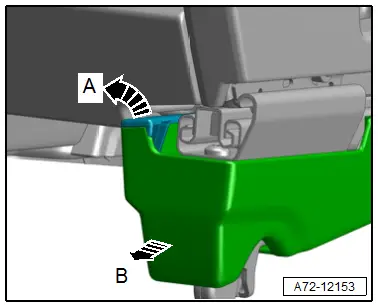
Seat Rail Tunnel-Side Trim Panel, Removing and Installing, Seat High, Outer Second Row
Removing
- Fold the seat forward.
- Remove the rear cover. Refer to → Chapter "Rear Cover, Removing and Installing, Seat High, Second Row".
- Open the latch -arrow A- and remove the trim panel toward the rear -arrow B-.
Installing
Install in reverse order of removal.
Installation notes, for example tightening specifications, replacing components. Refer to → Chapter "Overview - Bench Seat/Single Seat, Seat High Trim Panels, Outer Second Row Seat".
Seat Rail Trim Panel on Side Sill Side, Removing and Installing, Seat High, Outer Second Row
Removing
- Fold the seat forward.
- Remove the rear cover. Refer to → Chapter "Rear Cover, Removing and Installing, Seat High, Second Row".
- Remove the seat side trim on side sill side. Refer to → Chapter "Seat Side Trim on Side Sill Side, Removing and Installing, Outer Second Row Seat".
- Free up the wire for the backrest heating.
- Open the latch in direction of -arrow A- and remove the trim panel toward the rear in direction of -arrow B-.
Installing
Install in reverse order of removal.
Installation notes, for example tightening specifications, replacing components. Refer to → Chapter "Overview - Bench Seat/Single Seat, Seat High Trim Panels, Outer Second Row Seat".
Seat Rail Trim Panel, Removing and Installing, Seat High, Center Second Row
Removing
- Fold the outer seat forward.
- Fold the center backrest forward.
- First pull the inner piece -1- of the trim panel off toward the rear in direction of -arrow-.
- Then pull off the outer piece -2- toward the rear and disengage.

Installing
Install in reverse order of removal.
Installation notes, for example tightening specifications, replacing components. Refer to → Chapter "Overview - Bench Seat/Single Seat, Seat High Trim Panels, Center Second Row Seat".
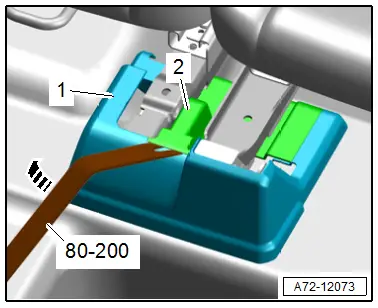
Hinge Tunnel-Side Trim Panel, Removing and Installing, Seat High, Outer Second Row
Special tools and workshop equipment required
- Pry Lever -80-200-
 Note
Note
- To avoid damaging the trim panels, the - 80-200- must be checked for grooves or burrs on the tips.
- Replace damaged trim panels.
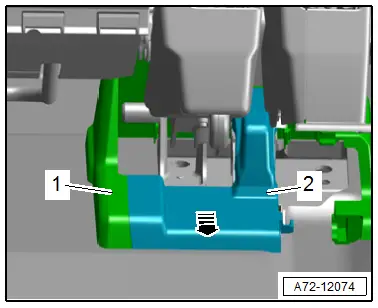
Removing
- Using the -80-200-, remove the inner piece -2- of the trim panel from the outer piece -1- in direction of -arrow-.
- Fold the outer seat forward.
- Remove the inner piece -2- of the trim panel in the direction of -arrow- from the outer piece -1-.
Installing
Install in reverse order of removal.
Installation notes, for example tightening specifications, replacing components. Refer to → Chapter "Overview - Bench Seat/Single Seat, Seat High Trim Panels, Outer Second Row Seat".
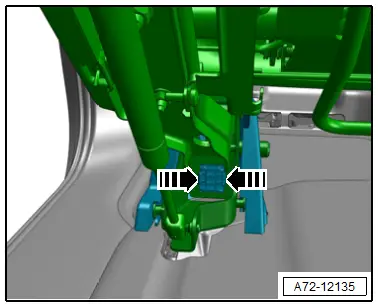
Hinge Trim Panel on Side Sill Side, Removing and Installing, Seat High, Outer Second Row
Removing
- Fold the outer seat forward.
- Release the hooks in direction of -arrows- and remove the outer trim panel forward.
Installing
Install in reverse order of removal.
Installation notes, for example tightening specifications, replacing components. Refer to → Chapter "Overview - Bench Seat/Single Seat, Seat High Trim Panels, Outer Second Row Seat".

