Audi Q7: Front Backrest, Removing and Installing
Front Backrest, Removing and Installing
 Caution
This procedure contains mandatory replaceable parts. Refer to component overview prior to starting procedure.
Mandatory Replacement Parts
- Bolt - Threaded Plate to Seat Pan
Removing
 WARNING
- Follow all safety precautions when working on pyrotechnic components. Refer to → Chapter "Safety Precautions for Pyrotechnic Components".
- Before handling pyrotechnic components (for example, disconnecting the connector), the person handling it must "discharge static electricity". This can be done by briefly touching the door striker pin, for example.
- Remove the front seat. Refer to → Chapter "Front Seat, Removing and Installing".
- Fasten the front seat on the -VAS6136-. Refer to → Chapter "Front Seat, Mounting on Fixture for Seat Repair".
- Remove the tunnel-side seat side trim. Refer to → Chapter "Seat Side Trim on Tunnel Side, Removing and Installing".
- Remove the side sill side seat side trim and the bracket. Refer to → Chapter "Seat Side Trim On Side Sill Side, Removing and Installing".
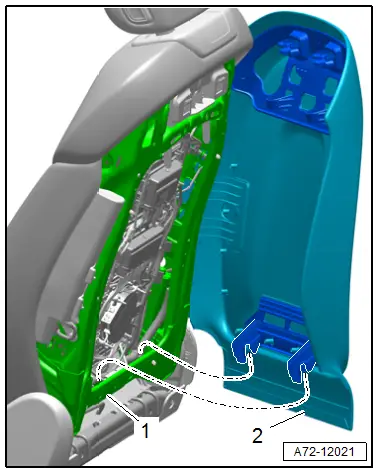
- Disconnect the electrical connectors for the backrest and free up the disconnected wiring harnesses. Refer to → Chapter "Modular Wiring Routing, Disconnecting and Connecting".
 Note
Note
The wiring harness between the connection point and the thorax airbag is continuous.
Vehicles with
- Press the safety catch -arrow A- to disconnect the connector -1-
- Remove the pneumatic line -2- by carefully lifting the safety catch slightly with a small screwdriver -arrow B-
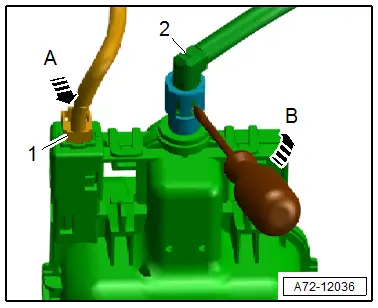
- Disconnect the pneumatic lines -1- to the seat bolster adjusters on the left and right side of the seat by carefully lifting the safety catch slightly using a small screwdriver -arrow-

Continuation for All Seats
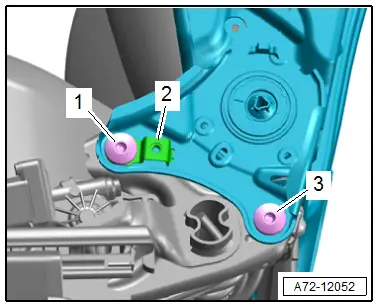
- Remove the left and right bolts -1 and 3- from the backrest hinge.
- If equipped, remove the threaded plate -2-.
- Remove the backrest from the seat pan by carefully guiding the wiring harnesses.
Installing
 WARNING
- Follow all safety precautions when working on pyrotechnic components. Refer to → Chapter "Safety Precautions for Pyrotechnic Components".
- Before handling pyrotechnic components (for example, connecting the connector), the person handling it must "discharge static electricity". This can be done by briefly touching the door striker pin, for example.
- Observe all measures when installing the front seat. Refer to → Chapter "Front Seat, Removing and Installing".
Install in reverse order of removal.
Installation notes, for example tightening specifications, replacing components. Refer to → Chapter "Overview - Front Backrest".
Backrest Cover, Removing and Installing
Removing
- Remove the headrest. Refer to → Chapter "Headrest, Removing and Installing".
- Move the front seat all the way forward into its highest position.
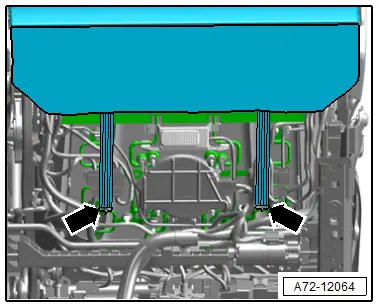
- Depending on vehicle equipment, disengage either 2 or 4 tension straps -arrows- on the bottom of the seat pan.
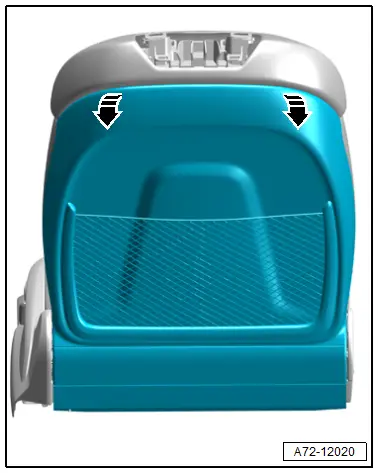
- Grab the backrest cover at the upper edge and pull toward the rear out of the retainer -arrows-.
- Disengage the lower backrest cover hooks -2- from the backrest -1- and remove the backrest cover.
Installing
Install in reverse order of removal and note the following:
- Check if the backrest cover is correctly latched.
Installation instructions: for example tightening specifications, replacing components. Refer to → Chapter "Overview - Front Backrest".
Spring Mat, Removing and Installing
Removing
 WARNING
- Follow all safety precautions when working on pyrotechnic components. Refer to → Chapter "Safety Precautions for Pyrotechnic Components".
- Before handling pyrotechnic components (for example, disconnecting the connector), the person handling it must "discharge static electricity". This can be done by briefly touching the door striker pin, for example.
- Remove the front seat. Refer to → Chapter "Front Seat, Removing and Installing".
- Fasten the front seat on the -VAS6136-. Refer to → Chapter "Front Seat, Mounting on Fixture for Seat Repair".
- Remove the backrest seat cover and cushion. Refer to → Chapter "Backrest Cover and Cushion, Removing and Installing, Seat without Pneumatic Components".
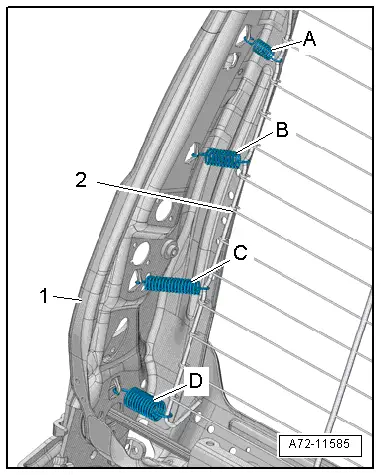
- Remove the springs -A through D- from the backrest frame -1-.
 Note
Note
The tension springs -A through D- can also stay engaged in the backrest frame -1- and the spring mat -2- can be disengaged directly from the tension springs.
- Move the spring mat -2- forward.
- Remove the spring mat through the openings in the backrest frame.
Installing
 WARNING
- Follow all safety precautions when working on pyrotechnic components. Refer to → Chapter "Safety Precautions for Pyrotechnic Components".
- Before handling pyrotechnic components (for example, connecting the connector), the person handling it must "discharge static electricity". This can be done by briefly touching the door striker pin, for example.
Install in reverse order of removal and note the following:
- Label the springs as shown in the illustration.
 Note
Note
Make sure the connectors are pushed in all the way and that they engage audibly.
 WARNING
Repairing pyrotechnic components (for example the airbag and seat belt tensioner) incorrectly increases the risk of unintentional deployments when the battery is connected.
- The ignition must be on when connecting the battery.
- For personal safety when connecting the battery, stay out of the deployment area of the airbag and maintain a distance from the seat belt tensioners/seat belts.
- Make sure that there are no other people inside the vehicle at the time when the battery is connected.
- Connect the battery ground cable with the ignition turned on. Refer to → Electrical Equipment; Rep. Gr.27; Battery; Battery, Disconnecting and Connecting.
 Note
Note
If the Airbag Indicator Lamp -K75- signals a fault after installing, check the Diagnostic Trouble Code (DTC) memory, erase it and check it again use the Vehicle Diagnostic Tester.
Installation notes, for example tightening specifications, replacing components. Refer to → Chapter "Overview - Front Backrest".
Backrest Fan, Removing and Installing
Removing
- The backrest cover must be removed. Refer to → Chapter "Backrest Cover, Removing and Installing".
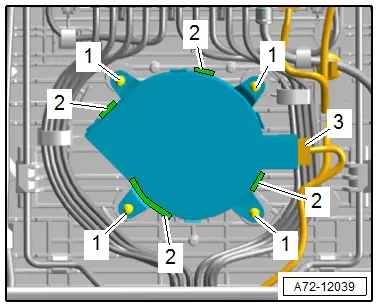
- Disconnect the connector -3-.
- Spray the rubber fasteners -1- for the elastic fan bracket with silicone-free lubricating spray and remove the fan from the rubber fasteners.
- Disengage the tabs -2- on the backrest fan and remove the fan.
Installing
Install in reverse order of removal.
Installation notes, for example tightening specifications, replacing components. Refer to → Chapter "Overview - Pneumatic System, Module Carrier/Lumbar Support/Seat Bolster Adjuster".

