Audi Q7: Seat Pan, Disassembling and Assembling
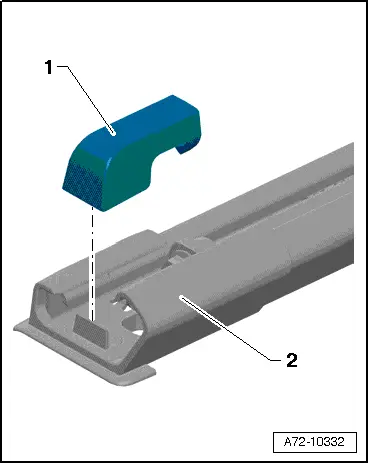
Front and Rear Seat Rail Cover, Removing and Installing
Special tools and workshop equipment required
- Trim Removal Wedge -3409-
Removing
- Move the front seat into its highest position.
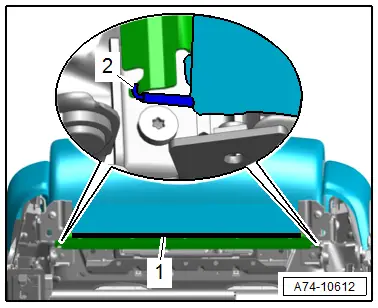
- Pry off the spindle cover -1- from the seat rail cover -2- and pry off the forward/back adjustment spindle using the -3409-.
 Caution
Risk of damaging the seat rail cover.
Proceed very carefully when removing and Installing.
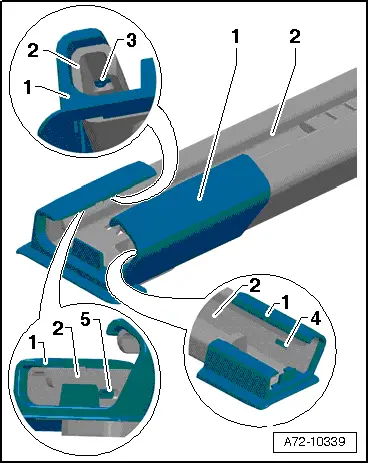
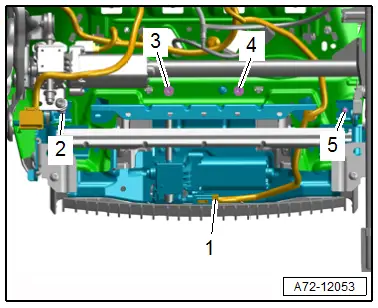
- Open the tabs -3, 4 and 5- on the seat rail carefully with a screwdriver and remove the cover -1- from the seat rail -2-.
Installing
Install in reverse order of removal.
Installation notes, for example tightening specifications, replacing components. Refer to → Chapter "Overview - Seat Pan, Trim Panels".
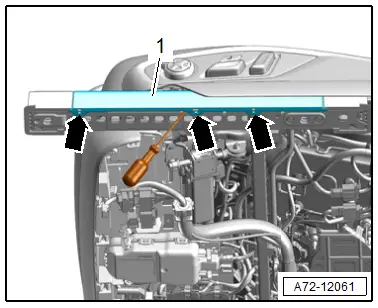
Upper Center Seat Rail Cover, Removing and Installing
Removing
- Move the front seat into its highest position.
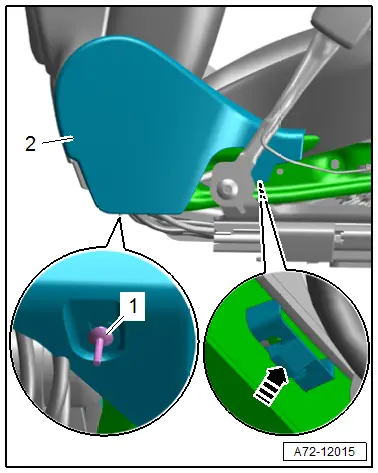
- Remove the seat side trim on side sill side. Refer to → Chapter "Seat Side Trim On Side Sill Side, Removing and Installing".
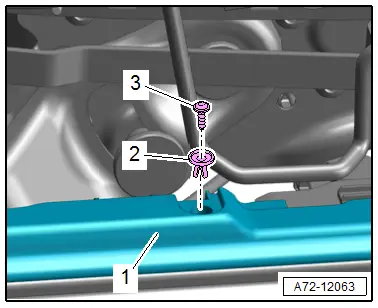
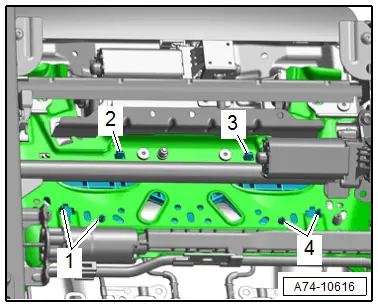
- Remove the threaded stud -3- and pull off the expanding clip -2- from the upper center seat rail cover -.-
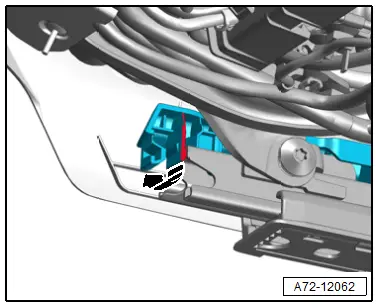
- Release the rear hook at the inside of the seat rail -arrow-, and lift up the rear cover slightly.
- Release the upper center seat rail cover by sliding in the direction of travel and remove it..
Installing
Install in reverse order of removal.
Installation notes, for example tightening specifications, replacing components. Refer to → Chapter "Overview - Seat Pan, Trim Panels".
Lower Center Seat Rail Cover, Removing and Installing
Removing
- Move the front seat into its highest position.
- Remove the front and rear cover for the seat rail on the side sill side. Refer to → Chapter "Front and Rear Seat Rail Cover, Removing and Installing".
- Unscrew the front seat and tip forward with the wires attached. Refer to → Chapter "Front Seat, Removing and Installing".
- Release the hooks -arrows- and disengage the lower center seat rail cover -1- at the upper edge.
Installing
Install in reverse order of removal.
Installation notes, for example tightening specifications, replacing components. Refer to → Chapter "Overview - Seat Pan, Trim Panels".
Seat Side Trim On Side Sill Side, Removing and Installing
Removing
- Move the front seat into its highest position.
- Manual seat: remove the seat height adjustment handle. Refer to → Chapter "Seat Height Adjuster, Removing and Installing, Seat Height Adjustment Handle".
- Remove the expanding rivet -3-.
- Open the retainer -1- at the inner front side of the seat side trim -arrow-.
- Remove the seat side trim -2- upward.
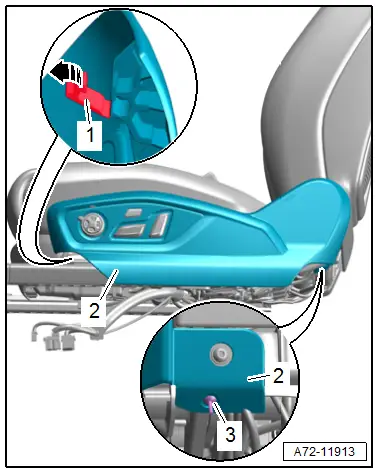
- Equipped on some models: disconnect the connectors, to do this press the release.
1 - Driver Seat Adjustment Control Head -E470-/ Front Passenger Seat Adjustment Control Head -E471-
2 - Driver Side Massage Function Button -E670-/ Front Passenger Massage Function Button -E671-
3 - Driver Seat Lumbar Support Adjustment Switch -E176-/ Front Passenger Seat Lumbar Support Adjustment Switch -E177-
- Free up the wiring harness.
- Remove the seat side trim on side sill side.
Remove the bracket for the seat side trim on the side sill side.
- Remove the bolts -arrows- and the bracket -1-.
Installing
Install in reverse order of removal and note the following:
 Note
Note
Make sure the connectors are pushed in all the way and that they engage audibly.
Installation notes, for example tightening specifications, replacing components. Refer to → Chapter "Overview - Seat Pan".
Seat Side Trim on Tunnel Side, Removing and Installing
Removing
- Unscrew the front seat and tip forward with the wires attached. Refer to → Chapter "Front Seat, Removing and Installing".
- Remove the expanding rivet -1-.
- Press down the tab in direction of -arrow- at the inside of the seat rail.
- Remove the seat side trim on the tunnel-side -2-.
Installing
Install in reverse order of removal.
Installation notes, for example tightening specifications, replacing components. Refer to → Chapter "Overview - Front Seat".
Front Seat Trim, Removing and Installing
Removing
- Move the front seat as far back as it will go.
- Release the hooks -arrows-, and remove the front seat trim -1- upward.
Installing
Install in reverse order of removal.
Installation notes, for example tightening specifications, replacing components. Refer to → Chapter "Overview - Seat Pan, Trim Panels".
Front Seat Trim Bracket, Removing and Installing
Removing
- Unscrew the front seat and tip to the rear with the wires attached. Refer to → Chapter "Front Seat, Removing and Installing".
- Remove the control module for seat functions. Refer to → Chapter "Seat Functions Control Module, Removing and Installing".
- Remove the compressor for the pneumatic seat. Refer to → Chapter "Pneumatic Seat Compressor, Removing and Installing".
- Remove the front seat trim. Refer to → Chapter "Front Seat Trim, Removing and Installing".
- Remove the bolts -2 and 4-.
- Disengage the hooks -1 and 5-.
- Remove the front seat trim bracket -3- forward from the guides -arrow-.
Installing
- Insert the bracket for the front trim -arrows-. When doing this, make sure the tabs -1- fit into the brackets -2, 3 and 4-.
Further installation is the reverse order of removal.
Installation notes, for example tightening specifications, replacing components. Refer to → Chapter "Overview - Seat Pan, Seat with Seat Depth Adjuster".
Seat Depth Adjuster, Removing and Installing
Special tools and workshop equipment required
- Engine/Transmission Holder - Seat Repair Fixture -VAS6136-
Removing
 WARNING
- Follow all safety precautions when working on pyrotechnic components. Refer to → Chapter "Safety Precautions for Pyrotechnic Components".
- Before handling pyrotechnic components (for example, disconnecting the connector), the person handling it must "discharge static electricity". For example, this can be done by briefly touching the door striker.
- Move seat depth adjuster forward.
- Remove the front seat. Refer to → Chapter "Front Seat, Removing and Installing".
- Fasten the front seat on the -VAS6136-. Refer to → Chapter "Front Seat, Mounting on Fixture for Seat Repair".
- Remove the bracket for the front trim. Refer to → Chapter "Front Seat Trim Bracket, Removing and Installing".
- Disengage the left and right rubber bands -2- at the seat depth adjuster and secure from sliding back using a cable tie, for example.
- Disengage the molding -1- for the cover on the seat depth adjuster.
- Disconnect and free up the connector -1-.
- Remove the bolts -2 to 5-.
- Release the tabs -2 and 3- and remove the seat cushion retaining plate together with the cover and seat cushion.
- Push the cover and seat cushion back or lift up.
- Disengage and remove the seat depth adjuster from the attachments -1 and 4-.
Installing
 WARNING
- Follow all safety precautions when working on pyrotechnic components. Refer to → Chapter "Safety Precautions for Pyrotechnic Components".
- Before handling pyrotechnic components (for example, connecting a connector), the person handling it must "discharge static electricity". For example, this can be done by briefly touching the door striker.
- Follow all the instructions when installing the front seat. Refer to → Chapter "Front Seat, Removing and Installing".
Install in reverse order of removal.
Installation instructions: for example tightening specifications, replacing components. Refer to → Chapter "Overview - Seat Pan, Seat with Seat Depth Adjuster".

