Audi Q7: Headrest, Removing and Installing
Headrest, Removing and Installing, Outer Second Row Seat
Removing
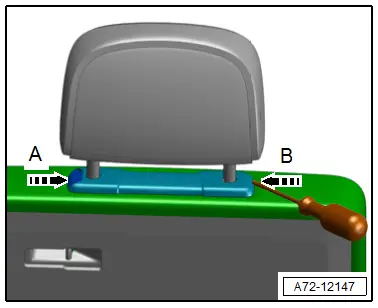
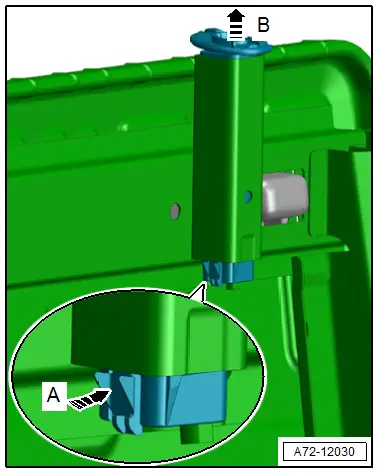
- Insert a small screwdriver into the opening sideways in the headrest guide trim and release the catch in direction of -arrow B-.
- Press the release button on the opposite side in direction of -arrow A- and remove the headrest upward at the same time.
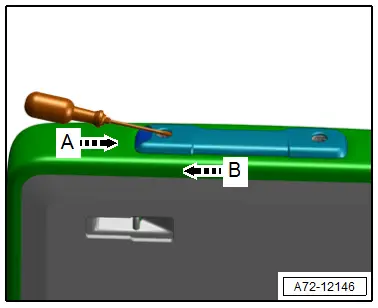
- Remove the headrest guide trim, as shown, by inserting a screwdriver between the trim and the headrest guide on the button side in direction of -arrow A-
- Remove the trim to side of the button in direction of -arrow B-.
Installing
Install in reverse order of removal.
Installation notes, for example tightening specifications, replacing components. Refer to → Chapter "Overview - Headrest and Headrest Guide, Outer Second Row Seat".
Headrest, Removing and Installing, Center Second Row Seat
Removing
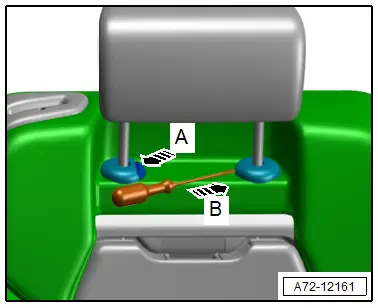
- Insert a small screwdriver into the opening sideways in the headrest guide trim and release the catch in direction of -arrow B-.
- Press the release button on the opposite side in direction of -arrow A- and remove the headrest upward at the same time.
Installing
Install in reverse order of removal.
Installation notes, for example tightening specifications, replacing components. Refer to → Chapter "Overview - Headrest and Headrest Guide, Center Second Row Seat".
Headrest, Removing and Installing, Third Row
 Caution
This procedure contains mandatory replaceable parts. Refer to component overview prior to starting procedure.
Mandatory Replacement Parts
- Bolts - Headrest to Seat
Removing
- Remove the third row seat. Refer to → Chapter "Third Row Seat, Removing and Installing".
- If the backrest is folded in, connect the backrest adjustment motor to an external power source and fold the backrest upright. Refer to → Wiring diagrams, Troubleshooting & Component locations.
- Remove cover and cushion. Refer to → Chapter "Cover and Cushion, Removing and Installing, Third Row Backrest".
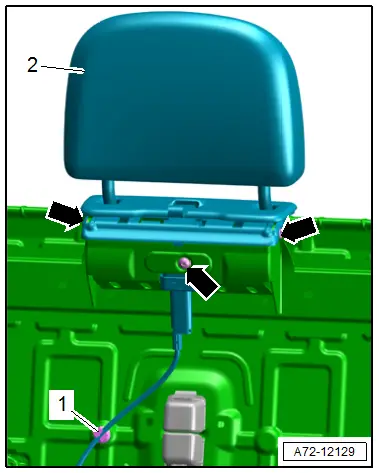
- Disengage the release cable bracket -3- from the backrest frame in direction of -arrow A-.
- Unclip the clip -2- for the release cable hook from the hook in direction of -arrow B-.
- Disengage the release cable hook from the clip and from the release lever -1-.
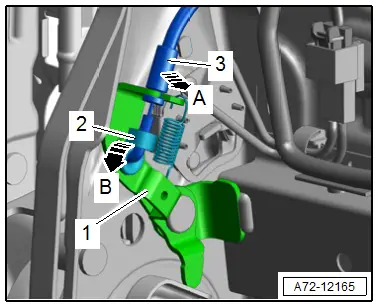
- Unclip the clip -1- for the release cable sheath.
- Remove the bolts -arrows-.
- Remove the headrest -2- upward from the backrest frame.
Installing and Adjusting
Install in reverse order of removal and note the following:
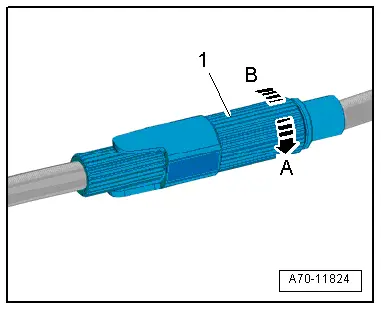
- The release cable must have little play.
- If required, adjust the release cable on the adjuster -1-.
- To do so, turn the adjuster in the direction of -arrows A or B-.
Installation notes, for example tightening specifications, replacing components. Refer to → Chapter "Overview - Headrest, Third Row Seat".
Headrest Guide, Removing and Installing
Headrest Guide, Removing and Installing, Outer Second Row Seat
Removing
- Remove the rear headrest. Refer to → Chapter "Headrest, Removing and Installing, Outer Second Row Seat".
- Remove the cover and cushion from the backrest frame. Refer to → Chapter "Cover and Cushion, Removing and Installing, Outer Second Row Backrest".
Headrest Guide with Release Button
- Press down the hook in direction of -arrow A- and remove the headrest guide upward in direction of -arrow B-.

Headrest Guide with Locking Spring
- Press down the hook in direction of -arrow A- and remove the headrest guide upward in direction of -arrow B-.
Installing
Install in reverse order of removal.
Installation notes, for example tightening specifications, replacing components. Refer to → Chapter "Overview - Headrest and Headrest Guide, Outer Second Row Seat".
Headrest Guide, Removing and Installing, Center Second Row Seat
Removing
- Remove the headrest. Refer to → Chapter "Headrest, Removing and Installing, Center Second Row Seat".
- Versions without center armrest: remove the cushion from the backrest. Refer to → Chapter "Cover and Cushion, Removing and Installing, Outer Second Row Backrest".
- Versions with center armrest: remove the center armrest trim. Refer to → Chapter "Center Armrest Trim, Removing and Installing".
Headrest Guide with Release Button
- Press down the 3 hooks in direction of -arrows A- and remove the headrest guide upward in direction of -arrow B-.
Headrest Guide without Release Button:
- Press down the 2 hooks in direction of -arrows A- and remove the headrest guide upward in direction of -arrow B-.

Installing
Install in reverse order of removal.
Installation notes, for example tightening specifications, replacing components. Refer to → Chapter "Overview - Headrest and Headrest Guide, Center Second Row Seat".

