Audi Q7: Left/Right Front Upper Body Vent Temperature Sensor -G385-/-G386-, Removing and Installing
Left Front Upper Body Vent Temperature Sensor -G385-, Removing and Installing
Removing
- Move the driver seat as far back as possible.
- Turn off the ignition.
- Remove the driver side instrument panel cover. Refer to → Body Interior; Rep. Gr.68; Storage Compartments and Covers; Driver Side Instrument Panel Cover, Removing and Installing.
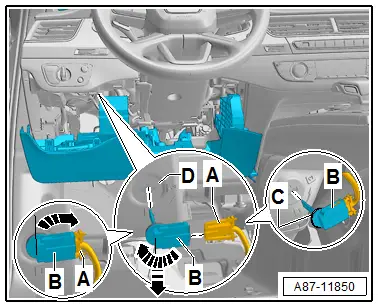
- Grasp behind the instrument panel, release the connector -A- and remove.
- Turn the sensor -B- 90º and remove it from the air duct -D-.
Installing
Install in reverse order of removal. Note the following:
- Check the seal -C- for damage and proper seating.
- Retrieve the Front A/C Display Control Head -E87- DTC memory and if necessary delete the displayed error. Refer to Vehicle Diagnostic Tester in the "Guided Fault Finding" function.
Right Front Upper Body Vent Temperature Sensor -G386-, Removing and Installing
Removing
- Move the right front seat (front passenger seat) as far back as possible.
- Turn off the ignition.
- Remove the glove compartment -E-. Refer to → Body Interior; Rep. Gr.68; Storage Compartments and Covers; Glove Compartment, Removing and Installing.
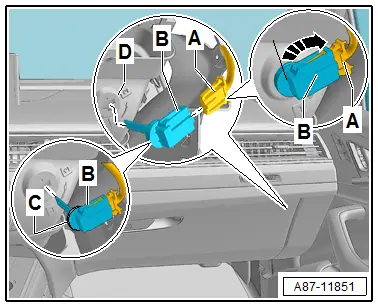
- Grasp behind the instrument panel, release the connector -A- and remove.
- Turn the sensor -B- 90º and remove it from the air duct -D-.
Installing
Install in reverse order of removal. Note the following:
- Check the seal -C- for damage and proper seating.
- Retrieve the Front A/C Display Control Head -E87- DTC memory and if necessary delete the displayed error. Refer to Vehicle Diagnostic Tester in the "Guided Fault Finding" function.
Footwell Vent Temperature Sensors -G261-/-G262-, Removing and Installing
Left Footwell Vent Temperature Sensor -G261-, Removing and Installing
Removing
- Remove the left footwell vent (driver side). Refer to → Chapter "Driver Side Footwell Vent, Removing and Installing".
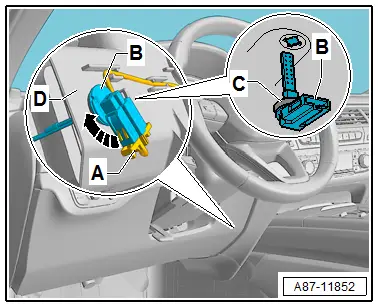
- Grasp behind the instrument panel, release the connector -A- and remove.
- Turn the sensor -B- 90º and remove from the heater and A/C unit air duct -D-.
Installing
Install in reverse order of removal. Note the following:
- Check the seal -C- for damage and proper seating.
- Retrieve the Front A/C Display Control Head -E87- DTC memory and if necessary delete the displayed error. Refer to Vehicle Diagnostic Tester in the "Guided Fault Finding" function.
Right Footwell Vent Temperature Sensor -G262-, Removing and Installing
Removing
- Remove the right footwell vent (front passenger side) -E-. Refer to → Chapter "Front Passenger Side Footwell Vent, Removing and Installing".
- Grasp behind the instrument panel, release the connector -A- and remove.
- Turn the sensor -B- 90º and remove from the heater and A/C unit air duct -D-.
Installing
Install in reverse order of removal. Note the following:
- Check the seal -C- for damage and proper seating.
- Retrieve the Front A/C Display Control Head -E87- DTC memory and if necessary delete the displayed error. Refer to Vehicle Diagnostic Tester in the "Guided Fault Finding" function.
Evaporator Vent Temperature Sensor -G263-, Removing and Installing
Removing
- Move the right front seat (front passenger seat) as far back as possible.
- Turn off the ignition.
- Remove screw clips -A-.
- Loosen the insulation -B- from the heater and A/C Unit air intake housing and remove.
- Remove the glove compartment. Refer to → Body Interior; Rep. Gr.68; Storage Compartments and Covers; Glove Compartment, Removing and Installing.
- If equipped, remove the air duct to the glove compartment cooling. Refer to → Chapter "Air Guide for Glove Compartment Cooling, Removing and Installing".
- Remove the right footwell vent (front passenger side). Refer to → Chapter "Front Passenger Side Footwell Vent, Removing and Installing".
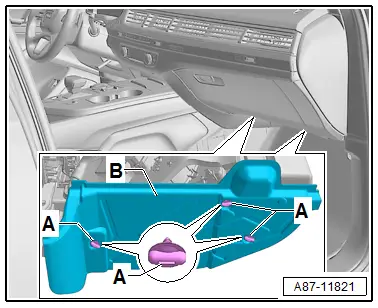
- Loosen the Evaporator Vent Temperature Sensor -G263--A- (with the connector -B- connected) from the evaporator housing on the heater and A/C unit -arrow- and remove.
- Loosen the locking mechanism -C- and remove the connector -B-.
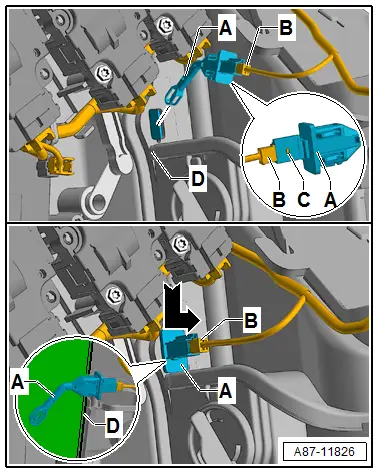
Installing
Install in reverse order of removal. Note the following:
- Insert the Evaporator Vent Temperature Sensor -G263--A- on the proper side in the evaporator housing mount -D- and check for secure fit.
- Retrieve the Front A/C Display Control Head -E87- DTC memory and if necessary delete the displayed error. Refer to Vehicle Diagnostic Tester in the "Guided Fault Finding" function.

