Audi Q7: Side Marker Lamp
Audi Q7 (4M) 2016-2026 Workshop Manual / Electrical System / Electrical Equipment / Exterior Lights, Switches / Side Marker Lamp
Overview - Side Marker Lamp
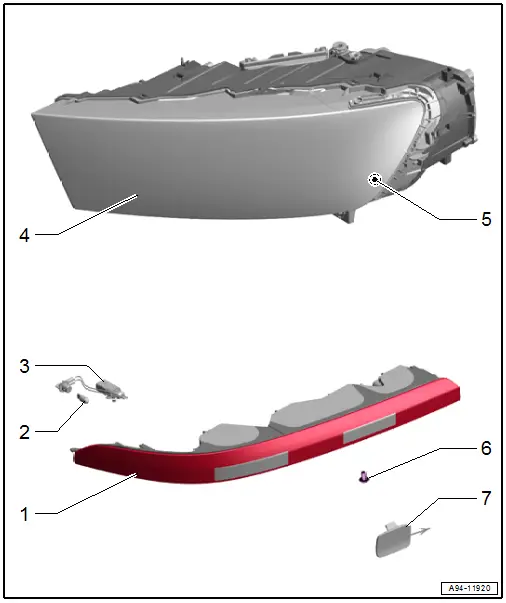
1 - Tail Lamp
- There are different versions. Refer to the Parts Catalog.
- Removing and installing. Refer to → Chapter "Tail Lamp, Removing and Installing".
2 - Rear Side Marker Lamp Bulb
- Left Rear Side Marker Lamp Bulb -M37-
- Right Rear Side Marker Lamp Bulb -M38-
- 12V, 3 W (W3W)
- Bulb, replacing. Refer to → Chapter "Rear Side Marker Lamp Bulb, Removing and Installing".
3 - Bulb Socket
4 - Headlamp Housing
- Removing and installing. Refer to → Chapter "Headlamp Housing, Removing and Installing".
5 - Front Side Marker Lamp Bulb
- Left Front Side Marker Lamp Bulb -M33-
- Right Front Side Marker Lamp Bulb -M34-
- Cannot be replaced separately
- If faulty replace the headlamp housing
6 - Bolt
- Tightening specification -Item 18-
7 - Cap
- For bolt
- In the bumper cover
Rear Side Marker Lamp Bulb, Removing and Installing
Removing
- Remove the tail lamp. Refer to → Chapter "Tail Lamp, Removing and Installing".
- Turn the socket -1- counter-clockwise in direction of -arrow- and remove it from the tail lamp.
- Remove the bulb -4- from the bulb socket -3-.
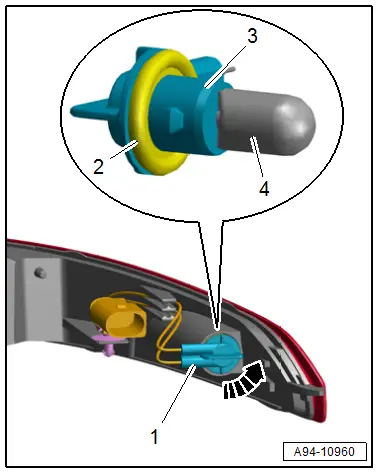
Installing
Install in the reverse order of removal while noting the following:
- Check the seal -2- for damage.
- Insert new bulbs in the bulb socket. Do not touch the bulb glass with bare hands.
- Secure the socket by turning it clockwise.

