Audi Q7: Sunroof Frame, Removing and Installing
- To complete the procedure, a second technician is required to be at the following position.
Removing
- Remove the headliner. Refer to → Body Interior; Rep. Gr.70; Roof Trim Panels; Headliner, Removing and Installing.
- Disconnect the connector -1- from the Power Sunroof Control Module -J245-.
- Remove the front and rear water drain hoses from the sunroof frame. Refer to → Chapter "Water Drain Hoses, Removing and Installing".
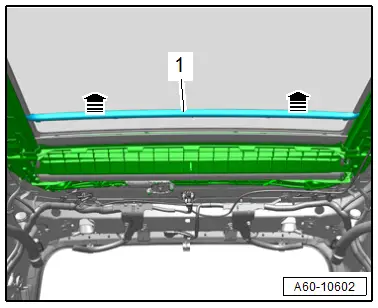
- Before removing the nuts, both technicians must hold the sunroof frame at the front and back.
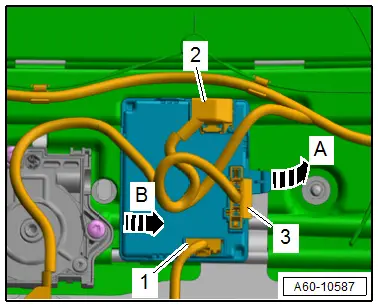
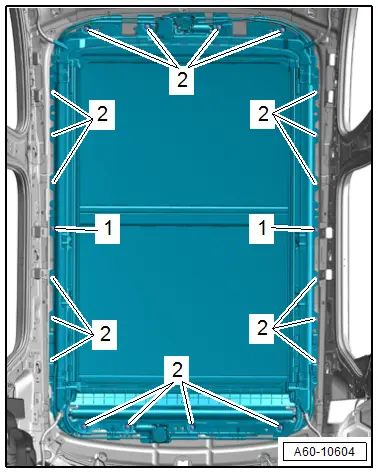
- Remove all nuts -2-.
- Remove the nuts -1- and the sunroof frame to the rear lid.
Installing
- Have the two technicians bring the sunroof frame in the installation position and install the nuts all the way.
- Tighten the nuts laterally first in the front and then the rear
- Tighten the nuts diagonally lengthwise.
Further installation is performed in reverse order of removal, while noting the following:
- Perform an adaptation. Refer to → Chapter "Power Sunroof Control Module -J245-, Programming".
Tightening Specifications
- Refer to → Chapter "Overview - Sliding Sunroof"
Glass Panel, Removing and Installing
Glass Panel, Removing and Installing, Front
 Caution
This procedure contains mandatory replaceable parts. Refer to component overview prior to starting procedure. Refer to → Chapter "Overview - Sliding Sunroof"
Removing
 NOTICE
Moving the slotted guide rail guide increases the risk of damaging the sliding sunroof components.
- Move the slotted guide rail guide only when the glass panel is installed.
- Open the glass panel just far enough until the trim is accessible.
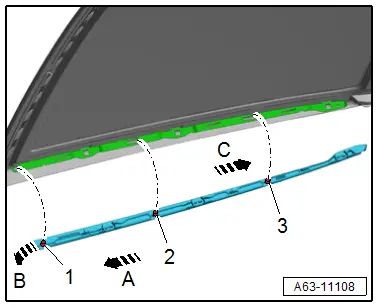
- Remove the trim from the front edge and pull it all the way toward the rear -arrow A-.
- Pull the trim on the rear edge slightly toward the inside to disengage the locking bracket -1--arrow B-.
- Push the trim toward the front -arrow C- and disengage the locking pins -2 and 3-.
- Remove the trim.
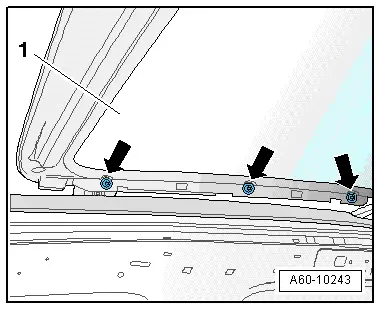
- Remove the left and right bolts -arrows- and the front glass panel -1-.
Installing
Install in reverse order of removal and note the following:
- Remove any locking fluid residue from the threaded hole using a thread tap.
- Install the front glass panel bolts, but do not tighten.
- Adjust the front glass panel (refer to → Chapter "Glass Panel, Adjusting"), then tighten the bolts.
- Perform an adaptation. Refer to → Chapter "Power Sunroof Control Module -J245-, Programming".
Tightening Specifications
- Refer to → Chapter "Overview - Sliding Sunroof"
Glass Panel, Removing and Installing, Rear
 Caution
This procedure contains mandatory replaceable parts. Refer to component overview prior to starting procedure. Refer to → Chapter "Overview - Sliding Sunroof"
To complete the procedure, a second technician is required to be at the following position.
Special tools and workshop equipment required
- Wedge Set -T10383/1-
Removing
- Open the front glass panel.
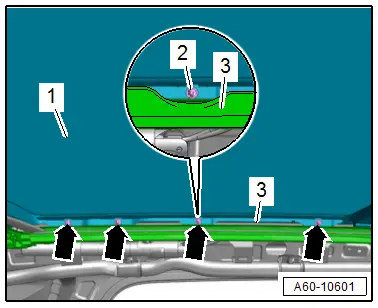
- Remove the rear trim -1- toward the front -arrows-.
- Pull the inner seal -3- on the positions marked with the -arrows- slightly toward the inside and remove the left, right and rear bolts -2-.
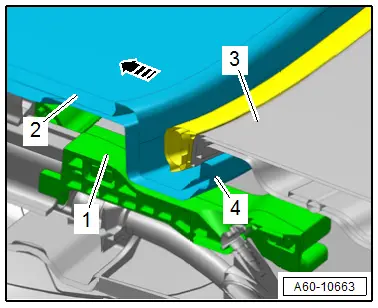
- Remove the glass panel at the rear -1- upward from the mounting points.

- Pull the rear side of the glass panel -2- forward -arrow-. The rain water drain channel -4- for the glass panel must be pulled over the raised section of the frame -1- and behind the roof frame -3- at the same time.
- Lift out the rear glass panel upward.
Installing
Install in reverse order of removal and note the following:
- Remove any locking fluid residue from the threaded hole using a thread tap.
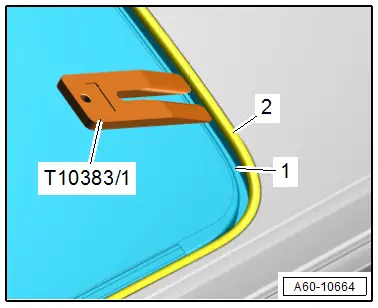
- When inserting and sliding into the roof opening, the rain water drain channel -1- must be slid under the seal -2- using the -T10383/1-
- Install the rear glass panel bolts, but do not tighten.
- Adjust the rear glass panel (refer to → Chapter "Glass Panel, Adjusting"), then tighten the bolts.
- Perform an adaptation. Refer to → Chapter "Power Sunroof Control Module -J245-, Programming".
Tightening Specifications
- Refer to → Chapter "Overview - Sliding Sunroof"
Glass Panel, Adjusting
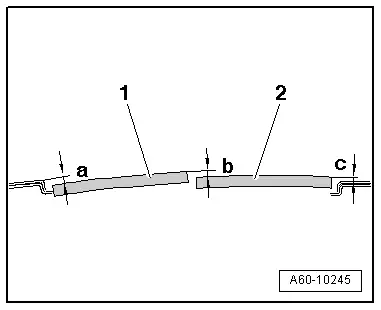
Adjustment Dimensions
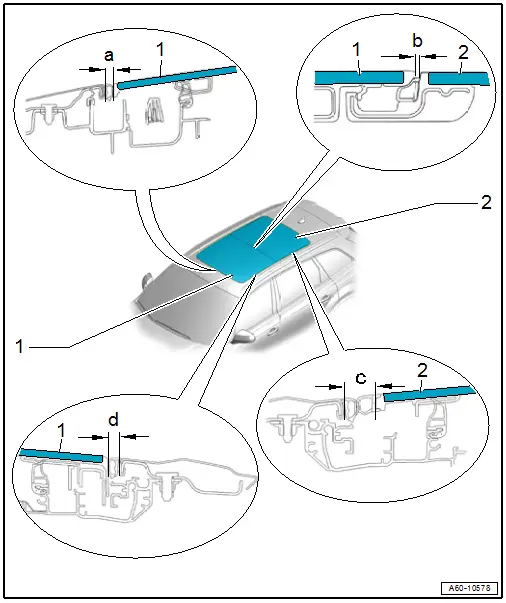
1 - Front Glass Panel
- Dimension -a- = 8.9 +- 1.2 mm
- Dimension -b- = 2.0 +- 0.5 mm
- Dimension -d- = 8.9 +- 1.2 mm
2 - Rear Glass Panel
- Dimension -b- = 2.0 +- 0.5 mm
- Dimension -c- = 19.3 +- 1.2 mm
Height Adjustment
- Only adjust the front glass panel at the front edge and the rear glass panel at the rear edge.
- To achieve the best possible exterior optical characteristics, make sure that the adjustment on left and right sides is performed as evenly (symmetrically) as possible.
- Check the adjustment of the front -1- and rear -2- glass panels using a depth gauge, for example.
- Dimension -a- = 1.7 +- 1.1 mm
- Dimension -b- = 1.0 +- 0.5 mm
- Dimension -c- = 0.3 +0.7/-0.3 mm
- Remove the inner seal from the sunroof frame.
- To adjust the front glass panel -1-, reach through the openings in the rubber trim to loosen both of the front screws -left arrows-.
- Close the glass panel.
- Adjust the glass panel and tighten the screws.

- To adjust the rear glass panel -1- tilt the front glass panel.
- Slightly pull the inner seal -3- toward the inside at the positions marked with -arrows- and loosen the screws -2-.
- Adjust the glass panel and tighten the screws.
Perform an adaptation. Refer to → Chapter "Power Sunroof Control Module -J245-, Programming".
Tightening Specifications
- Refer to → Chapter "Overview - Sliding Sunroof"

