Audi Q7: Sunroof Shade, Removing and Installing
Special tools and workshop equipment required
- Locking Pin (3 pc.) -T40011-
Removing
- Remove the rear glass panel. Refer to → Chapter "Glass Panel, Removing and Installing, Rear".
- Move the sunroof shade approximately 300 mm toward the front.
- Remove the headliner. Refer to → Body Interior; Rep. Gr.70; Roof Trim Panels; Headliner, Removing and Installing.
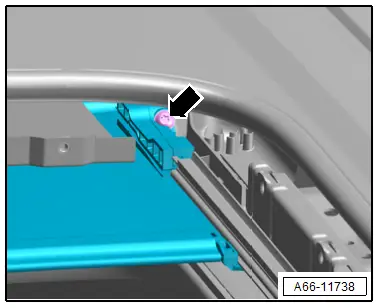
- Remove the bolt -arrow-.
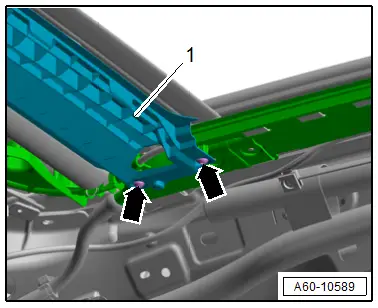
- Remove the cross bar -1- to do so remove the left and right bolts -arrows-.
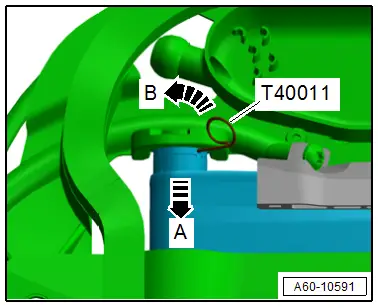
- Push the sunroof shade slightly to the left -arrow A-, so that the right securing hole on the sunroof shade is free.
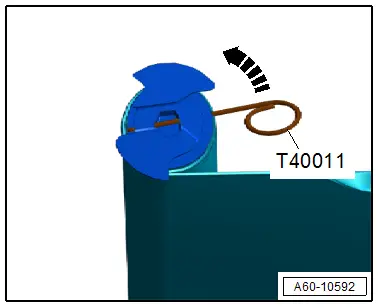
- Insert the -T40011- into the securing hole.
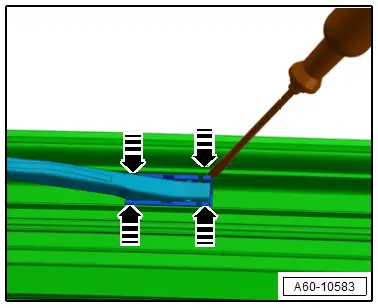
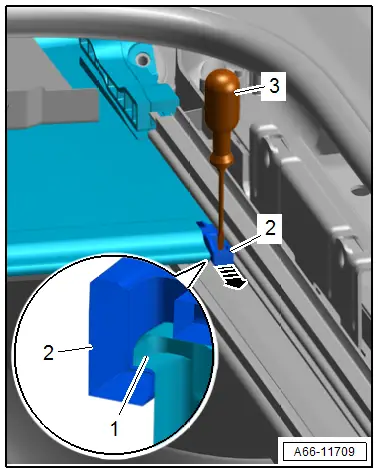
- Press the sun shade arch -2- forward -arrow- and hold.
- Using a screwdriver -3-, release the retainer -1- in the slide block -2- at the same time.
- Turn the right sunroof shade bearing, until it can be removed downward from the guide on the sunroof frame.
- Remove the sunroof shade toward the rear with all of the slide blocks out of the guide.
- Remove the sunroof shade.
Installing
Install in reverse order of removal and note the following:
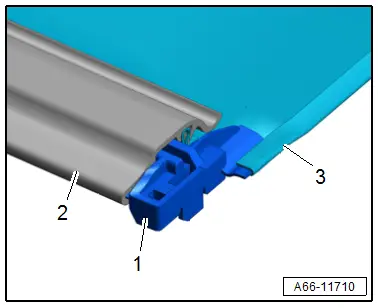
- Insert the slide block -1- into the front sun shade arch -2- and on the sun shade material -3-.
- Tension the sunroof shade with the -T40011- still inserted in the securing hole a total of six turns -arrow-.
TIP:
The sunroof shade mount only fits in one position in the sunroof frame.
- Insert the sunroof shade in the pretensioned condition in the sunroof frame.
After installing the sunroof shade, an adaptation must be performed.
- Connect the Vehicle Diagnostic Tester.
- Switch the ignition on.
- Select and start the Diagnostic operating mode.
- Select the Test plan tab.
- Select the Select individual test button and select the following tree structure consecutively:
- Body
- Body Assembly
- 01 - OBD-capable systems
- CA - Power Sunroof Control Module J245
- CA - Power Sunroof Control Module J245 Functions
- CA - Basic Setting
- CA - Roof Shade Control Module J394, no roof shade basic setting
- Start the selected program and follow the instructions on the Vehicle Diagnostic Tester display.
Tightening Specifications
- Refer to → Chapter "Overview - Sunroof Shade"
Sunroof Shade Motor -V260-, Removing and Installing
Special tools and workshop equipment required
- Removal Wedge -T40233-
Removing
- Remove the C-pillar trim panel on the driver side. Refer to → Body Interior; Rep. Gr.70; Vehicle Interior Trim Panels; C-Pillar Trim Panel, Removing and Installing.
- Remove the roof end strip. Refer to → Body Interior; Rep. Gr.70; Roof Trim Panels; Roof End Strip, Removing and Installing.
- Remove the D-pillar trim panels. Refer to → Body Interior; Rep. Gr.70; Vehicle Interior Trim Panels; D-Pillar Trim Panel, Removing and Installing.
- Open the sun shade completely.
- To avoid dirtying the headliner, clean the -T40233-.
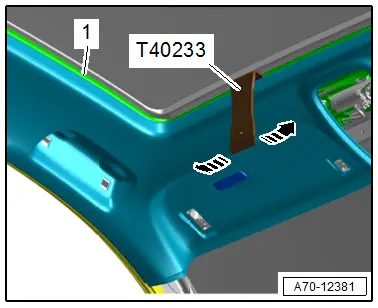
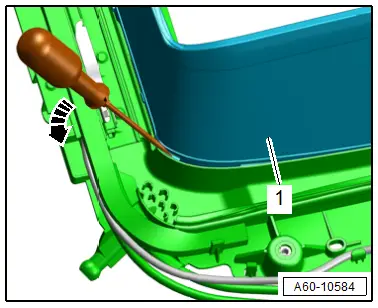
- Push the -T40233- between the frame -1- for the panorama roof and the headliner.
- Using the -T40233-, loosen the headliner all the way around the frame for the Panorama roof -arrows-.
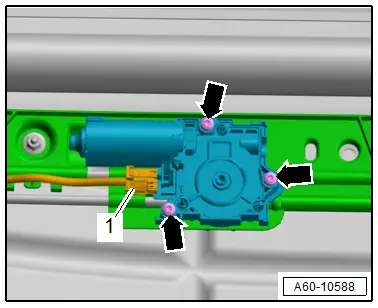
- Disconnect the connector -1-.
Remove the bolt -arrow- and the Sunroof Shade Motor -V260-.
Installing
Install in reverse order of removal.
Tightening Specifications
- Refer to → Chapter "Overview - Sunroof Shade"
Wind Deflector, Removing and Installing
Removing
- Position the glass panel so that it is tilted all the way.
- Disengage the net -1- from the wind deflector starting at the side from the frame for the sliding sunroof -arrow-.
- Pivot the wind deflector toward the rear and remove.
Installing
Install in reverse order of removal and note the following:
- Pivot the spring of the wind deflector toward the rear -A and B arrows-.
- Push the frame of the wind deflector downward -arrow C- and at the same time snap into the net.

Wind Deflector Bearing, Removing and Installing
Removing
- Position the glass panel so that it is tilted all the way.
- Push the retainers slightly to the side -arrows-.
- Remove the bearing for the wind deflector upward.
Installing
Install in reverse order of removal.