Audi Q7: Front Bumper Cover, Removing and Installing
- To complete the procedure, a second technician is required to be at the following position.
- Depending on the equipment version, the following additional work must be performed.
Special tools and workshop equipment required
- Hose Clamps - Up To 25 mm -3094-
- Engine Bung Set -VAS6122-
Removing
- Detach the front section of the front wheel housing liner near the bumper. Refer to → Chapter "Front Wheel Housing Liner, Removing and Installing, Front Section".
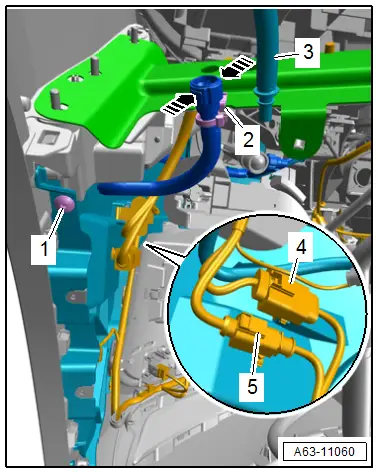
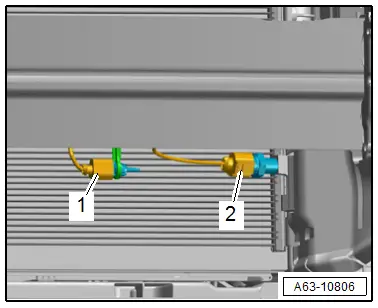
- Place a drip tray under the separating point for the washer fluid hose.
- Clamp off the washer fluid hose -3- with the -3094-.
- Push the release button -arrows- and disconnect the washer fluid hose for the headlamp washer system.
- Seal off the hose coupling with clean plugs from the -VAS6122-.
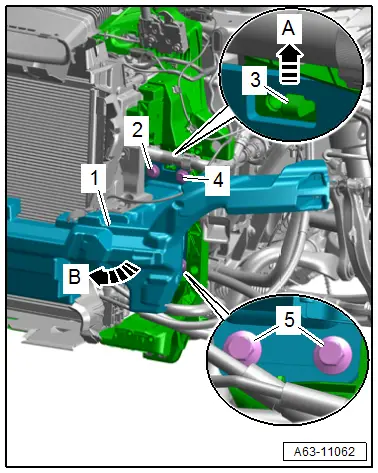
- Free up the washer fluid hose bracket -2-.
- Disconnect the connectors -4 and 5-.
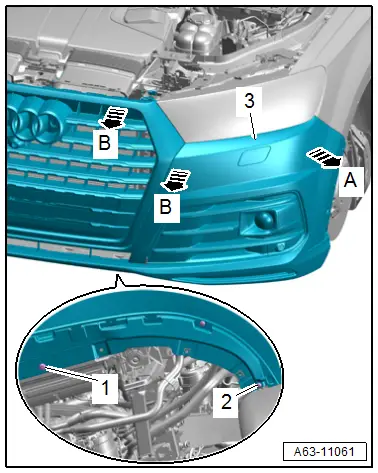
- Remove the bolt -1- for the bumper side section.
- Loosen the front wheel cover in the area of the bumper side section. Refer to → Chapter "Wheel Cover, Removing and Installing, Front ".
- Remove the front noise insulation. Refer to → Chapter "Noise Insulation, Removing and Installing".
- Remove the lock carrier cover. Refer to → Chapter "Lock Carrier Cover, Removing and Installing".
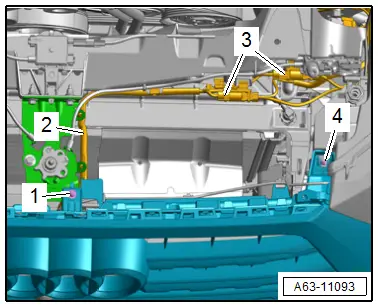
- If equipped, free up and disconnect the antenna wires -3-.
- Free up the wiring harness -2-.
- Remove the bolts -1 and 4-.
- Remove the bolts -1 and 2-.
- Disengage the side section -3- from the front side panel -arrow A- and remove the bumper cover toward the front with the help of a second technician -B arrows-.
Installing
Install in reverse order of removal and note the following:
Depending on the version, the following additional work is required:
- Adjust the adaptive cruise control (ACC). Refer to → Suspension, Wheels, Steering; Rep. Gr.44; Adaptive Cruise Control (ACC).
- Calibrate the night vision system camera. Refer to → Suspension, Wheels, Steering; Rep. Gr.44; Night Vision System; Night Vision System, Calibrating.
- Calibrate the Front Peripheral Camera -R243-. Refer to → Communication; Rep. Gr.91; Peripheral Camera.
Tightening Specifications
- Refer to → Chapter "Overview - Bumper Cover"
Impact Member, Removing and Installing
Impact Member, Removing and Installing
- Follow the safety precautions. Refer to → Body Interior; Rep. Gr.00; Safety Precautions; Safety Precautions when Working on Pyrotechnic Components.
Removing
- Remove the headlamps. Refer to → Electrical Equipment; Rep. Gr.94; Headlamps; Headlamps, Removing and Installing.
- Remove the bolts -3 and 4-.
 WARNING
Pyrotechnic components may deploy unintentionally.
Risk of injury.
- Discharge static electricity by briefly touching the door striker.
- Disconnect the connectors -1, 2 and 5-.
- Free up the wiring harness -6-.
- Mark the bolts for reinstallation.
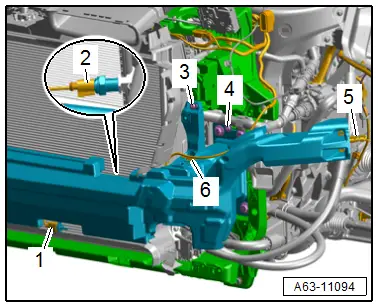
- Remove the bolts -2, 4 and 5-.
- Push the impact member -1- far enough upward -arrow A- until the tab -3- is free.
- Pivot the impact member on the left toward the front -arrow B-.
- Repeat the procedure on the opposite side.
- Remove the impact member.
- If the impact member is to be replaced, remove the following components additionally:
- Molded Foam Piece. Refer to → Chapter "Molded Foam Part, Removing and Installing".
- Remove the bracket for the outside air temperature sensor. Refer to → Chapter "Outside Air Temperature Sensor -G17- Bracket, Removing and Installing".
Installing
Install in reverse order of removal and note the following:
Tightening Specifications
- Refer to → Chapter "Overview - Impact Member"
Impact Member, Removing and Installing, Equipment Variations
Removing
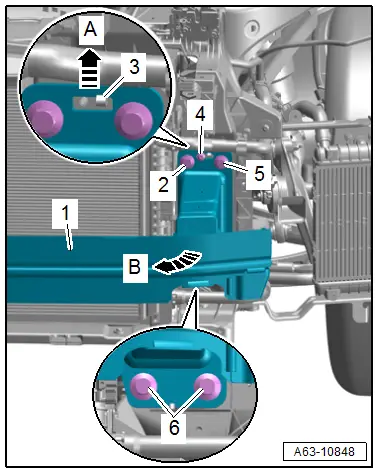
- Remove the radiator shutter. Refer to → Engine Mechanical; Rep. Gr.19; Radiator/Radiator Fan; Overview - Radiator/Radiator Fan.
- Disconnect the connectors -1 and 2- and free up the wiring harness.
- Mark the bolts for reinstallation.
- Remove the bolts -2, 4, 5 and 6-.
- Push the impact member -1- far enough upward -arrow A- until the tab -3- is free.
- Pivot the impact member on the left toward the front -arrow B-.
- Repeat the procedure on the opposite side.
- Remove the impact member.
- If the impact member is to be replaced, remove the following components additionally:
- Remove the bracket for the outside air temperature sensor. Refer to → Chapter "Outside Air Temperature Sensor -G17- Bracket, Removing and Installing".
Installing
Install in reverse order of removal.
Tightening Specifications
- Refer to → Chapter "Overview - Impact Member, Equipment Variations"

