Audi Q7: Passenger Occupant Detection System
Component Location Overview - Passenger Occupant Detection System
 Note
Note
For the passenger occupant detection system the heating element is used.
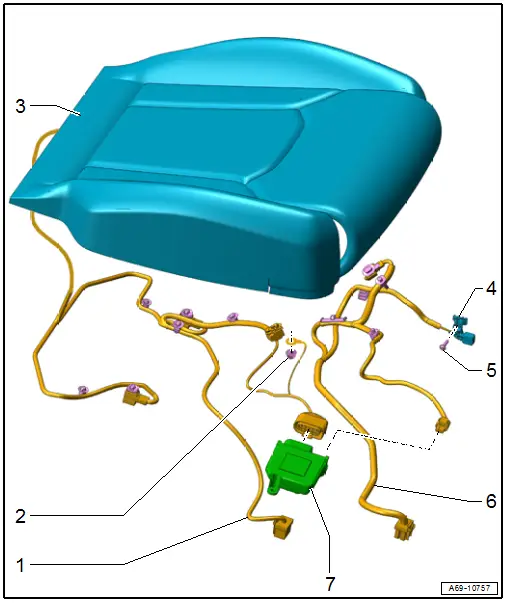
1 - Wiring Harness
- For the seat heating element with passenger occupant detection system
- Clipped in the seat frame.
- Connector station in the vehicle floor under on the seat.
- Removing and installing. Refer to → Chapter "Passenger Occupant Detection System, Removing and Installing".
2 - Nut
- 1.2 Nm
3 - Front Passenger Occupant Detection Sensor -G128-
- For the passenger occupant detection system the heating element is used.
- Depending on the seat version, the Front Passenger Occupant Detection Sensor -G128- is either sewn into the cover with the seat heating element, or bonded onto the cushion
- Removing and Installing. Refer to → Chapter "Passenger Occupant Detection System, Removing and Installing".
4 - Front Passenger Seat Position Sensor -G554-
- Driver seat: Driver Seat Position Sensor -G553-
- Removing and installing. Refer to → Chapter "Seat Position Sensor, Removing and Installing".
5 - Screw
- Tightening specification. Refer to Item-7-
6 - Wiring Harness
- For the seat position sensor/belt latch detection/seat belt switch
- Clipped in the seat frame.
- Connector station in the vehicle floor under on the seat.
- Removing and installing. Refer to → Chapter "Seat Position Sensor, Removing and Installing".
7 - Passenger Occupant Detection System Control Module -J706-
- Removing and installing. Refer to → Chapter "Passenger Occupant Detection System, Removing and Installing".
Passenger Occupant Detection System, Removing and Installing
Special tools and workshop equipment required
- Pry Lever -80-200-
- Engine/Transmission Holder - Seat Repair Fixture -VAS6136-
 Note
Note- The passenger occupant detection system is only installed in the passenger seat.
- The service kit for the passenger occupant detection system must always be installed completely.
- This means that the corresponding components Passenger Occupant Detection System Control Module -J706- and Front Passenger Occupant Detection Sensor -G128- from the service kit for the passenger occupant detection system must be installed.
- Exchanging of a component Passenger Occupant Detection System Control Module -J706- or Front Passenger Occupant Detection Sensor -G128- with another vehicle is not permitted.
- The parts of the service kit is different depending on the seat version. Refer to the Parts Catalog.
Removing
 WARNING
- Follow all safety precautions when working on pyrotechnic components. Refer to → Chapter "Safety Precautions for Pyrotechnic Components".
- Before handling airbag units (for example, disconnecting the connector), the person handling it must "discharge static electricity". This can be done by briefly touching the door striker pin, for example.
- Remove the front passenger seat. Refer to → Chapter "Front Seat, Removing and Installing".
- Fasten the front seat on the -VAS6136-. Refer to → Chapter "Front Seat, Mounting on Fixture for Seat Repair".
- Remove the backrest. Refer to → Chapter "Front Backrest, Removing and Installing".
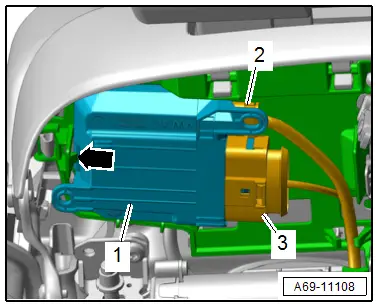
- Release the control module from the catches -arrow-.
- Disengage the control module -1- from the bracket.
- Disconnect the connectors -2 and 3- from the control module by pressing the release.
- Free up the wire.
- Remove the control module for seat functions. Refer to → Chapter "Seat Functions Control Module, Removing and Installing".
- If equipped, remove the compressor from the pneumatic seat. Refer to → Chapter "Pneumatic Seat Compressor, Removing and Installing".
- Remove the bracket for the front trim. Refer to → Chapter "Front Seat Trim Bracket, Removing and Installing".
- Disconnect modular wiring routing. Refer to → Chapter "Modular Wiring Routing, Disconnecting and Connecting".
- Open the corrugated tube and free up the wire.
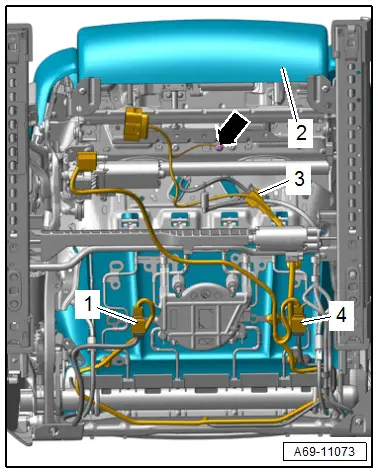
- Remove the nut -arrow- and free up the wire.
- Disconnect the connectors -1, 3 and 4-.
- Unclip and free up the wiring harness from the seat pan.
- Remove seat cover -2- with seat cushion for seat pan. Refer to → Chapter "Seat Pan Cover and Cushion, Removing and Installing".
- If necessary separate the seat cover from the seat cushion. Refer to → Chapter "Seat Pan Cover and Cushion, Separating".
Installing
 WARNING
- Follow all safety precautions when working on pyrotechnic components. Refer to → Chapter "Safety Precautions for Pyrotechnic Components".
- Before handling pyrotechnic components (for example, connecting the connector), the person handling it must "discharge static electricity". This can be done by briefly touching the door striker pin, for example.
- Observe all measures when installing the front seat. Refer to → Chapter "Front Seat, Removing and Installing".
Install in reverse order of removal and note the following:
 Note
Note
Make sure the connectors are installed all the way and engage audibly.
When installing a new service kit perform the basic setting of the passenger occupant detection system control module. Refer to → Chapter "Passenger Occupant Detection System Deactivation Additional Safety Precautions, Market-Specific".
- Select "airbag" in "Guided Fault Finding" to complete see Vehicle Diagnostic Tester.
- Passenger Occupant Detection System Control Module -J706-, basic setting
 Note
Note
If the Airbag Indicator Lamp -K75- signals a fault after installing, check the DTC memory, erase it and check it again use the Vehicle Diagnostic Tester.
Installation notes, for example tightening specifications, replacing components. Refer to → Chapter "Component Location Overview - Passenger Occupant Detection System".

