Audi Q7: Overview - Front Bumper Cover
Overview - Bumper Cover
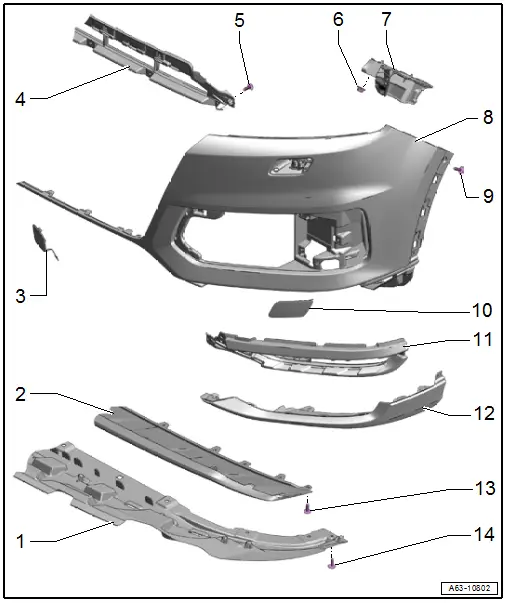
1 - Bumper Cover End Plate
- Removing and Installing. Refer to → Chapter "Front Bumper Cover End Plate, Removing and Installing".
2 - Impact Guard
- Removing and Installing. Refer to → Chapter "Impact Guard, Removing and Installing".
3 - Towing Eye Cover
4 - Center Air Duct
- Removing and Installing. Refer to → Chapter "Center Air Duct, Removing and Installing ".
5 - Bolt
- 2 Nm
- Quantity: 4
6 - Nut
- 4 Nm
- Quantity: 5
7 - Mount
- For the bumper cover
- To secure the headlamp
- Removing and Installing. Refer to → Chapter "Bumper Cover Mount, Removing and Installing".
8 - Bumper Cover
- Removing and Installing. Refer to → Chapter "Bumper Cover, Removing and Installing".
- Overview - Rear Reflector. Refer to → Chapter "Overview - Rear Reflector"
- Overview - Covers and Air Guides. Refer to → Chapter "Overview - Covers and Air Guides"
9 - Bolt
- 2.5 Nm
10 - Washer Nozzle Cover
- For the headlamp washer system
- Removing and Installing. Refer to → Chapter "Headlamp Washer System Washer Nozzle Cover, Removing and Installing".
11 - Side Air Duct
- Removing and Installing. Refer to → Chapter "Side Air Duct, Removing and Installing".
12 - Bumper Cover Lower Section
- Removing and Installing. Refer to → Chapter "Bumper Cover Lower Section, Removing and Installing".
13 - Bolt
- 2 Nm
- Quantity: 6
14 - Bolt
- 2 Nm
- Quantity: 8
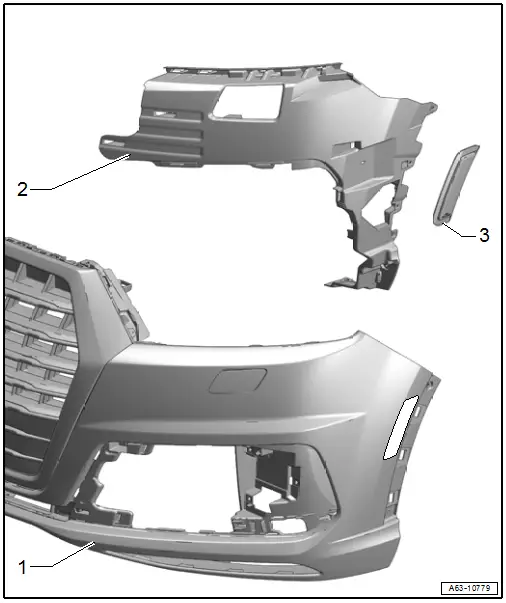
Overview - Bumper Cover, S Line

1 - Bumper Cover End Plate
- Removing and Installing. Refer to → Chapter "Front Bumper Cover End Plate, Removing and Installing".
2 - Towing Eye Cover
3 - Center Air Duct
- Removing and Installing. Refer to → Chapter "Center Air Duct, Removing and Installing, S Line".
4 - Bolt
- 2 Nm
- Quantity: 4
5 - Cap
- For the air intake grille
- Equipped on some models
- Removing and Installing. Refer to → Chapter "Air Intake Grille Cap, Removing and Installing".
6 - Mount
- For the bumper cover
- To secure the headlamp
- Removing and Installing. Refer to → Chapter "Bumper Cover Mount, Removing and Installing".
7 - Side Cap
- For the air intake grille
- Equipped on some models
- Removing and Installing. Refer to → Chapter "Air Intake Grille Cap, Removing and Installing".
8 - Nut
- 4 Nm
- Quantity: 5
9 - Cover
- For the lower air intake grille
- Removing and Installing. Refer to → Chapter "Side Air Duct, Removing and Installing, S Line".
10 - Lower Air Intake Grille
- Removing and Installing. Refer to → Chapter "Side Air Duct, Removing and Installing, S Line".
11 - Bolt
- 2.5 Nm
12 - Bumper Cover
- Removing and Installing. Refer to → Chapter "Bumper Cover, Removing and Installing".
- Overview - Rear Reflector. Refer to → Chapter "Overview - Rear Reflector"
- Overview - Covers and Air Guides. Refer to → Chapter "Overview - Covers and Air Guides"
13 - Washer Nozzle Cover
- For the headlamp washer system
- Removing and Installing. Refer to → Chapter "Headlamp Washer System Washer Nozzle Cover, Removing and Installing".
14 - Bolt
- 2 Nm
- Quantity: 8
Overview - Rear Reflector
1 - Bumper Cover
- Removing and Installing. Refer to → Chapter "Bumper Cover, Removing and Installing".
2 - Reinforcement
- For the bumper cover
- Not available separately.
3 - Rear Reflector
- Removing and Installing. Refer to → Chapter "Reflector, Removing and Installing".
Overview - Covers and Air Guides
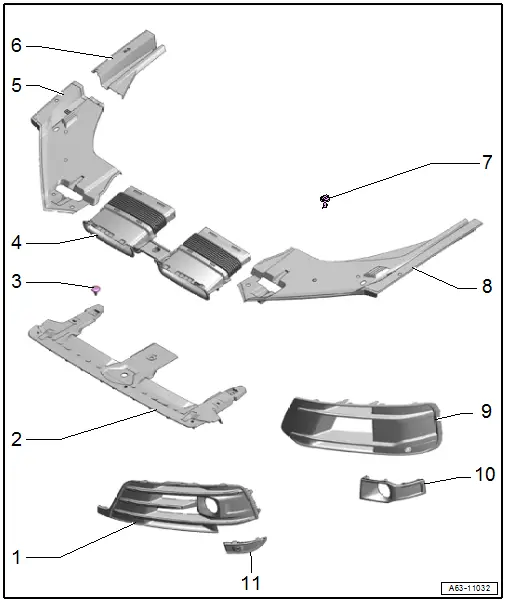
1 - S Line Air Intake Grille
- There are different versions. Refer to the Parts Catalog.
- Removing and Installing. Refer to → Chapter "Air Intake Grille, Removing and Installing".
2 - Lock Carrier Cover
- Removing and Installing. Refer to → Chapter "Lock Carrier Cover, Removing and Installing".
3 - Expanding Clip
- Quantity: 5
4 - Air Duct
- Remove any dirt, leaves and salt residue.
5 - Right Headlamp Cover
- Removing and Installing. Refer to → Chapter "Headlamp Cover, Removing and Installing".
6 - Right Cover
- For the vin
- Removing and Installing. Refer to → Chapter "Headlamp Cover, Removing and Installing".
7 - Clip
- Quantity: 2
8 - Left Headlamp Cover
- Removing and Installing. Refer to → Chapter "Headlamp Cover, Removing and Installing".
9 - Air Intake Grille
- There are different versions. Refer to the Parts Catalog.
- Removing and Installing. Refer to → Chapter "Air Intake Grille, Removing and Installing".
10 - Trim
- For vehicles with adaptive cruise control (ACC)
- Removing and Installing. Refer to → Chapter "Air Intake Grille, Removing and Installing, Versions with Adaptive Cruise Control (ACC)".
11 - S Line Mount
- For the parking aid sensor
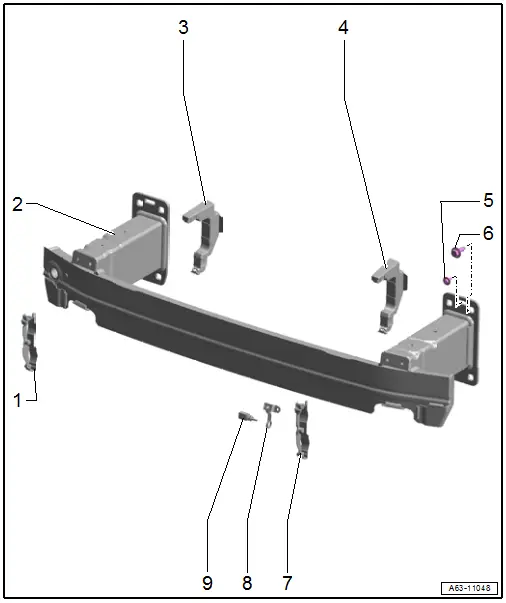
Overview - Impact Member
Overview - Impact Member

1 - Molded Foam Part
- Market-Specific Version
- Removing and Installing. Refer to → Chapter "Molded Foam Part, Removing and Installing".
2 - Driver Side Pedestrian Protection Crash Sensor 2 -G851-/Front Passenger Side Pedestrian Protection Crash Sensor 2 -G852-
- Unit with pressure hose
- For situations when it must be replaced.
- Removing and Installing. Refer to → Body Interior; Rep. Gr.69; Pedestrian Protection; Overview - Pedestrian Protection.
3 - Outside Air Temperature Sensor -G17-
- Removing and Installing. Refer to → Heating, Ventilation, and Air Conditioning; Rep. Gr.87; Additional Components for Control and Regulation; Outside Air Temperature SensorG17, Removing and Installing.
4 - Bracket
- For Outside Air Temperature Sensor -G17-
- Equipped on some models. Refer to the → Electronic Parts Catalog (ETKA) for allocation.
- Removing and Installing. Refer to → Chapter "Outside Air Temperature Sensor -G17- Bracket, Removing and Installing".
5 - Expanding Rivet
6 - Bolt
- 60 Nm
- Quantity: 4
7 - Bolt
- 4.5 Nm
- For securing the impact member to the lock carrier
8 - Impact Member
- There are different versions. Refer to the Parts Catalog.
- Removing and Installing. Refer to → Chapter "Impact Member, Removing and Installing".
Conditions for Replacing the Driver Side Pedestrian Protection Crash Sensor 2 -G851-/Front Passenger Side Pedestrian Protection Crash Sensor 2 -G852-
- The molded foam part is visibly damaged.
- The impact member is visibly deformed.
- The bumper cover is deformed.
- The pressure hose is damaged.
Overview - Impact Member, Equipment Variations
1 - Right Front Section Air Guide
- Clipped into the rear section air guide
2 - Impact Member
- There are different versions. Refer to the Parts Catalog.
- Removing and Installing. Refer to → Chapter "Impact Member, Removing and Installing, Equipment Variations".
3 - Right Rear Section Air Guide
4 - Left Rear Section Air Guide
5 - Bolt
- 4.5 Nm
- For securing the impact member to the lock carrier
6 - Bolt
- 60 Nm
- Quantity: 4
7 - Left Front Section Air Guide
- Clipped into the rear section air guide
8 - Bracket
- For Outside Air Temperature Sensor -G17-
- Equipped on some models. Refer to the → Electronic Parts Catalog (ETKA) for allocation.
- Removing and Installing. Refer to → Chapter "Outside Air Temperature Sensor -G17- Bracket, Removing and Installing".
9 - Outside Air Temperature Sensor -G17-
- Removing and Installing. Refer to → Heating, Ventilation, and Air Conditioning; Rep. Gr.87; Additional Components for Control and Regulation; Outside Air Temperature SensorG17, Removing and Installing.

