Audi Q7: Steering Wheel
Overview - Steering Wheel
Overview - Steering Wheel, Three-Spoke Steering Wheel
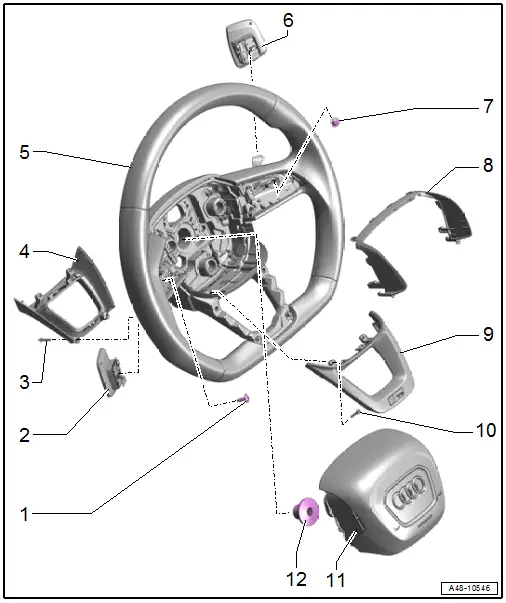
1 - Bolt
- Tightening specification. Refer to → Communication; Rep. Gr.91; Multifunction Steering Wheel; Overview - Multifunction Steering Wheel.
2 - Tiptronic Downshift Button -E480-
- Overview. Refer to → Communication; Rep. Gr.91; Multifunction Steering Wheel; Overview - Multifunction Steering Wheel.
3 - Bolt
- 1.2 Nm
4 - Rear Trim
- For the steering wheel
5 - Three-Spoke Steering Wheel
- Removing and installing. Refer to → Chapter "Steering Wheel, Removing and Installing".
6 - Tiptronic Upshift Button -E479-
- Overview. Refer to → Communication; Rep. Gr.91; Multifunction Steering Wheel; Overview - Multifunction Steering Wheel.
7 - Bolt
- Tightening specification. Refer to → Communication; Rep. Gr.91; Multifunction Steering Wheel; Overview - Multifunction Steering Wheel.
8 - Upper Trim
- For the steering wheel
9 - Lower Trim
- For the steering wheel
10 - Bolt
- 1.2 Nm
11 - Driver Side Airbag
 WARNING
Follow the safety precautions when working on airbags. Refer to → Body Interior; Rep. Gr.00; Safety Precautions; Safety Precautions for Pyrotechnic Components.
- Removing and installing. Refer to → Body Interior; Rep. Gr.69; Driver Side Airbag; Airbag Unit with Igniter, Removing and Installing.
12 - Bolt
- 30 Nm +90º
- Replace after removing
Overview - Steering Wheel, Four-Spoke Steering Wheel
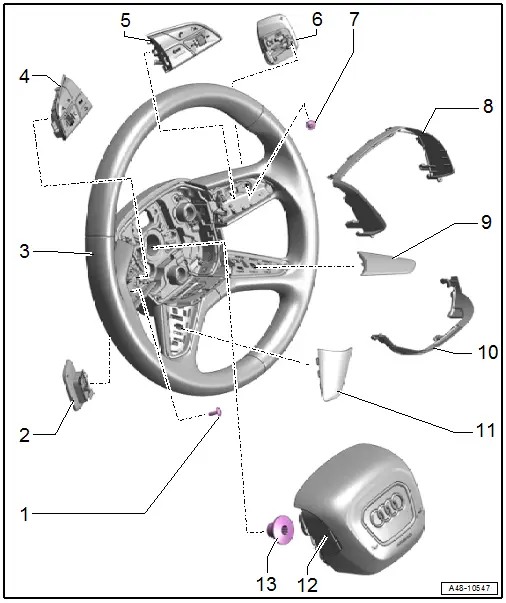
1 - Bolt
- Tightening specification. Refer to → Communication; Rep. Gr.91; Multifunction Steering Wheel; Overview - Multifunction Steering Wheel.
2 - Tiptronic Downshift Button -E480-
- Overview. Refer to → Communication; Rep. Gr.91; Multifunction Steering Wheel; Overview - Multifunction Steering Wheel.
3 - Four-Spoke Steering Wheel
- Removing and installing. Refer to → Chapter "Steering Wheel, Removing and Installing".
4 - Left Multifunction Buttons on Steering Wheel -E440-
- Overview. Refer to → Communication; Rep. Gr.91; Multifunction Steering Wheel; Overview - Multifunction Steering Wheel.
5 - Right Multifunction Buttons on Steering Wheel -E441-
- Overview. Refer to → Communication; Rep. Gr.91; Multifunction Steering Wheel; Overview - Multifunction Steering Wheel.
6 - Tiptronic Upshift Button -E479-
- Overview. Refer to → Communication; Rep. Gr.91; Multifunction Steering Wheel; Overview - Multifunction Steering Wheel.
7 - Bolt
- Tightening specification. Refer to → Communication; Rep. Gr.91; Multifunction Steering Wheel; Overview - Multifunction Steering Wheel.
8 - Upper Trim
- For the steering wheel
9 - Trim
- For the steering wheel spoke
10 - Lower Trim
- For the steering wheel
11 - Trim
- For the steering wheel spoke
12 - Driver Side Airbag
 WARNING
Follow the safety precautions when working on airbags. Refer to → Body Interior; Rep. Gr.00; Safety Precautions; Safety Precautions for Pyrotechnic Components.
- Removing and installing. Refer to → Body Interior; Rep. Gr.69; Driver Side Airbag; Airbag Unit with Igniter, Removing and Installing.
13 - Bolt
- 30 Nm +90º
- Replace after removing
Steering Wheel, Removing and Installing
Special tools and workshop equipment required
- Torque Wrench 1331 5-50Nm -VAG1331-
- Steering Wheel Scales -VAS6458-
Removing
- Bring wheels in the straight position.
- Move the steering wheel as far down as possible to do this use the full steering column adjustment range.
- Switch off the ignition.
- Remove the airbag unit. Refer to → Body Interior; Rep. Gr.69; Driver Side Airbag; Airbag Unit with Igniter, Removing and Installing.
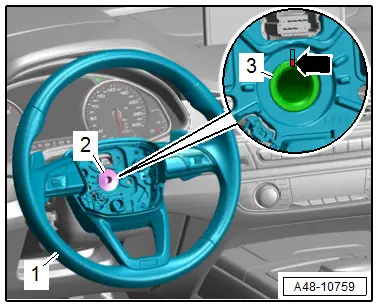
- Remove the bolt -2-.
- For reinstallation, mark the steering wheel installation position -1- to the steering column -3--arrow-.
- Remove the steering wheel from the steering column.
Installing
Install in reverse order of removal and note the following:
- Front wheels in straight position.
- Note the marks on the steering column/steering wheel when reusing.
- Install the airbag unit. Refer to → Body Interior; Rep. Gr.69; Driver Side Airbag; Airbag Unit with Igniter, Removing and Installing.
- Perform a road test.
- If the steering wheel is crooked, it must be removed again and reset on the steering column splines.
- Readapting the end position of the steering gear. Refer to → Chapter "Steering Gear End Position, Readapting".
Tightening Specifications
- Refer to → Chapter "Overview - Steering Wheel"

