
Audi Q7: Third Row Backrest Adjustment Button, Removing and Installing
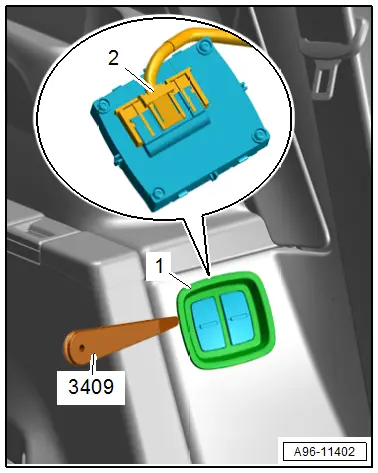
Left and Right Third Row Seat Backrest Adjustment Button -E565-/-E549-, Removing and Installing, Left Rear Door
Special tools and workshop equipment required
- Trim Removal Wedge -3409-
Removing
- Fold the second row rear seat backrest forward. Refer to the Vehicles Owner's Manual.
- Pry out the backrest adjustment button -1- with the Trim Removal Wedge -3409-.
- Disconnect the connector -2-.
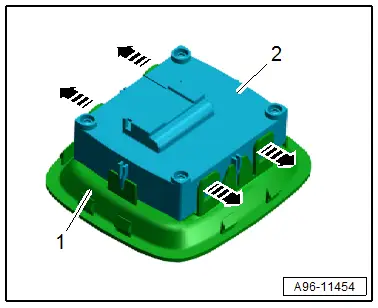
- Release the retainers in direction of -arrows-.
- Remove the backrest adjustment button -2- from the trim -1-.
Installing
Install in the reverse order of removal while noting the following:
- Insert the backrest adjustment button in the cut-out and push in until it clicks into place.
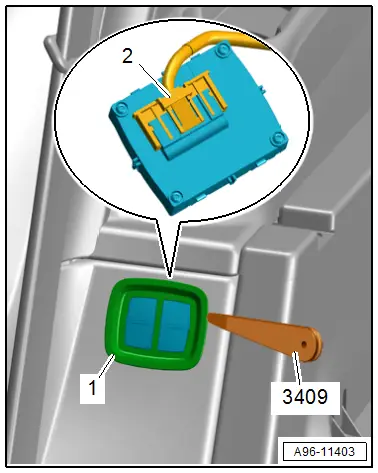
Left and Right Third Row Button 2 for Backrest Adjustment -E801-/-E804-, Removing and Installing, Right Rear Door
Special tools and workshop equipment required
- Trim Removal Wedge -3409-
Removing
- Fold the second row rear seat backrest forward. Refer to the Vehicles Owner's Manual.
- Pry out the backrest adjustment button -1- with the Trim Removal Wedge -3409-.
- Disconnect the connector -2-.
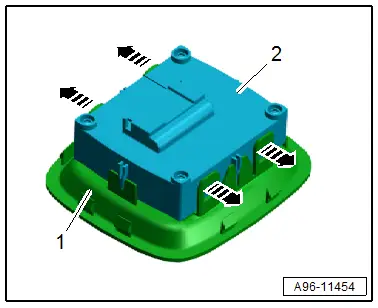
- Release the retainers in direction of -arrows-.
- Remove the backrest adjustment button -2- from the trim -1-.
Installing
Install in the reverse order of removal while noting the following:
- Insert the backrest adjustment button in the cut-out and push in until it clicks into place.
Left and Right Third Row Button 3 for Backrest Adjustment -E802-/-E805-, Removing and Installing, Luggage Compartment
Removing
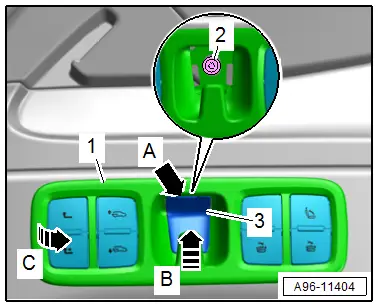
- Using a narrow screwdriver at the opening -arrow A- release the cap and at the same time push on the bottom slightly upward in direction of -arrow B-.
- Remove the cap.
- Remove the bolt -2-.
- Pivot out the button trim -1- from the mount in direction of -arrow C-.
- Disconnect the connectors.
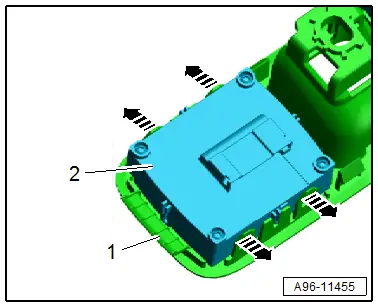
- Release the retainers -arrows-.
- Remove the backrest adjustment button -2- from the trim -1-.
Installing
Install in the reverse order of removal while noting the following:
- The button trim must be flush along the entire length of the mount.
Tightening Specifications
- Refer to → Fig. "Tightening Specification for Third Row Button for Backrest Adjustment - in Luggage Compartment"
Loading Sill Lowering Control Head -E682-/Power Pivoting Trailer Hitch Button -E474-, Removing and Installing
Removing
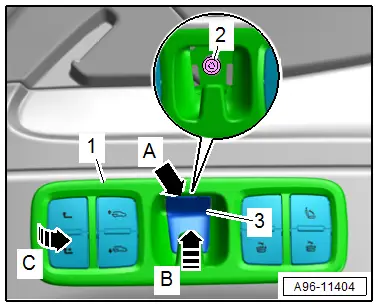
- Using a narrow screwdriver at the opening -arrow A- release the cap and at the same time push on the bottom slightly upward in direction of -arrow B-.
- Remove the cap.
- Remove the bolt -2-.
- Pivot out the button trim -1- from the mount in direction of -arrow C-.
- Disconnect the connectors.
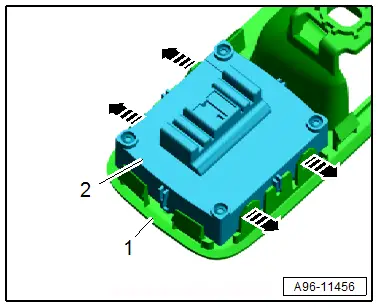
- Release the retainers in direction of -arrows-.
- Remove the loading sill lowering control head -2- from the trim -1-.
Installing
Install in the reverse order of removal while noting the following:
- The loading sill lowering control head trim must be flush along the entire length of the mount.
Tightening Specifications
- Refer to → Fig. "Tightening Specification for Third Row Button for Backrest Adjustment - in Luggage Compartment"
Release Button in Rear Lid Handle -E234-, Removing and Installing
Special tools and workshop equipment required
- Connecting Rod Support -3090-
Removing
- Remove the lower rear lid trim panel. Refer to → Body Interior; Rep. Gr.70; Luggage Compartment Trim Panels; Rear Lid Lower Trim Panel, Removing and Installing.
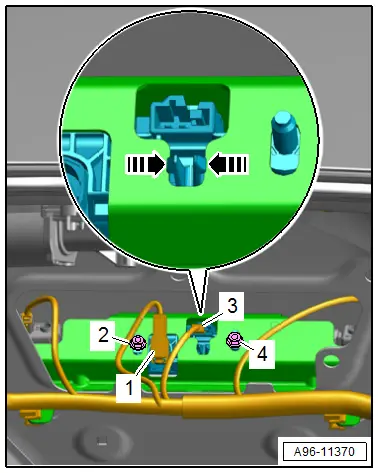
- Disconnect the connector -3- and the antenna wire -1-.
- Remove the nuts -2 and 4-.
- Open the tabs in direction of -arrows-.
- Remove the license plate lamps. Refer to → Chapter "Left and Right License Plate Lamp -X4-/-X5-, Removing and Installing".
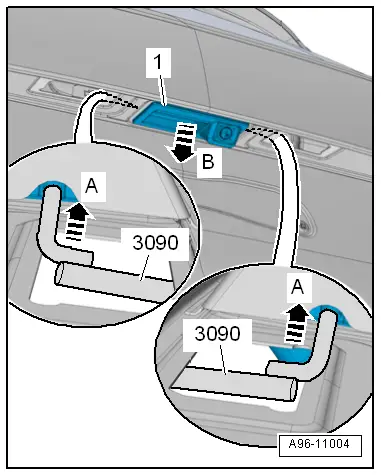
- Release the side retaining tabs using the Connecting Rod Support -3090- in direction of -arrows A- and press the button -1- outward in direction of -arrow B-.
Installing
Install in the reverse order of removal while noting the following:
- For vehicles with a rearview camera, the Rearview Camera -R189- must be recalibrated. Refer to → Communication; Rep. Gr.91; Rearview Camera System; Rearview Camera System, Calibrating.
Tightening Specifications
- Refer to → Fig. "Tightening Specification: Anti-Theft Protection to Release Button In Rear Lid Handle -E234- "

