Audi Q7: Component Location Overview - Vehicle Interior Trim Panels
Audi Q7 (4M) 2016-2026 Workshop Manual / Body / Body Interior / Interior Trim / Component Location Overview - Vehicle Interior Trim Panels
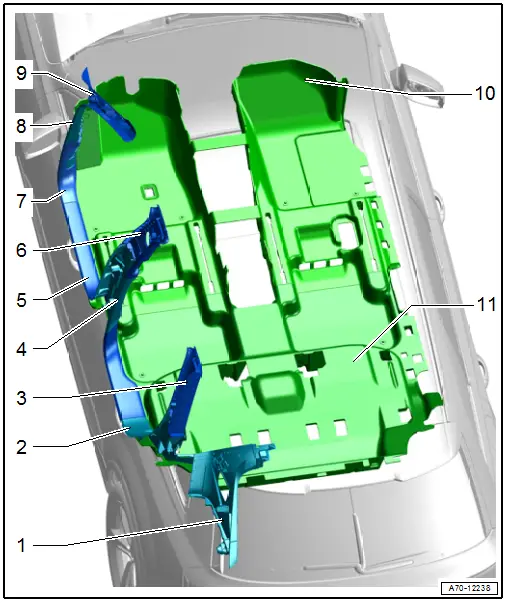
1 - D-Pillar Trim Panel
- Overview. Refer to → Chapter "Overview - D-Pillar Trim Panel".
2 - Rear Sill Panel Strip
- Overview. Refer to → Chapter "Overview - Sill Panel Strip".
3 - C-Pillar Trim Panel
- Overview. Refer to → Chapter "Overview - C-Pillar Trim Panel".
4 - B-Pillar Lower Trim Panel
- Overview. Refer to → Chapter "Overview - B-Pillar Trim Panel".
5 - Front Sill Panel
- Overview. Refer to → Chapter "Overview - Sill Panel Strip".
6 - B-Pillar Upper Trim Panel
- Overview. Refer to → Chapter "Overview - B-Pillar Trim Panel".
7 - A-Pillar Lower Trim Panel
- Overview. Refer to → Chapter "Overview - A-Pillar Trim Panel".
8 - A-Pillar Gap Cover
- Overview. Refer to → Chapter "Overview - A-Pillar Trim Panel".
9 - A-Pillar Upper Trim Panel
- Overview. Refer to → Chapter "Overview - A-Pillar Trim Panel".
10 - Front Carpet
- Overview. Refer to → Chapter "Overview - Footrest and Carpet".
11 - Rear Carpet
- Overview. Refer to → Chapter "Overview - Footrest and Carpet".
Overview - Sill Panel Strip
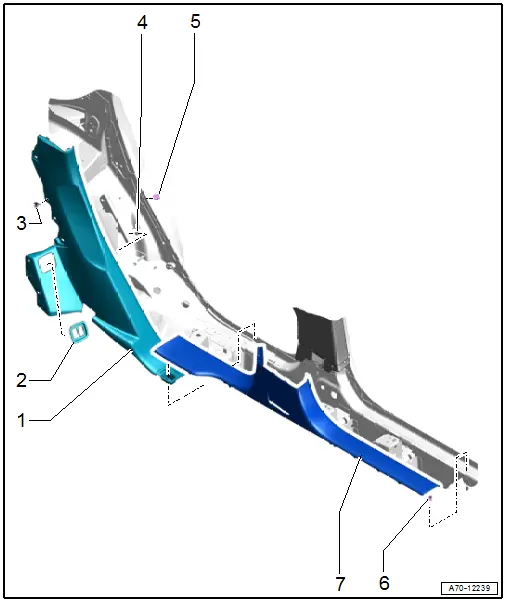
1 - Rear Sill Panel Strip
- Removing and installing. Refer to → Chapter "Rear Sill Panel, Removing and Installing".
- Press on until it engages audibly
- Stretch the door seal lip over
2 - Switch Trim
- Only 7 seats
- Removing and installing. Refer to → Electrical Equipment; Rep. Gr.96; Controls; Component Location Overview - Controls in Luggage Compartment.
3 - Clip
- Quantity: 3
- Insert in the sill panel strip
- Replace damaged or deformed clips
4 - Clip
- Insert in the sill panel strip
- Remove any remaining clips in the body mounting points using the Omega Clip Tool -T40280-. To install, insert into the sill panel strip.
- Replace damaged or deformed clips
5 - Clip
- Quantity: 2
- Install inside the body
- Replace damaged or deformed clips
6 - Clip
- Quantity: 8
- Insert in the sill panel strip
- Remove any remaining clips in the body mounting points using the Omega Clip Tool -T40280-. To install, insert into the sill panel strip.
- Replace damaged or deformed clips
7 - Front Sill Panel
- Removing and installing. Refer to → Chapter "Front Sill Panel Strip, Removing and Installing".
- Press on until it engages audibly
- Stretch the door seal lip over

