Audi Q7: Overview - Footrest and Carpet
Audi Q7 (4M) 2016-2026 Workshop Manual / Body / Body Interior / Interior Trim / Overview - Footrest and Carpet
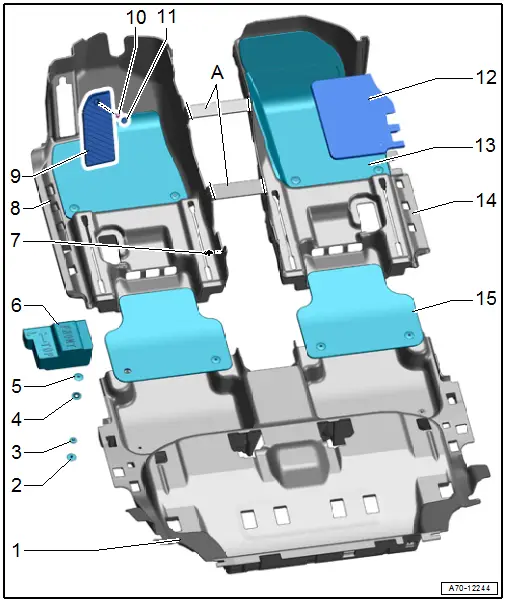
1 - Rear Carpet
- One piece
- Removing and installing. Refer to → Chapter "Rear Carpet, Removing and Installing".
2 - Bracket
- For floor mat
- Quantity: 4 each on front and rear
- Insert from below into the carpet
3 - Cap
- For floor mat
- Quantity: 4 each on front and rear
- Unclip with Pry Lever -80-200-
- Press into the bracket until it engages audibly
4 - Bracket
- For floor mat
- Quantity: 4 each on front and rear
- Insert from below into the floor mat
5 - Cap
- For floor mat
- Quantity: 4 each on front and rear
- Unclip with Pry Lever -80-200-
- Press into the bracket until it clicks into place
6 - Filler Piece
- Quantity: 8
- Note the installation position
7 - Expanding Clip
- Quantity: 3 on the left and right side
8 - Front Carpet
- Is one piece as replacement part; remove both connecting pieces -A- at the perforation after assembly
- Removing and installing. Refer to → Chapter "Front Carpet, Removing and Installing".
9 - Footrest
- Removing and installing. Refer to → Chapter "Footrest, Removing and Installing".
- Engage in the relay and fuse panel
10 - Bolt
- 3 Nm
11 - Cap
12 - Battery Cover
13 - Floor Mat
- Quantity: 2
14 - Front Carpet
- Is one piece as replacement part; remove both connecting pieces -A- at the perforation after assembly.
- Removing and installing. Refer to → Chapter "Front Carpet, Removing and Installing".
15 - Floor Mat
- Quantity: 2

