Audi Q7: Overview - A/B/C/D-Pillar Trim Panel
Audi Q7 (4M) 2016-2026 Workshop Manual / Body / Body Interior / Interior Trim / Overview - A/B/C/D-Pillar Trim Panel
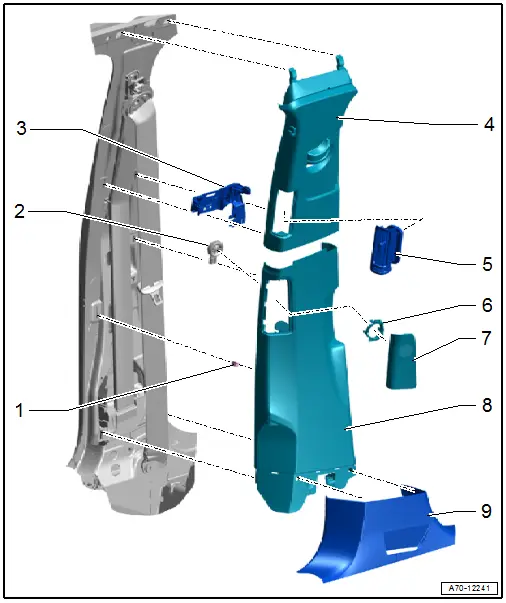
Overview - A-Pillar Trim Panel

1 - Clip
- Insert in the trim panel
- Replace damaged or deformed clips
2 - A-Pillar Lower Trim Panel
- Removing and installing. Refer to → Chapter "A-Pillar Lower Trim Panel, Removing and Installing".
- Stretch the door seal lip over
3 - Clip
- Insert into the gap cover
- Remove the clips that are still in the mounting points on the body using the Omega Clip Tool -T40280-.
4 - A-Pillar Gap Cover
- Removing and installing. Refer to → Chapter "A-Pillar Trim Panel, Removing and Installing".
- Hook into the A-pillar upper trim panel and clip into the A-pillar
- Stretch the door seal lip over
5 - A-Pillar Upper Trim Panel
- Removing and installing. Refer to → Chapter "A-Pillar Upper Trim Panel, Removing and Installing".
- Press on until it engages audibly
- Stretch the door seal lip over
6 - Bolt
- 3.5 Nm
7 - Clip
- With hooks
- Insert in the trim panel
8 - Cap
- With the "Airbag" symbol
- Unclip using flat-head screwdriver
9 - Clip
- Insert in the trim panel
- Remove the clips that are still in the mounting points on the body using the Omega Clip Tool -T40280-.
- Replace damaged or deformed clips
10 - Clip
- Press in completely, it must engage.
11 - Release Lever Handle
- For the latch
- Driver side only
- Removing and installing. Refer to → Body Exterior; Rep. Gr.55; Hood; Latch Release Lever, Removing and Installing.
12 - Bolt
- 2.5 Nm
- Driver side only
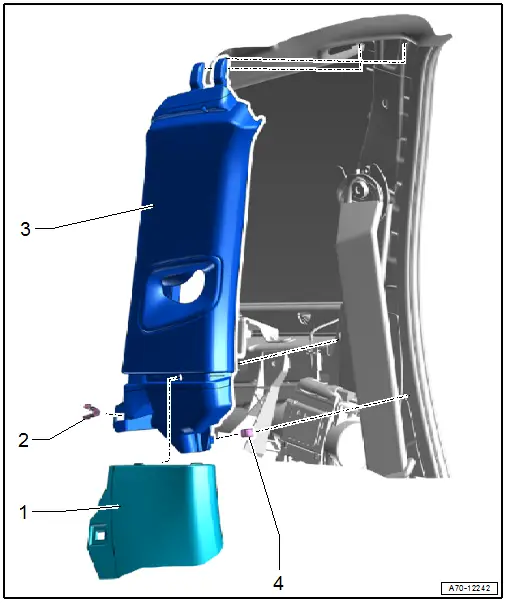
Overview - B-Pillar Trim Panel
1 - Clip
- Quantity: 4
- Insert in the trim panel
- Remove any remaining clips in the body mounting points using the Omega Clip Tool -T40280-. To install, insert into the trim panel.
- Replace damaged or deformed clips
2 - Speaker
- Removing and installing. Refer to → Communication; Rep. Gr.91; Sound System; Component Location Overview - Sound System.
3 - Bracket
- Removing and installing. Refer to → Chapter "B-Pillar Upper Trim Panel, Removing and Installing".
- Clipped in the B-pillar
- Press on it until it locks
4 - B-Pillar Upper Trim Panel
- Removing and installing. Refer to → Chapter "B-Pillar Upper Trim Panel, Removing and Installing".
- Insert in the upper part of the mounting points on the roof and clip into the bracket
- Press on until it engages audibly
- Stretch the door seal lip over.
5 - Vent
- Removing and installing. Refer to → Chapter "B-Pillar Upper Trim Panel, Removing and Installing".
- Connect electrical harness connector, first insert lower vent in the trim and press on it until it engages audibly
6 - Speaker Adapter
- Clip into the speaker trim
7 - Speaker Trim
- Clipped in the B-pillar trim panel
- Removing and installing. Refer to → Chapter "Speaker Trim, Removing and Installing".
- Press on until it engages audibly
8 - B-Pillar Lower Trim Panel
- Removing and installing. Refer to → Chapter "B-Pillar Lower Trim Panel, Removing and Installing".
- Clipped in the B-pillar
- Press on until it engages audibly
- Stretch the door seal lip over.
- Equipped on some models on the front passenger side: with Air Ionization System Button -E677-
9 - Front Sill Panel
- Removing and installing. Refer to → Chapter "Front Sill Panel Strip, Removing and Installing".
- Engage the sill panel strip in the B-pillar trim.
- Press on until it engages audibly
- Stretch the door seal lip over.
Overview - C-Pillar Trim Panel
1 - Rear Sill Panel Strip
- Removing and installing. Refer to → Chapter "Rear Sill Panel, Removing and Installing".
- Press on until it engages audibly
- Stretch the door seal lip over
2 - Clip
- Insert in the trim panel
- Replace any damaged or deformed clips
3 - C-Pillar Trim Panel
- Removing and installing. Refer to → Chapter "C-Pillar Trim Panel, Removing and Installing".
- Insert at the top in the mounting points on the roof
- Press on until it engages audibly
- Stretch the door seal lip over
4 - Clip
- Quantity: 2
- Insert in the trim panel
- Remove any remaining clips in the body mounting points using the Omega Clip Tool -T40280-. To install, insert into the trim panel.
- Replace damaged or deformed clips
Overview - D-Pillar Trim Panel
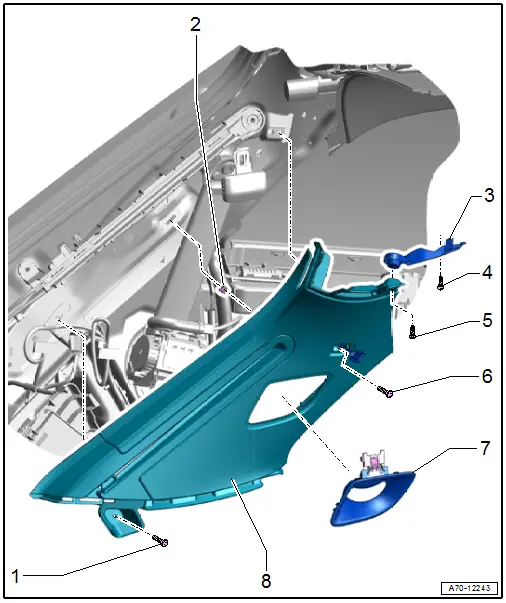
1 - Bolt
- 2 Nm
2 - Clip
- Insert in the trim panel
- Remove any remaining clips in the body mounting points using the Omega Clip Tool -T40280-. To install, insert into the trim panel.
- Replace damaged or deformed clips
3 - Bracket
- For the D-pillar trim
- Insert in the mounting points on the roof
- Removing and installing. Refer to → Chapter "D-Pillar Trim Panel, Removing and Installing".
4 - Bolt
- 3 Nm
5 - Bolt
- 2 Nm
6 - Bolt
- 3.5 Nm
7 - Rear Seat Belt Guide
- Only 7 seats
- Removing and installing. Refer to → Chapter "Rear Seat Belt Guide, Removing and Installing".
8 - D-Pillar Trim Panel
- Removing and installing. Refer to → Chapter "D-Pillar Trim Panel, Removing and Installing".
- Press on until it engages audibly
- Stretch the rear lid seal lip

