Audi Q7: Door B-Pillar Trim, Removing and Installing
B-Pillar Door Trim, Removing and Installing, Front
Removing
- Move the door window into the "open" position.
- Remove the window frame trim panel. Refer to → Body Interior; Rep. Gr.70; Front Door Trim; Window Frame Trim Removing and Installing.
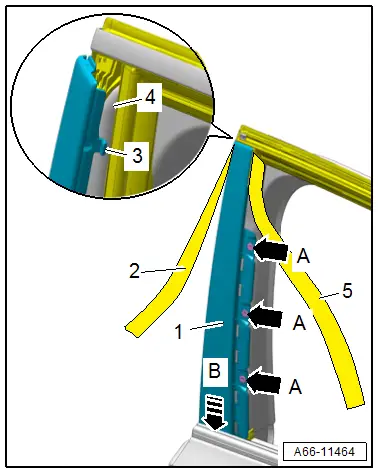
- Remove the seal -1- from the rear window guide near the B-pillar trim.
- Remove the bolts -A arrows-.
- Push the B-pillar trim -4- downward -arrow A-. While doing this, the tab -3- will disengage from the opening -2-.
- Push the B-pillar trim toward the outside until it disengages.
- Remove the B-pillar trim upward.

Installing
Install in reverse order of removal and note the following:
 Note
Note
For an easier installation, spray the seal with soapy water, for example.
Tightening Specifications
- Refer to → Chapter "Overview - B-Pillar Trim"
B-Pillar Door Trim, Removing and Installing, Rear
Special tools and workshop equipment required
- Roller -3356-
- Cleaning Solution -D 009 401 04-
- Applicator -D 009 500 25-
- Bonding Agent -D 355 205 A2-
Removing
- Move the door window into the "open" position.
- Remove the window frame trim panel. Refer to → Body Interior; Rep. Gr.70; Rear Door Trim Panels; Window Frame Trim Panel, Removing and Installing.
- Remove the window guide -5- from the B-pillar trim -1-.
- Loosen the window guide sealing lip -2- from the bonding on the B-pillar trim.
- Remove the bolts -A arrows-.
- Push the B-pillar trim downward -arrow B-. While doing this, the tab -3- will disengage from the door body -4-.
- Pull the B-pillar trim forward from the enclosure and upward from the door.
Installing
Install in reverse order of removal and note the following:
- The vehicle and the B-pillar trim must be at room temperature.
- The adhesive surfaces must be free of dirt and grease.
- If the Bonding Agent -D 355 205 A2- dries longer than 3 hours, then it must be primed again.
- Remove the adhesive residue using Adhesive Strip Remover -VAS6349-.
- Clean the adhesive surface using the Cleaning Solution -D 009 401 04-.
- Apply Bonding Agent -D 355 205 A2- on the adhesive surface using the Applicator -D 009 500 25- and let dry.
- Remove the protective film from the adhesive tape and adhesive tape the B-pillar trim.
- Vehicle resting time is a minimum 0.5 hours with the doors open at room temperature.
Tightening Specifications
- Refer to → Chapter "Overview - B-Pillar Trim"
Door C-Pillar Trim, Removing and Installing
Removing
- Move the door window into the "open" position.
- Remove the window frame trim panel. Refer to → Body Interior; Rep. Gr.70; Rear Door Trim Panels; Window Frame Trim Panel, Removing and Installing.
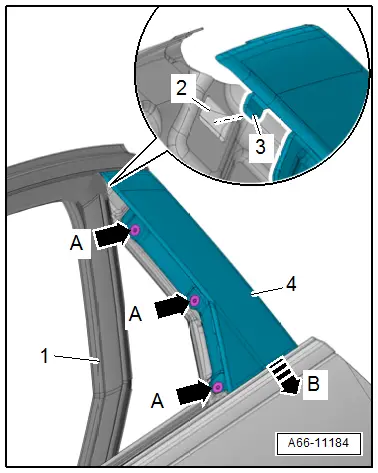
- Remove the window guide -1- just far enough from the C-pillar trim -4- until the bolts are accessible.
- Remove the bolts -A arrows-.
- Push the C-pillar trim downward -arrow B-. While doing this, the tab -3- will disengage from the door body -2-.
- Pull the C-pillar trim toward the rear from the holder and upward from the door.
Installing
Install in reverse order of removal.
Tightening Specifications
- Refer to → Chapter "Overview - C-Pillar Trim"

