Audi Q7: Door Handle, Removing and Installing
Removing
- Remove the housing. Refer to → Chapter "Door Handle, Removing and Installing".
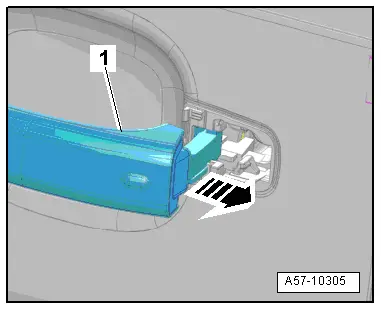
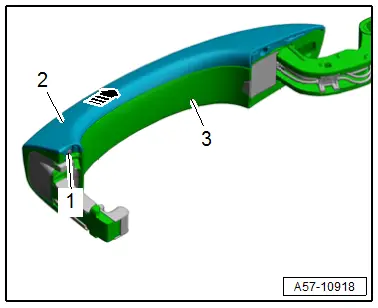
- Pull the door handle -1- in the direction of the -arrow-. This disengages the door handle from the operating lever in the mounting bracket.
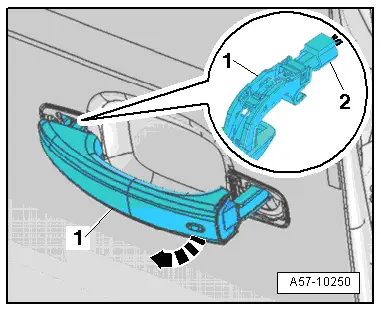
- Tilt the door handle -1- outward -arrow- and remove it from the mount on the mounting bracket.
- Equipped on some models: disconnect the connector -2- on the door handle.
- If the door handle is to be replaced, also remove the following components:
- Door handle trim. Refer to → Chapter "Door Handle Trim, Removing and Installing".
- Rear exterior door handle illumination bulb. Refer to → Electrical Equipment; Rep. Gr.94; Exterior Door Handle Lamps; Exterior Door Handle Illumination Bulb, Removing and Installing.
Installing
Install in reverse order of removal and note the following:
 Note
Note
Replace the seals for the door handles if damaged or brittle.
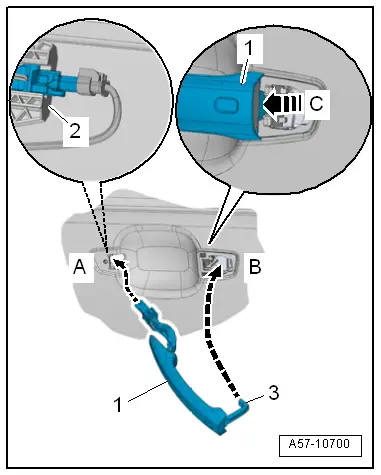
- Insert the door handle -1--arrow A-. It must engage in the mount -2- on the mounting bracket.
- Pivot the door handle in the direction of -arrow B- and engage audibly forward in the direction of travel -arrow C-.
- The carrier -3- is placed in the operating lever from this.
Door Handle Trim, Removing and Installing
Removing
- Remove the door handle. Refer to → Chapter "Door Handle, Removing and Installing".
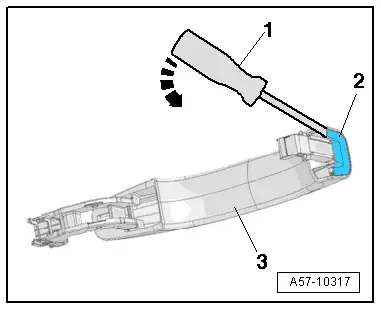
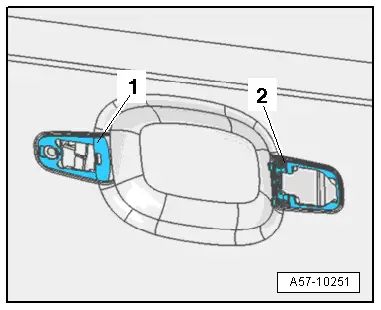
- Pry the door handle trim -2- out using an awl -1- at the location shown in the illustration -arrow-.
- Remove the trim from the door handle -3-.
Installing
Install in reverse order of removal.
Door Handle Trim Molding, Removing and Installing
Removing
- Remove the door handle. Refer to → Chapter "Door Handle, Removing and Installing".
- Remove the bolt -1-.
- Remove the trim molding -2- from the door handle -3--arrow-.
Installing
Install in reverse order of removal and note the following:
- The bolt head must not project over the contact surface for the tread.
Tightening Specifications
- Refer to → Chapter "Overview - Door Handle and Mounting Bracket"
Mounting Bracket, Removing and Installing
 NOTICE
Risk of damaging the operating cable by deforming it.
- Never sharply bend or kink the operating cable.
Special tools and workshop equipment required
- Pry Lever -80-200-
Removing
- Move the door window into the "closed" position.
- Remove the door inner cover. Refer to → Chapter "Door Inner Cover, Removing and Installing".
- Remove the door handle. Refer to → Chapter "Door Handle, Removing and Installing".
- Unclip the backing plates -1 and 2- for the door handle.
- Equipped on some models: disengage the wire on the mounting bracket -arrow-.
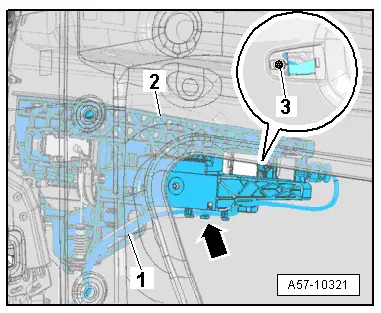
- Free up the spiral clip -1- for the wire using the -80 - 200-.
- Remove the bolt -3-.
- Disengage the mounting bracket -2- toward the rear and carefully to the opening for the door inner cover, at the same time pay attention to the operating cable.
- Disengage the operating cable from the operating lever on the mounting bracket. Refer to → Chapter "Door Lock Cable, Removing and Installing".
Installing
- Engage the operating cable in the operating lever on the mounting bracket. Refer to → Chapter "Door Lock Cable, Removing and Installing".
- Bring the mounting bracket -2- into the installation position and on the outer door panel -1--arrows-.
Further installation is performed in reverse order of removal, while noting the following:
- Equipped on some models: the wiring harness for the exterior door handle touch sensor/exterior door handle illumination must be routed on the mounting bracket, that points to the outer door panel.

 Note
Note
If the wiring harness is not routed correctly, there may be noises when opening and closing the door window, because the door window grazes the wiring harness.
Tightening Specifications
- Refer to → Chapter "Overview - Door Handle and Mounting Bracket"

