Audi Q7: Gear Oil, Checking Level
Gear Oil, Checking Level, 0DB and 0D2
Special tools and workshop equipment required
- Drip Tray
 Caution
This procedure contains mandatory replaceable parts. Refer to component overview prior to starting procedure.
Mandatory Replacement Parts
- Plug - Oil filler
- Remove the oil filler plug -arrow A- to check transmission fluid.
The oil level is correct when the rear final drive is filled up to the lower edge of the oil fill hole.
- Transmission fluid specification: Refer to → Chapter "Capacities".
- Install the plug -arrow A- and tighten it.
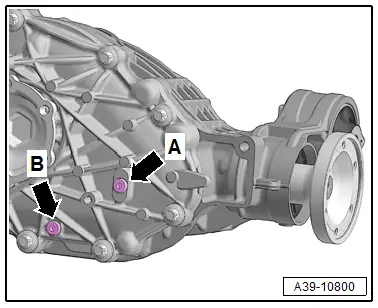
Tightening Specifications:
Oil filler plug -arrow A- 15 Nm
Oil drain plug -arrow B- 15 Nm
Gear Oil, Checking Level, 0D3 "Sport Differential"
Test Requirement
 Caution
This procedure contains mandatory replaceable parts. Refer to component overview prior to starting procedure.
Mandatory Replacement Parts
- Plug - Oil filler
- Gear oil temperature: 10 ºC to 60 ºC (50 to 140 ºF)
- The rear final drive must be in the installed position.
- The vehicle must be level.
- Refer to → Chapter "Component Location Overview - Drain and Check Plugs, 0D3 Sport Differential"
Special tools and workshop equipment required
- Drip Tray
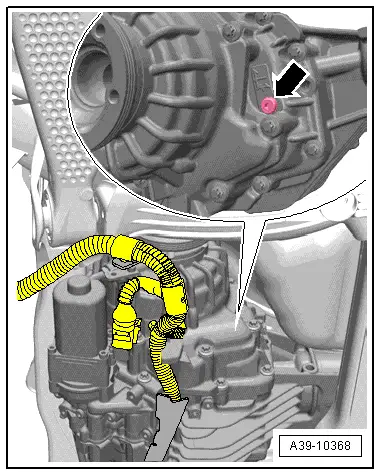
- Remove the gear oil check plug -arrow-, located on the right side of the final drive.
- The oil level is correct when the rear final drive is filled up to the lower edge of the oil fill hole.
- Refer to the Parts Catalog for the correct transmission fluid specification.
- If necessary fill the gear oil.
- Refer to → Chapter "Gear Oil, Filling, 0D3 Sport Differential"
- Install the gear oil inspection plug -arrow- and tighten. Tightening specification: 15 Nm