Audi Q7: Headlamp Power Output Module, Removing and Installing
Right and Left LED Headlamp Power Output Module 1 -A27-/-A31-, Removing and Installing
Removing
- Remove the headlamp housing. Refer to → Chapter "Headlamp Housing, Removing and Installing".
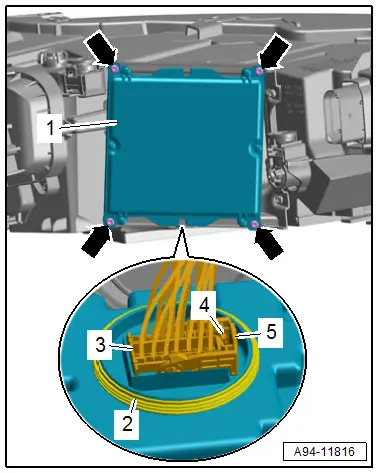
- Remove the bolts -arrows-.
- Remove the power output module -1-.
- Disconnect the connector -3-.
- To disconnect push the connector tab -4-, pivot the retaining bracket -5- upward and remove the connector.
Installing
Install in the reverse order of removal while noting the following:
- Check the seal -2- for damage.
Tightening Specifications
- Refer to → Chapter "Overview - Headlamps, LED Headlamps"
Left and Right Light Control Module -J1018-/-J1023-, Removing and Installing
Removing
- Remove the left or right headlamp cover. Refer to → Body Exterior; Rep. Gr.63; Front Bumper.
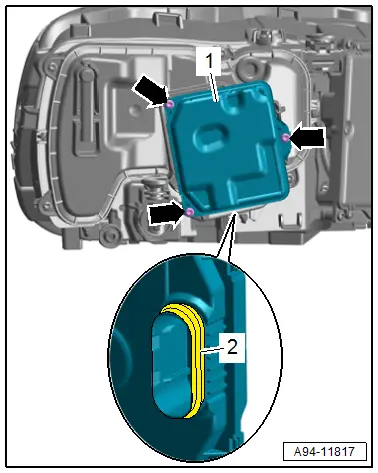
- Remove the bolts -arrows-.
- Remove the power output module -1-.
Installing
Install in the reverse order of removal while noting the following:
- Check the seal -2- for damage.
Tightening Specifications
- Refer to → Chapter "Overview - Headlamps"
Left and Right Headlamp Beam Adjustment Motor -V48-/-V49-, Removing and Installing
Removing
- Remove the front wheel housing liner front section. Refer to → Body Exterior; Rep. Gr.66; Wheel Housing Liner; Front Wheel Housing Liner, Removing and Installing.
- Left Light Control Module -J1018- or Right Light Control Module - J1023-, removing and installing. Refer to → Chapter "Left and Right Light Control Module -J1018-/-J1023-, Removing and Installing".
- Remove the bolts -arrows-.
- Unclip the connector from the control module for the light from the housing cover -1- to do so press the four tabs. Remove the housing cover -1-.

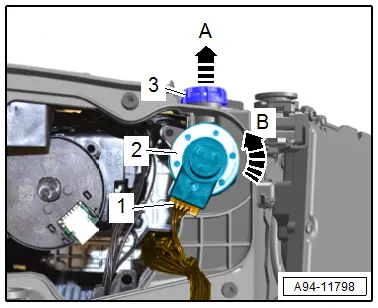
- Pry out the height adjusting screw -3- in the direction of -arrow A-.
- The height adjustment -3- must be replaced.
- Disconnect the connector -1-.
- Turn the adjustment motor -2- counter-clockwise in direction of -arrow B- and tilt it downward. This disengages the ball head upward from the ball head mount.
- Remove the adjustment motor.
Installing
Install in the reverse order of removal while noting the following:
- Insert the adjusting axle ball head into the lamp unit ball socket in the headlamp from above, to do so push the lamp unit toward the rear.
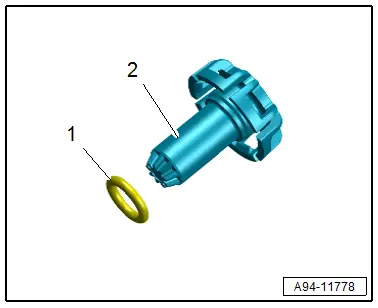
- Check the seal -1- on the height adjusting screw -2- for damage.
- Close the housing cover and tighten the bolts.
- Adjust the headlamp. Refer to → Chapter "Headlamp, Adjusting".
Tightening Specifications
- Refer to → Chapter "Overview - Headlamps"
Headlamp Fan, Removing and Installing
Left and Right Headlamp Fan -V407-/-V408-, Removing and Installing
Removing
- Remove the front wheel housing liner front section. Refer to → Body Exterior; Rep. Gr.66; Wheel Housing Liner; Front Wheel Housing Liner, Removing and Installing.
- Left Light Control Module -J1018- or Right Light Control Module - J1023-, removing and installing. Refer to → Chapter "Left and Right Light Control Module -J1018-/-J1023-, Removing and Installing".
- Remove the bolts -arrows-.
- Unclip the connector from the control module for the light from the housing cover -1- to do so press the four tabs. Remove the housing cover -1-.

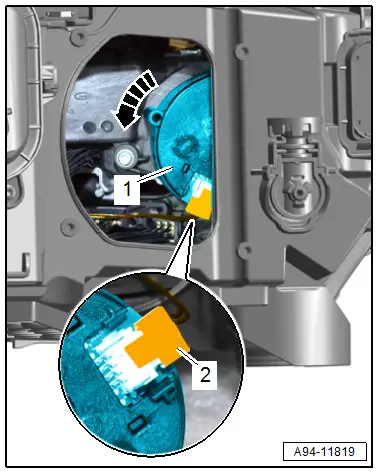
- Press the release button and disconnect the connector -1-.
- Turn the fan -2- counter-clockwise in direction of -arrow- and remove.
Installing
Install in reverse order of removal.
Tightening Specifications
- Refer to → Chapter "Overview - Headlamps, LED Headlamps"
Left and Right Headlamp Fan 2 -V463-/-V464-, Removing and Installing
Removing
- Remove the power output module 1 for LED headlamp. Refer to → Chapter "Right and Left LED Headlamp Power Output Module 1 -A27-/-A31-, Removing and Installing".
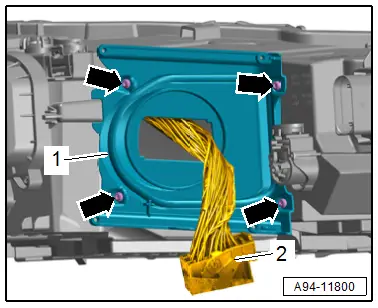
- Remove the bolts -arrows-, remove the mount -1- at the same time guide out the wiring harness -2-.
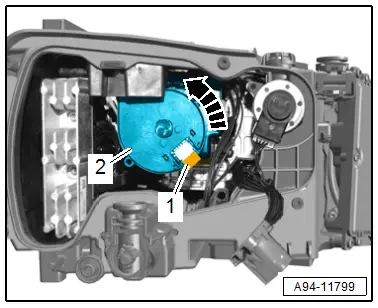
- Turn the fan -1- counter-clockwise in direction of -arrow- and remove.
- Press the release button and disconnect the connector -2-.
Installing
Install in reverse order of removal.
Tightening Specifications
- Refer to → Chapter "Overview - Headlamps, LED Headlamps"

