Audi Q7: Left and Right Rear Treble Speaker -R14-/-R16-, Removing and Installing
The Left Rear Treble Speaker -R14-/Right Rear Treble Speaker -R16- are located in the B-pillars.
Removing and installing is identical.
Removing
- Turn off the ignition and all electrical equipment and remove the ignition key.
- Remove the B-pillar trim panel. Refer to → Body Interior; Rep. Gr.70; Vehicle Interior Trim Panels; B-Pillar Trim Panel, Removing and Installing.
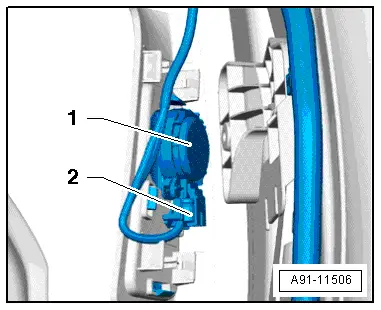
- Release and disconnect the connector -2- from the Left Rear Treble Speaker -R14--1-.
- Release the Left Rear Treble Speaker -R14--1- until it can be removed from the B-pillar trim panel.
Installing
- Install in reverse order of removal.
Left and Right Rear Treble Speakers 2 -R217-/-R218-, Removing and Installing
Left and Right Rear Treble Speakers 2 -R217-/-R218-, Removing and Installing, Bang & Olufsen
The Left Rear Treble Speaker 2 -R217-/Right Rear Treble Speaker 2 -R218- are located in the rear of the roof on the left and right sides.
Removing and installing is identical.
Removing
- Turn off the ignition and all electrical equipment and remove the ignition key.
- Lower the rear headliner. Refer to → Body Interior; Rep. Gr.70; Roof Trim Panels; Overview - Headliner.
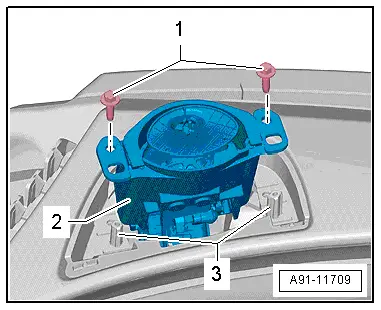
- Release and disconnect the connectors -2 and 3- on the Left Rear Treble Speaker 2 -R217--1-.
- Remove the bolts -arrows- on the Left Rear Treble Speaker 2 -R217--1-.
- Remove the Treble Speaker -R217--1- from the roof.

Installing
- Install in reverse order of removal.
Tightening Specifications
- Refer to → Chapter "Component Location Overview - Soand System, Speaker, Bang & Olufsen"
Left and Right Front Treble Speaker -R20-/-R22-, Removing and Installing
Left and Right Front Treble Speaker -R20-/-R22-, Removing and Installing, Basic and Standard
The Left Front Treble Speaker -R20--1- and Right Front Treble Speaker -R22- are located in the front of the instrument panel.
Removing and installing is identical.
Removing
- Turn off the ignition and all electrical equipment and remove the ignition key.
- Remove the side speaker trim. Refer to → Body Interior; Rep. Gr.70; Instrument Panel; Speaker Trim, Removing and Installing.
- Remove the bolts -1- on the Left Front Treble Speaker -R20--2- and then remove the Left Front Treble Speaker -R20--2- upward from the centering pins -3-.
- Release and disconnect the connector from the Left Front Treble Speaker -R20--2-.

Installing
- Install in reverse order of removal.
Tightening Specifications
- Refer to → Chapter "Component Location Overview - Soand System, Speaker, Standard, BOSE"
Left and Right Front Treble Speaker -R20-/-R22-, Removing and Installing, BOSE
The Left Front Treble Speaker -R20- and Right Front Treble Speaker -R22- are located in the upper A-pillars (at height of the exterior rearview mirror).
Removing and installing is identical.
Removing
- Turn off the ignition and all electrical equipment and remove the ignition key.
- Remove the A-pillar trim panel. Refer to → Body Interior; Rep. Gr.70; Vehicle Interior Trim Panels; A-Pillar Trim Panel, Removing and Installing.
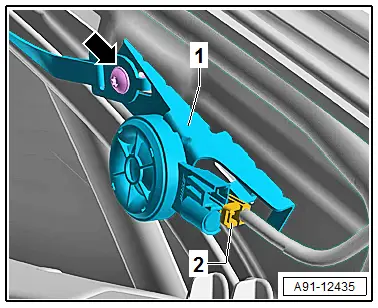
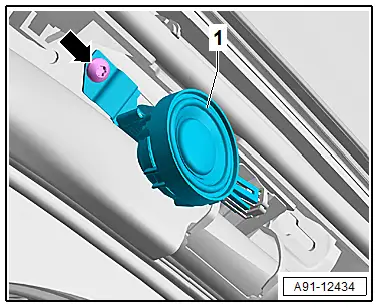
- Push out the bolts -arrows- on the Left Front Treble Speaker -R20--1- and remove the Left Front Treble Speaker -R20--1- upward.
- Release and disconnect the connector -2- from the Left Front Treble Speaker -R20--1-.
Installing
- Install in reverse order of removal.
Tightening Specifications
- Refer to → Chapter "Component Location Overview - Soand System, Speaker, Standard, BOSE"
Front Treble Speakers -R20-/-V344-/-R22-/-V345-, Removing and Installing, Bang & Olufsen
The Left Front Treble Speaker -R20- and Right Front Treble Speaker -R22- are located in the front of the instrument panel.
Removing and installing is identical.
The Left Front Treble Speaker Motor -V344-/Right Front Treble Speaker Motor -V345- is integrated in the Left Front Treble Speaker -R20--1- and Right Front Treble Speaker -R22--4-. The speaker motors cannot be replaced separately.
Removing
- Turn off the ignition and all electrical equipment and remove the ignition key.
- Remove the side speaker trim. Refer to → Body Interior; Rep. Gr.70; Instrument Panel; Speaker Trim, Removing and Installing.
- Remove the bolts -1- on the Left Front Treble Speaker -R20--2- and then remove the Left Front Treble Speaker -R20--2- upward from the centering pins -3-.
- Release and disconnect the connector from the Left Front Treble Speaker -R20--2-.
Installing
- Install in reverse order of removal.
Tightening Specifications
- Refer to → Chapter "Component Location Overview - Soand System, Speaker, Bang & Olufsen"
Left and Right Front Treble Speaker 2 -R220-/-R221-, Removing and Installing
The Left Front Treble Speaker 2 -R220- and Right Front Treble Speaker 2 -R221- are located in the A-pillars at the top.
Removing and installing is identical.
Removing
- Turn off the ignition and all electrical equipment and remove the ignition key.
- Remove the A-pillar trim panel. Refer to → Body Interior; Rep. Gr.70; Vehicle Interior Trim Panels; A-Pillar Trim Panel, Removing and Installing.
- Release and disconnect the connector from the Left Front Treble Speaker 2 -R220--1-.
- Remove the bolt -arrow-.
- Remove the Left Front Treble Speaker 2 -R220--1-.
Installing
- Install in reverse order of removal.
Tightening Specifications
- Refer to → Chapter "Component Location Overview - Soand System, Speaker, Standard, BOSE"
- Refer to → Chapter "Component Location Overview - Soand System, Speaker, Bang & Olufsen"
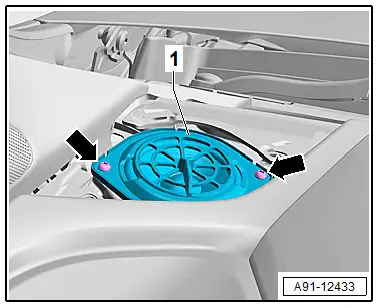
Left and Right Front Speaker -R2-/-R3-, Removing and Installing
Left and Right Front Speaker -R2-/-R3-, Removing and Installing, BOSE
The Left Front Speaker -R2- and Right Front Speaker -R3- are located in the front instrument panel.
Removing and installing is identical.
Removing
- Turn off the ignition and all electrical equipment and remove the ignition key.
- Remove the side speaker trim. Refer to → Body Interior; Rep. Gr.70; Instrument Panel; Speaker Trim, Removing and Installing.
- Remove the bolts -arrows- on the Left Front Speaker -R2--1- and the Left Front Bass Speaker -R2--1- upward.
- Release and disconnect the connector from the Left Front Speaker -R2--1-.
Installing
- Install in reverse order of removal.
Tightening Specifications
- Refer to → Chapter "Component Location Overview - Soand System, Speaker, Standard, BOSE"

