Audi Q7: Overview - Rear Seat Backrest
Audi Q7 (4M) 2016-2026 Workshop Manual / Body / Body Interior / Seat Frames / Overview - Rear Seat Backrest
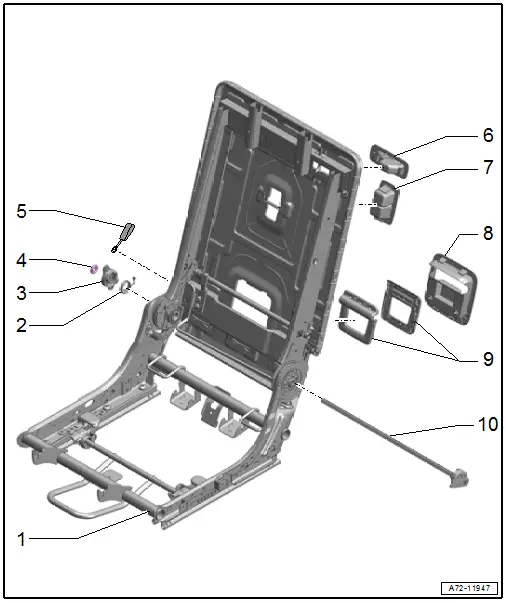
1 - Seat/Backrest Frame
- Not detachable
2 - Spiral Spring
3 - Release Lever
- For backrest
4 - Lock Washer
- Replace after removing
5 - Pull Loop
- For the backrest release
- Removing and installing. Refer to → Chapter "Seat Side Trim on Tunnel Side, Removing and Installing, Outer Second Row Seat".
6 - Trim for Net Partition
- Equipped on some models
- Removing and installing. Refer to → Chapter "Net Partition Trim, Removing and Installing, Outer Second Row Seat".
- Press on until it engages audibly.
7 - Cover
- For the upper child seat anchor
- Removing and installing. Refer to → Chapter "Upper Child Seat Anchor Cover, Removing and Installing, Second and Third Row".
- Press into the seat frame until it engages audibly.
8 - Trim
- For the seat folding release handle
- Equipped on some models
- Removing and installing. Refer to → Chapter "Seat Folding Release Handle, Removing and Installing, Seat High, Outer Second Row".
- Press on until it engages audibly.
9 - Handle
- For seat folding release
- Equipped on some models
- Removing and installing. Refer to → Chapter "Seat Folding Release Handle, Removing and Installing, Seat High, Outer Second Row".
- Lock the inner and outer shell for the release handle carefully together
10 - Shaft
- For rear seat backrest locking mechanism
- Removing and installing. Refer to → Chapter "Rear Seat Backrest Locking Mechanism, Removing and Installing, Outer Second Row Seat".
Overview - Rear Seat Backrest, Second Row Backrest with Center Armrest
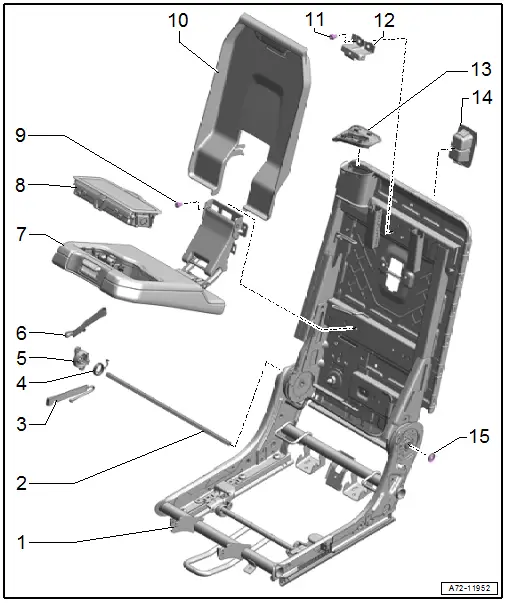
1 - Seat/Backrest Frame
- Not detachable
2 - Shaft
- For rear seat backrest locking mechanism
- Removing and installing. Refer to → Chapter "Rear Seat Backrest Locking Mechanism, Removing and Installing, Center Second Row Seat".
3 - Pull Loop
- Removing and installing. Refer to → Chapter "Seat Side Trim, Removing and Installing, Center Second Row Seat".
4 - Spiral Spring
5 - Release Lever
- For backrest
6 - Pull Loop
- For rear seat backrest locking mechanism
- Removing and installing. Refer to → Chapter "Seat Side Trim, Removing and Installing, Center Second Row Seat".
7 - Center Armrest
- Removing and installing. Refer to → Chapter "Center Armrest, Removing and Installing".
8 - Cupholder
- Removing and installing. Refer to → Chapter "Cupholder, Removing and Installing".
9 - Bolt
- 6.5 Nm
- Quantity: 3
10 - Trim
- For the center armrest
- Removing and installing. Refer to → Chapter "Center Armrest Trim, Removing and Installing".
11 - Bolt
- 6.5 Nm
- Quantity: 2
12 - Stop
- For the center armrest
13 - Seat Belt Guide Inner Piece
- Removing and installing. Refer to → Chapter "Cover and Cushion, Removing and Installing, Center Second Row Backrest".
14 - Cover
- For the upper child seat anchor
- Removing and installing. Refer to → Chapter "Upper Child Seat Anchor Cover, Removing and Installing, Second and Third Row".
- Press into the seat frame until it engages audibly.
15 - Lock Washer
- Replace after removing
Overview - Rear Seat Backrest, Third Row Backrest
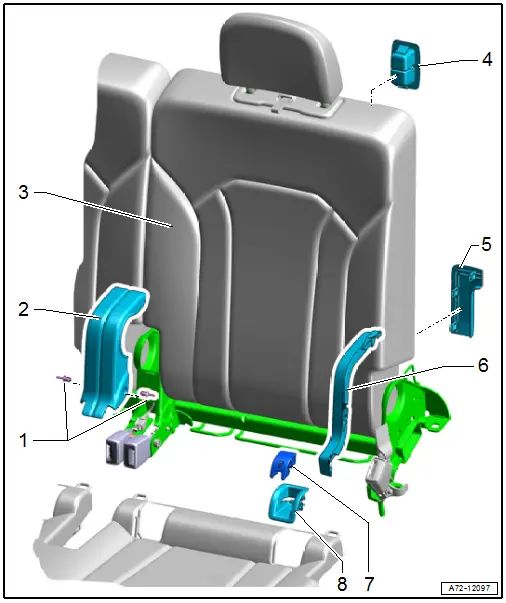
1 - Expanding Clip
2 - Seat Frame Trim Panel
- Tunnel-side
- Removing and installing. Refer to → Chapter "Seat Frame Tunnel-Side Trim Panel, Removing and Installing, Third Row".
3 - Rear Seat Backrest
- Removing and installing. Refer to → Chapter "Third Row Seat, Removing and Installing".
4 - Cover
- For the upper child seat anchor
- Removing and installing. Refer to → Chapter "Upper Child Seat Anchor Cover, Removing and Installing, Second and Third Row".
- Press into the seat frame until it engages audibly.
5 - Backrest Hinge Cover
- Removing and installing. Refer to → Chapter "Backrest Hinge Cover, Removing and Installing".
6 - Seat Frame Trim Panel
- Side sill side
- Removing and installing. Refer to → Chapter "Seat Frame Trim Panel on Side Sill Side, Removing and Installing, Third Row".
7 - Cap
- For the child seat anchor
- Quantity: 4
- Removing and installing. Refer to → Chapter "Lower Child Seat Anchor Guide, Removing and Installing, Second and Third Row".
- Must be secure in the anchor
8 - Guide
- For the lower child seat anchor
- Quantity: 4
- Removing and installing. Refer to → Chapter "Lower Child Seat Anchor Guide, Removing and Installing, Second and Third Row".
- Must be secure in the anchor

