Audi Q7 Owners & Service Manuals

Audi Q7: Protective Diode -J201-, Removing and Installing

Audi Q7 (4M) 2016-2024 Workshop Manual / Electrical System / Electrical Equipment / Wiring / Protective Diode -J201-, Removing and Installing

Removing

- Disconnect the ground cable from the battery when the ignition is switched off. Refer to → Chapter "Battery, Disconnecting and Connecting".

- Remove the front sill panel. Refer to → Body Interior; Rep. Gr.70; Vehicle Interior Trim Panels; Sill Panel, Removing and Installing.

- Remove the A-pillar lower trim panel. Refer to → Body Interior; Rep. Gr.70; Vehicle Interior Trim Panels; A-Pillar Trim Panel, Removing and Installing.

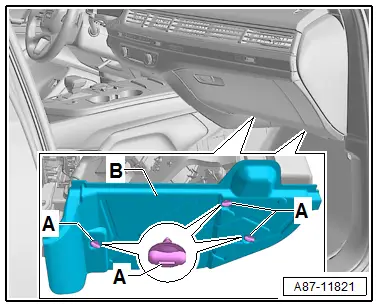
- Remove the screw clips -A-.

- Loosen and remove the insulation -B- from the A/C unit air intake manifold.

- Push the carpet in the area of the footwell to the side as far as possible.

A87-11821

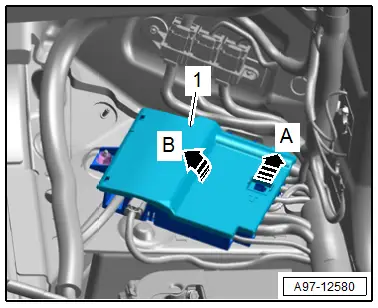
- Release the retainer in direction of -arrow A- and open the cover -1- in direction of -arrow B-.

A97-12580

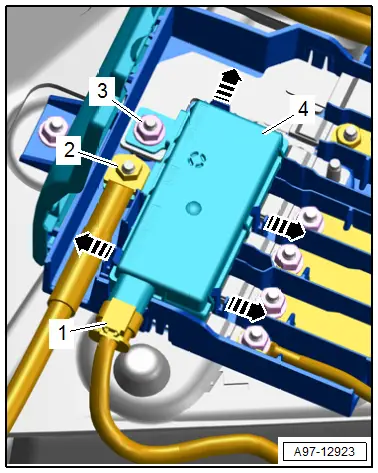
- Disconnect the connector -1-.

- Remove the wire -2-.

- Remove the nut -3-.

- Release the catches -arrows- and remove the protective diode -4-.

A97-12923

Installing

Install in reverse order of removal and note the following:

- Connect the battery. Required actions.

Tightening Specifications

  • Refer to → Chapter "Overview - Component Location Relay Panel, Fuse Panel, E-Boxes, Right Footwell"

Fuse Panel C -SC-, Removing and Installing

Removing

- Remove the driver side instrument panel cover. Refer to → Body Interior; Rep. Gr.68; Storage Compartments and Covers; Driver Side Instrument Panel Cover, Removing and Installing.

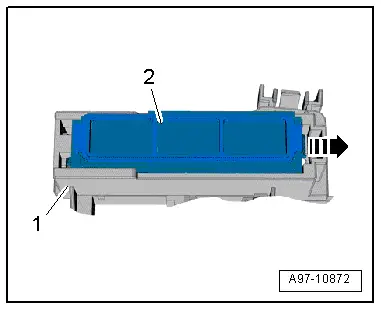
- Open the clip -3- and remove fuse panel C -2- on the instrument panel central tube -1- in direction of -arrow-.

A97-11909

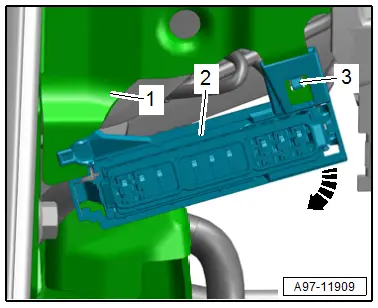
- Release the tab in direction of -arrow-, push fuse panel -2- to the rear and disengage it from the fuse panel C -1-.

A97-10872

Installing

Install in reverse order of removal.

    READ NEXT:

     Relay and Fuse Panels Inside Luggage Compartment on Left Side, Removing and Installing

    Fuse Panel F -SF-, Removing and Installing Removing - Remove the left luggage compartment side trim panel. Refer to → Body Interior; Rep. Gr.70; Luggage Compartment Trim Panels

     Control Modules

    Component Location Overview - Control Modules 1 - Vehicle Electrical System Control Module -J519- Removing and installing. Refer to → Chapter "Vehicle Electrical System Control M

     Connectors

    Component Location Overview - Connectors 1 - Left Front Door Cut-Off Connector‎ Disconnecting. Refer to → Chapter "Front Door Cut-Off Connector, Disconnecting". 2 - 

    SEE MORE:

     Bracket for Adjustment Motors on Front Heater and A/C Unit, Removing and Installing

    Rear Temperature Door Motor -V137- Bracket, Removing and Installing - Move the driver seat as far back as possible. - Turn off the ignition. Removing - Remove the driver side instrument panel cover. Refer to → Body Interior; Rep. Gr.68; Storage Compartments and Covers

     Fuel Filler Door Lock Motor -V155-, Removing and Installing

    Removing - Remove the fuel filler door unit. Refer to → Chapter "Fuel Filler Door Unit, Removing and Installing". - Remove the bolts -arrows-. - Remove the fuel filler door lock motor -1- with the emergency release cable from the fuel filler door unit -2-. - If the fuel

    © 2019-2024 Copyright www.a-q7.com